Here at Hackaday, we are big proponents of using the best tool for the job (or making your own tool if required). But when all you know how to use is Java, everything looks object-oriented. Bad jokes aside, it is important to have many tools at your disposal to allow you to choose wisely. Why not spend a few minutes with [No Boilerplate] and understand the basics of Rust?
The focus of the video is to go through as much Rust as possible and teach you how to read it. The idea is that rather than work your way from basic concepts, [No Boilerplate] will go over the vast majority of what you’ll see in a Rust-based program. Whether you’re coming from an object-oriented, functional, or just plain C-based background; you’ll feel comfortable since he makes an effort to compare to what you already know. Some of Rust’s more unique features are covered such as mutability, scope, matching, and strings. However, lifetimes, closures, and traits were left out to keep the video short. These topics are covered in an excellent blog post by [Faster than lime] which this video was based on.
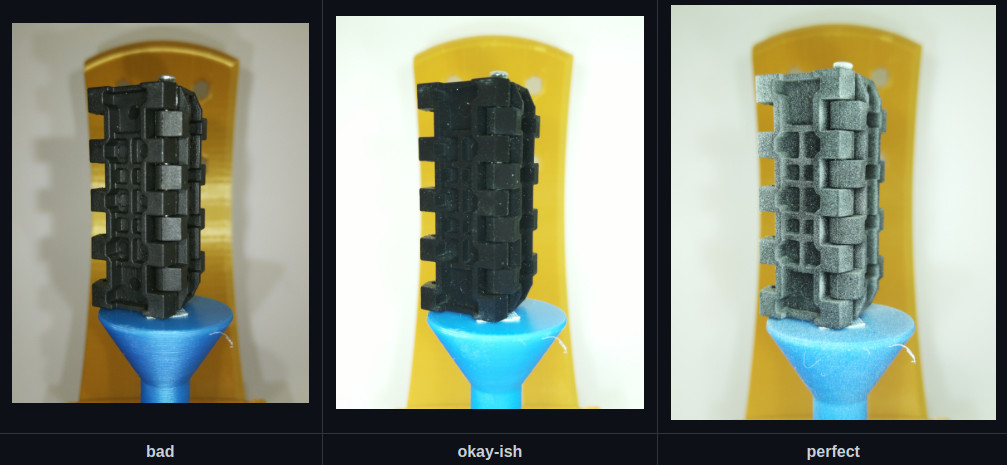
When it comes to 3D scanning, a perfect surface looks a lot like the image above: thousands of distinct and random features, high contrast, no blurry areas, and no shiny spots. While most objects don’t look quite that good, it’s possible to get usable results anyway, and that’s what [Thomas] aims to help people do with his tips on how to create a perfect, accurate 3D scan with photogrammetry.
3D scanning in general is pretty far from being as simple as “point box, press button”, but there are tools available to make things easier. Good lighting is critical, polarizers can help, and products like chalk spray can temporarily add matte features to otherwise troublesome, shiny, or featureless objects. [Thomas] provides visuals of each of these, so one can get an idea of exactly what each of those elements brings to the table. There’s even a handy flowchart table to help troubleshoot and improve tricky scan situations.
[Thomas] knows his stuff when it comes to 3D scanning, seeing as he’s behind the OpenScan project. The last time we featured OpenScan was back in 2020, and things have clearly moved forward since then with a new design, the OpenScan Mini. Interesting in an open-sourced scanning solution? Be sure to give it a look.
When you want a couple copies of a thing, you can 3D print ’em. When you want a ton of them, you might consider making a mold. If those are the shoes you’re in, you should check out this video from [Robert Tolone] (embedded below). Or heck, just check out all of his videos.
Even just in this single video from a couple years back, there are a ton of tips that’ll help you when you’re trying to pour resin of just the right color into a silicone mold. Mostly, these boil down to testing everything out in small quantities before pouring it in bulk, because a lot changes along the way. And that’s where [Robert]’s experience shines through — he knows all of the trouble spots that you need to test for.
For instance? Color matching. Resin dyes are incredibly concentrated, so getting the right amount is tricky. Mixing the color at a high concentration first and then sub-diluting it slowly allows for more control. But even then, the dried product is significantly lighter than the mixture, so some experimentation is necessary. [Robert] sneaks up on just the right color of seafoam green and then pours some test batches. And then he pours it in the exact shape of the mold just to be sure.
That’s just one of the tips in this video, which is just the tip of the mold-casting iceberg. Pour yourself a coffee, settle down, and you’ll learn something for sure. If you’re into more technical parts and CNC machining, we still love the Guerilla Guide after all these years.
Much thank to [Zane] for tipping us off to this treasure trove.
The Ball Grid Array, or BGA package is no longer the exclusive preserve of large, complex chips on computer motherboards: today even simple microcontrollers are available with those little solder balls. Still, many hobbyists prefer to stay with QFP and QFN packages because they’re easier to solder. While that is a fair point, BGA packages can offer significant space savings, and are sometimes the only choice: with the ongoing chip shortage, some other package versions might simply be unavailable. Even soldering doesn’t have to be complicated: if you’re already comfortable with solder paste and reflow profiles, adding a BGA or two into the mix is pretty easy.
In this article we’ll show that working with BGA chips is not as difficult as it may seem. The focus will be on printed circuit board design: how to draw proper footprints, how to route lots of signals and what capabilities your PCB manufacturer should have. We’ll cover soldering and rework techniques in a future article, but first let’s take a look at why BGAs are used at all.
We often take our “SoftwareSerial” libraries for granted, and don’t investigate what goes on under the hood — until they fail us, at least. Would you like to learn how to harness the power of interrupt-driven bitbanging? [Jim Mack] teaches us how to make our protocol implementations fly using the LTC protocol as a springboard.
LTC (Linear/[Longitudinal] TimeCode) is a widely-used and beautifully-crafted protocol that tends to fly under our radar, and is one that hackers could learn plenty from. It’s used for synchronization of audio/video devices during media production and playback. LTC’s signal is almost digital but not quite: it doesn’t need a clock, and it has no polarity. Additionally, it mimics an audio signal really well, you can decode it at any playback speed, and many other benefits and quirks that [Jim] outlines. You do need to maintain the timings, though, and [Jim]’s article shows us how to keep them right while not inconveniencing your primary tasks.
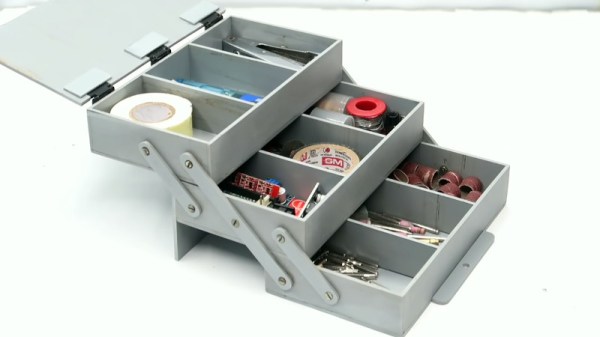
Would you believe the multi-tiered toolbox pictured here started its life as a piece of bog standard PVC pipe? It certainly wouldn’t be our first choice of building material, but as shown in the video after the break, it only takes a heat source and something suitably flat to convert a piece of PVC pipe into a versatile sheet material.
Flattening the heated PVC.
Unrolling the PVC pipe and getting it flat is covered in the first minute of the video, while the rest of the run time is dedicated to building the tool box. Each and every piece you see here, except for the screws and lid hinges, is carefully cut from the PVC sheet. Though we suspect a few more chunks of pipe went into this build than the video would have you believe.
Would we build such an elaborate box if we had to cut each piece of the thing out by hand? Probably not. But then, we can’t deny the final results here are pretty impressive. Incidentally, if you thought those hinges on the top looked a lot like links removed from a watch band…you’d be correct.
Admittedly we’re a bit late covering this one, and under normal circumstances we might have let it slip by given the several million views it’s amassed over the last year. But the central theme of reusing a common material to build something unexpected is solid Hackaday territory, and aligns closely with this year’s Hackaday Prize challenges.
Your [Bornhack] plans include leaving lemons in patterns as an info display. Your squirrel feeder needs to only dispense nuts when the squirrels deserve it. As promised last week, an intro to gating, feeding, and moving bulk material.
Gates
Bulk material flow needs control. Starting is easy, it’s stopping that’s hard.
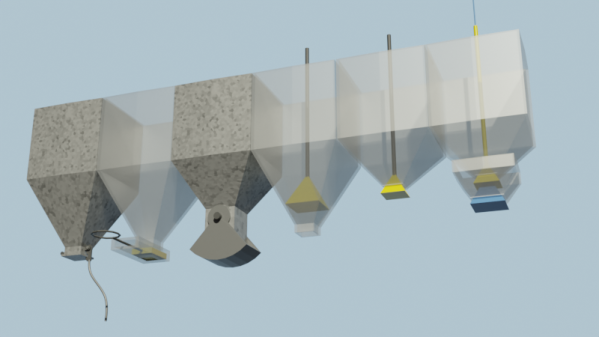
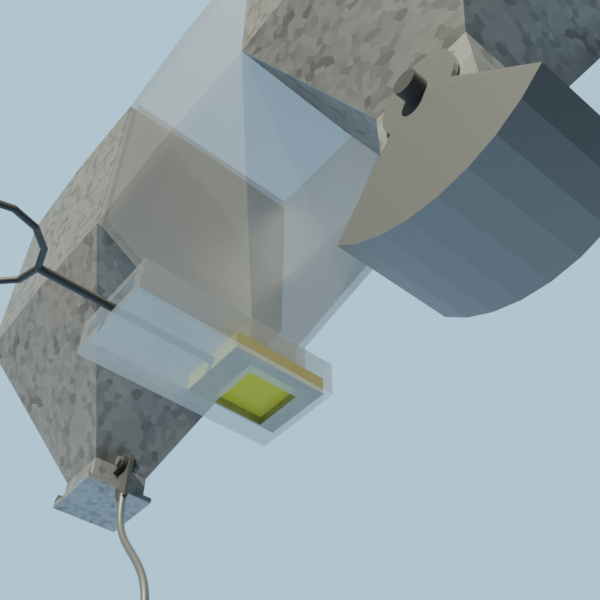
Dump Gate, Slide Gate, Clamshell Gate
If your need is just to dump out the entire contents of the bin, a dump gate works – a trapdoor with a latch. If you need to stop before emptying the bin, you can use a slide valve – a flat piece of material in a box that slides in and out. Friction from material bearing down on them causes large open/close forces. Material can jam between the flap and the housing when closing.
A variation is the clam shell gate — a section of a cylinder on arms that swings aside, like a crane’s grab. They tend to leak, but with the material’s weight against the hinge pin, they are easier to close with a high force against them.
The upward bell gate, helps with in-bin flow pattern and seals well. Open by pulling from above or pushing from below, through the outlet. The material moving around the gate acts to improve the flow, and because the material at the lip is on an inclined surface, they tend to seal better. If it still has a leakage problem, a flexible lip can cure it.
A cone, suspended on a cable below the outlet of the hopper is a downward bell. Lowering the cable lets material flow between the outlet rim and the bell. When the cable is raised, if a lump sticks at one place the bell moves aside. The sealing surfaces are angles, so material rolls off. The bin is shallower and there’s no outlet pipe. This design ensures clearance so large particles don’t wedge against the wall as the bell closes.
Upward Bell, Downward Bell, Double Bell
Any of these gates would close just fine if not for the material in the bin. Double gates exploit this. The main bin has a normal gate and outlet. The outlet is below the lip of the much smaller, lower control bin. If the control bin fills, the main bin stops. The control bin has a gate larger than the main bin. Closing the main gate as far as it will go reduces flow through the control gate to a trickle. The control gate can now be fully closed, which fills the control bin and blocks the main outlet.
You might not want to share environments between bins. Maybe one has pressure, nasty chemicals, or hot gases. In that case, a rotary airlock gate is a paddle wheel apparatus in a close fitting housing. Material is metered out as it turns. A double gate also works (blast furnaces use double bells). If you need to meter a set amount, a sliding cavity like a grocery store bulk bin works. So does a rotary airlock.
Locomotive sander systems spread sand on the rails to increase traction. The sand is gated with a “sand trap”. A pipe supplies sand to a ‘valve’ with a sharp upward U bend. Of course this blocks. A compressed air line from a valve in the cab feeds into the upward end of the U bend. As long as air flows, the blockage is constantly cleared and sand flows. It’s collected and sent to the wheels.
Feeders
If you need a constant flow, independent of how much is in the bin, you need a feeder.
The rotary air lock can be a simple feeder. A conveyor feeder is a belt at the bottom of the bin. One side has a slight gap between bin and belt. Material covers the belt as high as the gap. A screw feeder is a helical screw at the bottom of the hopper, taking material off to the side. The screw needs a varying pitch, starting out slow and increasing, to let it fill gradually from all along the hopper. A vibratory feeder is a chute designed to arch, with a vibrator to make it flow anyway.
Any of these can have a poor pattern of feeding, taking from one place along it’s inlet. Fins and inserts in the bin can help – a doctor blade to regulate how deep the first couple inches of belt feed, or an anti-rathole type insert to keep mass flow going.
Conveyors
Unlike a feeder, a conveyor depends on whatever is feeding it to control the feed rate. Feeders are for controlling feed rate. Conveyors for moving stuff. A feeder will change it’s output when it’s speed changes. A conveyor may change how much is in each section (the ‘loading’) but the output is speed independent.
Screw conveyors should have a fixed pitch, and can be angled up to 45 degrees. Belts can be inclined up to the angle of repose of the material. These are best made with a slight ‘V’ in the belt so the material doesn’t roll off. Boards on the side also work, but introduce friction into the system as the material slides against them.
Don’t overlook skips — a bucket pulled up an incline. The front wheels run on tracks slightly narrower than the back wheels. Dip the inside tracks down at the end to dump.
Moving floors made of long strips will move a pile of material if actuated in the proper sequence. Picture the order as ‘123123123123’: shove 1 backwards suddenly, and the material above it will stay with the mass, do 2 and 3, then slowly move all forward. They also move solid objects, so many trucks have such floors.
Finally, you can always fluidize the material and blow it about with air or water, then remove the fluid at the other end. Think old time logging, with logs floated down the river.
Have fun hacking. We hope we’ve given you some options for dealing with walnuts.