The Straddler Makes AVR Breadboarding Truly Plug And Play

the_straddler_avr_programmer

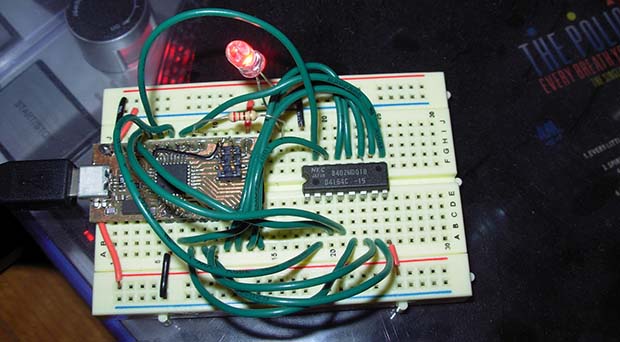
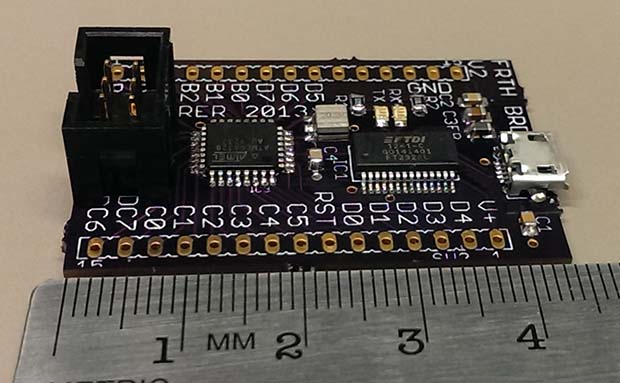
It’s not that breadboarding AVR circuits is difficult. But you have to admit that it takes some time to set everything up. We don’t label the top of our DIP chips so that you know what each pin does just by looking. Which means that wiring up the programmer involves pulling out the datasheet. [Vinnie] found the solution to this problem which is to make one of these interface PCBs for each AVR chip family. The long pins make it easy to drop over the top of your microcontroller, which is where the name comes from.

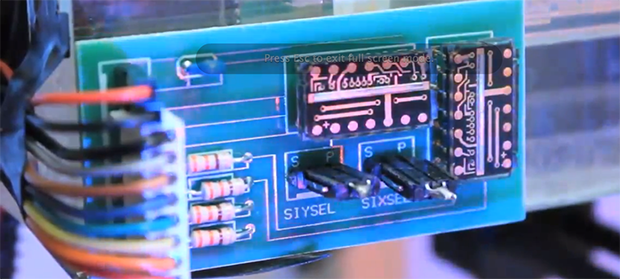
His first stab at the idea was just a hunk of home etched PCB which broke out the programming pins into the 6-pin ICSP standard. This second rendition uses the 10-pin standard and adds a few extras into the mix. He included decoupling capacitors which need to be used in every circuit anyway. There’s a crystal along with its load capacitors. This clock source is a snap to enable by burning some fuses. If you choose to use the internal oscillator instead this hardware won’t interfere. The LED is used to get you up and running with blinky firmware as quickly as possible. He plans to add jumper in the next revision which can disconnect this components from the I/O pin. Now you just need to add a 10-pin header to that USB keyboard AVR programmer and you’re in business.

Unplayable Holophonor Replica Is Unplayable

holophonor

You won’t find all that many props or homemade replica builds here at Hackaday, but [Harrison Krix’s] work is second to none, and his Futurama Holophonor replica is worth drooling over. [Harrison] sourced an old (and apparently grimy) clarinet from a local thrift store, which he strips clean of its keys and attachments. The body itself receives some subtle modifications from the lathe and epoxy to plug some holes. Custom-spun plastic pieces complete the rest of the body, including the meticulously crafted bell which houses 54 LEDs.

[Harrison] also whips up a breakout board for a mini Arduino Pro with 4 fading and 4 blinking channels, and some custom power supply options for the Holophonor’s base: a scratch-built fiberglass AAA battery holder and optional AC adapter jack. As an added bonus, he’s fitted the Holophonor’s stand with a set of Robot Devil hands that hold it in place. The only video is an illumination test, but it sure is pretty. You can see it below! It looks perfect, but alas is unplayable which actually makes it even more authentic.

The Holophonor is the latest in a slew of work from Volpin Props. You probably remember [Harrison’s] first Daft Punk helmet from a few years back, or the second one that followed shortly after.

Continue reading “Unplayable Holophonor Replica Is Unplayable”

Microcontrollers And Node.js, Naturally

We see a surprising amount of projects using Node.js, but despite this we haven’t seen much JavaScript running microcontrollers, even the ARM powered Raspi or BeagleBone. The folks at Technical Machine want to change that with a very cool dev board designed to be an Internet-connected JavaScript running prototyping device from the very beginning. It’s called Tessel, and brings some very cool tools to any maker’s workbench.

On board this little… board is an ARM Cortex-M3 running at 180 MHz, 32 Megs of Flash, 32 Megs of SDRAM, and a TI CC3000 WiFi module that we’ve heard so much about. The 16-pin GPIO can connect to other Tessel modules that allow for servos, accelerometers, micro SD cards, and a whole bunch of other sensors for just about any project imaginable.

Aside from having WiFi built in from the get-go, Tessel also has some Arduino compatibility, allowing it to work with existing shields and code. It seems pretty cool, and we can’t wait to get our hands on one when it launches in September.

Bow Tie Kindly Suggests That You Back Off

personalSpaceBowtie

Everyone’s had their “personal space bubble” burst. You just wanted a friendly conversation, but now some overzealous blockhead is standing on your shoes and breathing in your face, making you guess what he had for lunch. Fortunately, [Grissini] has created this sylish bowtie solution. Stand too close (within 19 inches) and the LEDs come to life, flashing a warning that indicates a personal space violation. [Grissini’s] tie is 3D printed to accommodate most of the electronics, which snugly snap into place. The rest of the wiring appears to run through the neck strap and connect up to a battery pack hidden elsewhere. You can check out a brief description and demonstration in a video after the break.

We’ve seen this hack for the ladies: [Jeri’s] dress performs a similar function. We’re unsure, however, if these LEDs can deter your average socially-awkward space invader. What we’d really like to see is someone take these hacks to their logical conclusion and make a wearable out of the non-lethal dazzler clone…hopefully the victim would back up a step or two before they spewed.

If you’re lonely and want to encourage people to come closer, maybe this LED bow tie will help. Or, who knows, maybe it’s yet another way to scare people off.

Continue reading “Bow Tie Kindly Suggests That You Back Off”

The RPC: A Stand-alone MIDI Workstation

raspiMidiRPC

Not just another pretty enclosure, this shiny little red box is [Lauri’s] stand-alone MIDI workstation. The build uses an Arduino Mega 2560 to handle the MIDI inputs and outputs. It communicates via serial with a Raspberry Pi that acts as a sequencer and oversees all user interactions. The Pi’s SD card offers convenient storage for your work, though we wish it was easily ejectable from the front of the box and not trapped under the hood. [Lauri’s] RPC also squeezes in the necessary USB hub for the RasPi and an HDMI-to-VGA converter. As an all-in-one solution, this is a sleek little box that–once paired with some software for arpeggiators, chord harmonies, and scales–will be a handy MIDI sequencer with robust control ready to be conveniently mounted on your rack.

Now all you’ll need is something to plug in. Why not check out the custom MIDI recorder we featured last week, or the organ-to-MIDI keyboard conversion for inspiration.

[Thanks Teemu]

An Elegant Timepiece From Paper And A Fistful Of Servos

papercraftClock

Segments rise from a sheer white surface to reveal the time in this papercraft digital / analog clock build by [Jacky Mok].

New York-based designer [Alvin Aronson] is responsible for the original, titled “D/A Clock,” which he built as a student at RISD using Corian instead of paper. [Aronson]’s design is also massive in comparison. It measures one meter wide by a half meter tall. Without access to either a 3D printer or to a laser cutter, [Jacky] instead reduces the scale of his interpretation and relies on cardstock as the primary construction material. His experience with papercraft typography leads to a design that anyone with an Exacto knife and a slice of patience should find manageable. [Jacky] ignores the Exacto option, however, and cuts his pieces with a tool we saw earlier this year: the Silhouette Portrait.

The clock’s electronics include an Arduino Uno, a servo motor controller, twenty-eight servos and an RTC breakout board that handles timekeeping. Each servo drives its own segment by sliding a paperclip forward or backward inside a small, hollow aluminum rod. Though we’re still holding out for a video of the finished papercraft build, you can watch a video of Aronson’s original clock after the break and see what inspired [Jacky’s] design.

Need another clock to envy? Last month’s build by [ebrithil] uses twenty-two servos to individually spin the segments. If you prefer that your clocks light up, [Aaron’s] o-scope transformation has you covered.

Continue reading “An Elegant Timepiece From Paper And A Fistful Of Servos”

The Cramp: A MSP430-powered Crane Lamp

theCramp

If you think your last project required a lot of soldering, take a look at [Multivac’s] remote controlled and fully-articulable desktop crane lamp. Sure, it’s a 430 microcontroller combined with an LED driver, 32 LEDs, PWM control, and some moving parts: but take a closer look at the structure. The Cramp uses an old HDD as its base, with the crane spinning around the main bearing that previously supported the platter. A system of spools and pulleys provides a reasonable range of motion to the rest of the build. Relocating the entire assembly, however, is evidently an unpleasant task.

[Multivac] based his design on a Liebherr LR1750 Crawler Crane, which he meticulously pieced together using leftover copper salvaged from an upgrade to his home’s mains wiring. A mountain of solder secures what must include several hundred joints—possibly more. The head of the lamp is an elegant exoskeleton-interpretation of industrial designer Eero Saarinen’s TWA Flight Center. You can see the Cramp in action in the video below.

Continue reading “The Cramp: A MSP430-powered Crane Lamp”