Building An IR Thermometer That Fits On Your Keychain

Non-contact infrared (IR) thermometers used to be something of an exotic tool, but thanks at least in part due to the COVID-19 pandemic, they’re now the sort of thing you see hanging up near the grocery store checkout as a cheap impulse buy. Demand pushed up production, and the economies of scale did the test. Now the devices, and the sensors within them, are cheap enough for us hackers to play with.

The end result is that we now have projects like this ultra compact IR thermometer from [gokux]. With just a handful of components, some code to glue it all together, and a 3D printed enclosure to wrap it all up, you’ve got a legitimately useful tool that’s small enough to replace that lucky rabbit’s foot you’ve got on your keys.

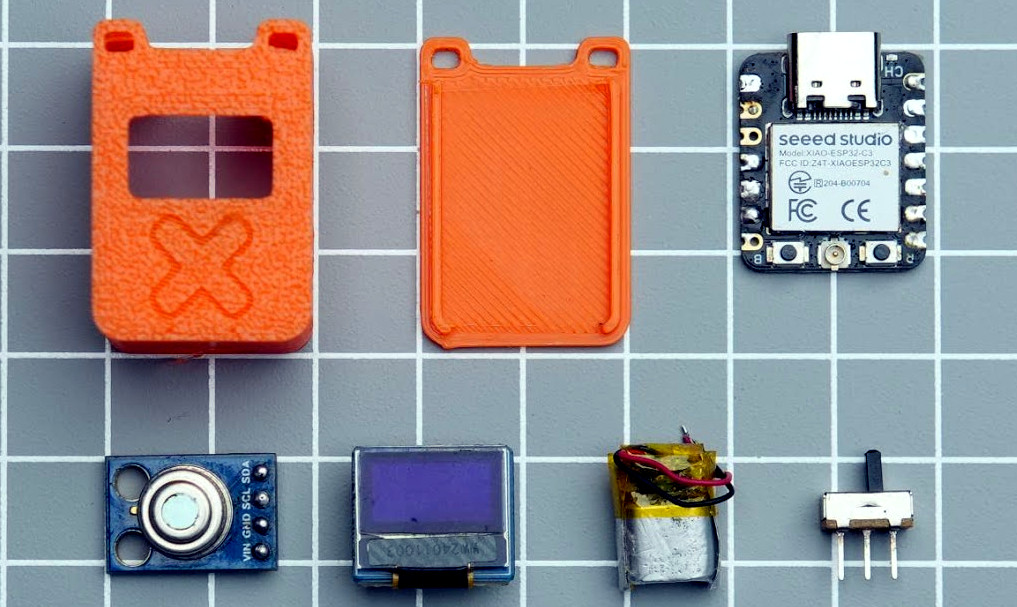
If this project looks familiar, it’s because the whole thing is closely related to the LiDAR rangefinder [gokux] put together last month. It shares the same Seeed Studio XIAO  ESP32-C3 microcontroller, 0.49 inch OLED display, and tiny 40 mAh LiPo battery. The only thing that’s really changed, aside from the adjustments necessary to the 3D printed enclosure, is that the LiDAR sensor was replaced with a MLX90614 IR temperature sensor.

[gokux] has put together some great documentation for this build, making it easy for others to recreate and remix on their own. Assembly is particularly straightforward thanks to the fact that both the display and temperature sensor communicate with the ESP32 over I2C, allowing them to be wired daisy chain style — there’s no need for even a scrap of perfboard inside the case, let alone a custom board.

Toyota Heater Switches Learn New Tricks

The look, the feel, the sound — there are few things more satisfying in this world than a nice switch. If you’re putting together a device that you plan on using frequently, outfitting it with high-quality switches is one of those things that’s worth the extra cost and effort.

So we understand completely why [STR-Alorman] went to such great lengths to get the aftermarket seat heaters he purchased working with the gorgeous switches Toyota used in the 2006 4Runner. That might not sound like the kind of thing that would involve reverse engineering hardware, creating a custom PCB, or writing a bit of code to tie it all together. But of course, when working on even a halfway modern automobile, it seems nothing is ever easy.

The process started with opening up the original Toyota switches and figuring out how they work. The six-pin units have a lot going on internally, with a toggle, a rheostat, and multiple lights packed into each one. Toyota has some pretty good documentation, but it still took some practical testing to distill it down into something a bit more manageable. The resulting KiCad symbol for the switch helps explain what’s happening inside, and [STR-Alorman] has provided a chart that attributes each detent on the knob with the measured resistance.

But understanding how the switches worked was only half the battle. The aftermarket seat heaters were only designed to work with simple toggles, so [STR-Alorman] had to develop a controller that could interface with the Toyota switches and convince the heaters to produce the desired result. The custom PCB hosts a Teensy 3.2 that reads the information from both the left and right seat switches, and uses that to control a pair of beefy MOSFETs. An interesting note here is the use of very slow pulse-width modulation (PWM) used to flip the state of the MOSFET due to the thermal inertia of the heater modules.

We love the effort [STR-Alorman] put into documenting this project, going as far as providing the Toyota part numbers for the switches and the appropriate center-console panel with the appropriate openings to accept them. It’s an excellent resource if you happen to own a 4Runner from this era, and a fascinating read for the rest of us.

A devboard with the CH32V003, with a few resistors and bodges, with a USB-C cable plugged into it, and a programmer plus an extra probe attached.

USB PD On CH32V003 Teaches You Everything

How do you talk USB Power Delivery (PD)? Grab a PHY? Use a MCU with one built-in? Well, if you’re hardcore enough, you can do it with just a few resistors and GPIOs. [eeucalyptus] shows you their implementation of USB-PD on a CH32V003, which has no PD peripheral. This includes building a PD trigger, completely open source, and walking you through the entire low-level PD basics, too!

It helps that CH32V003 is a 32-bit MCU with a good few resources and peripherals, for instance, an internal comparator. Other than that, you don’t need much in terms of hardware resources, but you do need a steady hand — parts of the firmware had to be written in assembly to keep up with PD timing. Want to tinker with the fruit of this research, perhaps, further build upon the code? There’s an example board on GitHub, too!

Want to try your own luck with this method? There’s a schematic, and logic analyzer captures, and a board to refer to. Again, more than enough information on every single low-level detail! Otherwise, grab an MCU pre-programmed to talk PD, maybe a trigger board chip, or maybe even a PD PHY and implement PD communications with it directly – it’s pretty easy!

We thank [Julianna] for sharing this with us!

SIMD-Accelerated Computer Vision On The ESP32-S3

One of the fun parts of the ESP32-S3 microcontroller is that it got upgraded to the newer Cadence Xtensa LX7 processor core, which turns out to have a range of SIMD instructions that can help to significantly speed up a range of tasks. [Shranav Palakurthi] recently used this to speed up the processing of video frames to detect corners using the FAST method. By moving some operations that benefit from SIMD over to an optimized version written in LX7 ASM, the algorithm’s throughput was increased by 220%, from 5.1 MP/s to 11.2 MP/s, albeit with some caveats.

The problem with the SIMD instructions in the LX7 other than them being very poorly documented – unless you sign an NDA with Cadence –  is that it misses many instructions that would be really useful. For [Shranav] the lack of support for direct misaligned reads and comparing of unsigned 8-bit numbers were hurdles, but could be worked around, with the results available on GitHub.

Much of the groundwork for this SIMD implementation was laid by [Larry Bank], who reverse-engineered the SIMD instructions from available documentation and code samples, finding that the ESP32-S3 misses quite a few common SIMD instructions, including various shifts and unaligned reads and writes. Still, it’s good enough for quite a few tasks, as long as you can make it work with the available instructions.

Two of these boards next to each other, one showing the front, assembled, side with the MCU and supporting components soldered on, and the other showing the back, patch panel, side, with wires connecting the MCU pads to testpoints leading to the supporting components

Try Out MCUs With This Jumperable TSSOP20 Adapter

There are so many new cool MCUs coming out, and you want to play with all of them, but, initially, they tend to be accessible as bare chips. Devboards might be hard to get, not expose everything, or carry a premium price. [Willmore] has faced this problem with an assortment of new WCH-made MCUs, and brings us all a solution – a universal board for TSSOP20-packaged MCUs, breadboard-friendly and adaptable to any pinout with only a few jumpers on the underside.

The board brings you everything you might want from a typical MCU breakout – an onboard 3.3V regulator, USB series resistors, a 1.5K pullup, decoupling capacitors, and a USB-C port. All GPIOs are broken out, and there’s a separate header you can wire up for all your SWD/UART/USB/whatever needs – just use the “patch panel” on the bottom of the board and pick the test points you want to join. [Willmore] has used these boards for the CH32Vxxx family, and they could, no doubt, be used for more – solder your MCU on, go through the pin table in the datasheet, do a little point-to-point wiring, and you get a pretty functional development board.

Continue reading “Try Out MCUs With This Jumperable TSSOP20 Adapter”

$3 Smartwatch Can Run Python

[Poking Technology] doesn’t think much of his new smartwatch. It is, by his admission, the cheapest possible smartwatch, coming in at about $3. It has very few useful features but he has figured out how to port MicroPython to it, so for a wrist-mounted development board with BLE, it might be useful. You can check it out in the video below.

The first step is a teardown, which reveals surprisingly little on the inside. There’s a tiny battery, a few connections, a display, and a tiny CPU board. There are, luckily, a few test pads that let you get into the CPU. What do you get? A 24 MHz Telink CPU with 512k of flash and 16k of RAM, along with all the other hardware.

Continue reading “$3 Smartwatch Can Run Python”

screenshot of the code defining a hid descriptor by using essentially macros for common descriptor types

Coupling STM32 And Linux? Consider HID Over I2C

If you’re pairing a tiny Linux computer to a few peripherals — perhaps you’re building a reasonably custom Pi-powered device — it’s rightfully tempting to use something like an STM32 for all your low-level tasks, from power management to reading keyboard events.

Now, in case you were wondering how to tie the two together, consider HID over I2C, it’s a standardized protocol with wide software and peripheral support, easily implementable and low-power. What’s more, [benedekkupper] gives you an example STM32 project with a detailed explanation on how you too can benefit from the protocol.

There are several cool things about this project. For a start, its code is generic enough that it will port across the entire STM32 lineup nicely. Just change the pin definitions as needed, compile it, flash it onto your devboard and experiment away. Need to change the descriptors? The hid-rdf library used lets you define a custom descriptor super easily, none of that building a descriptor from scratch stuff, and it even does compile-time verification of the descriptor!

The project has been tested with a Raspberry Pi 400, and [benedekkupper] links a tutorial on quickly adding your I2C-HID device on an Linux platform; all you need is DeviceTree support. Wondering what’s possible with HID? We’ve seen hackers play with HID aplenty here, and hacking on the HID standard isn’t just for building keyboards. It can let you automate your smartphone, reuse a laptop touchpad or even a sizeable Wacom input surface, liberate extra buttons on gamepads, or build your own touchscreen display.