RC Override For Autonomous Hardware

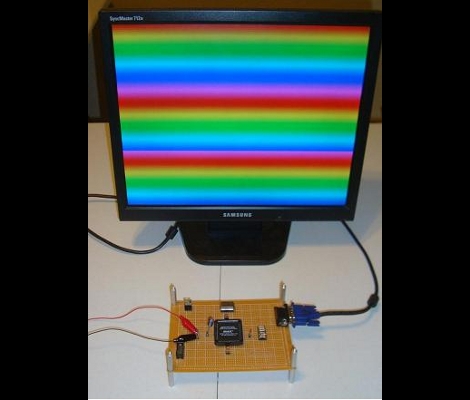
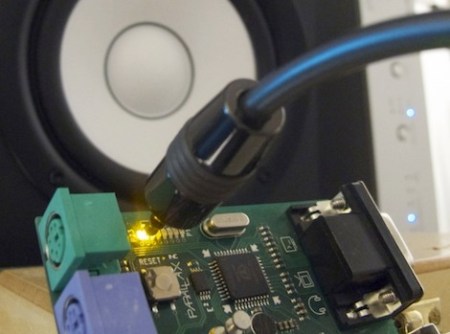
[Simon Inns] developed this board to act as a radio controlled override for autonomous hardware. It sits between some servo motors and two different sets of controllers for those motors. One set of hardware that can control the motors is a microcontroller programmed for autonomous tasks. In [Simon’s] case this enables a sailboat to navigate open water with out human intervention. But if that board fails, or if you just need to call the boat back to port, this module allows for a traditional RF vehicle controller to take command.

The board seen above, dubbed the Servo Switcher, uses a PIC 12F683 to monitor the incoming signal from the RF receiver. If that signal is not present it switches control of the motors over to a separate microcontroller board. This means that the override control is established simply by turning the handheld controller on. This will save you a swim to retrieve your boat, which is a nice convenience. But if you modify this for a plane or helicopter, it can save your aircraft from certain destruction. Check out the video walk through after the break.

Continue reading “RC Override For Autonomous Hardware”

Birthday Gift Is A Constant Reminder Of Impending AARP Membership

birthday_countdown_timer

Sometimes milestone birthdays can be a bit depressing. 30 is rough, and 40 tougher – but 50…that’s a big one!

[Ryan’s] uncle is going to be turning 50 shortly, and in the interest of good-natured fun, he has constructed a handy birthday countdown timer for his uncle, lest he forget (or tries to avoid) the big day.

The device displays the amount of time left before his uncle’s birthday, playing an audio clip of “Don’t fear the Reaper” when the clock strikes 00:00. This is accomplished by using the MSP430’s internal clock to keep time, while also interfacing with a Nokia 3310 LCD panel to display the countdown timer. The music is provided by the circuit board from a greeting card he gutted for the project, which was wired to the LaunchPad in order to be triggered at the right moment. Everything was crammed inside an Altoids tin, as you can see in the picture above.

Though not overly complicated, it’s a fun little project, and we’re hoping his uncle gets a big kick out of it. Once his birthday has come and gone, [Ryan] plans on converting the piece into a permanent desktop clock for his uncle.

TI’s Grace – A New MCU IDE GUI (DNFTT)

TI has recently been fighting to gain traction in the market of low-cost microcontroller development platforms with products such as the MSP430 Value Line Launchpad.  In order to meet the needs of a rapidly growing customer base and appeal to a broader market they have recently released Grace beta Graphical Peripheral Configuration Tool. Grace is a plugin for TI’s own Code-Composer Studio (CCS) IDE that allows users to graphically control many aspecst of MSP430 development and is compatible with all MSP430F2xx/G2xx MCUs.

Utilizing a simple “wizard-like” interface, Grace allows users to quickly and efficiently control peripherals such clocks, timers, OpAmps,  ADCs, GPIOs, comparators, and even more advanced features such as serial communications or the configuration of low-level register settings. Once everything is configured as desired, Grace outputs standard C code that can be debugged and handled as if it were hand-written.

Although Code-Composer Studio is not free, there is a 30-day full-featured trial available as well as other (restricted) free licensing options as well. Since CCS is based on the Eclipse open-source  software development framework, perhaps we will see other similar development tools in the near future. Although not an apples-to-apples comparison, we could imagine that such a tool might provide many novice users with a simple and cost-effective alternative to the Arduino IDE.

The questions then becomes: If a later incarnation were to raise the MSP430 line to “Arduino-killer” status, would it be rejoiced as such or would it simply then become a new target for those die-hard microcontroller purists who love to shout “overkill” on the forums at the slightest provocation? Of course we would love to hear your take in the comments below!

Magic 8 Thing Answers All Of Your Burning Questions

magic_8_thing

[Pete] was hard at work putting off a repair job for a friend, and wondered how much longer he could possibly procrastinate. With no fellow humans in earshot to which he could propose this question, he thought it would be great if he could ask a Magic 8-ball for an answer. Alas, he doesn’t have a Magic 8-ball, so he would have to build one if he wanted his answer.

Continuing to delay the repair job, he scrounged around his house and dug up an ATmega328 to control the 8-ball and a LCD panel to display the sage-like responses. He wanted the 8-ball to be as authentic in operation as he could, so he had to locate some sort of sensor that would register if the device had been shaken. With no accelerometer at hand, he opted to use a mercury tilt switch that he scavenged from an old thermostat. He wrote some software to display the responses from the original Magic 8-ball when shaken, then he threw the components together in a small plastic case.

As you can see in the video below, his Magic 8-thing works just like the original, sans the dark fluid and icosahedron. If you were wondering, he did finally ask the 8-thing whether he had procrastinated long enough on his initial task – the response: “Yes”

If you’re in the mood for more Magic 8-ball shenanigans, check out these posts!

Continue reading “Magic 8 Thing Answers All Of Your Burning Questions”

pov_business_card

POV Business Card Is Guaranteed To Get You Noticed

Some say that handing out business cards is an antiquated practice due to the ubiquity of smart phones which can be used to trade or record contact information in mere moments. Instructables user [sponges] however, doesn’t agree and is pushing a “business card renaissance” of sorts with his POV business card.

Hand-built in his basement, the cards feature a handful of SMD LEDs that display his name, followed by his phone number when waved back and forth. Constructed to be nearly the same size as a standard business card, his verison uses a PIC to manage the display as well as a tilt sensor to monitor the card’s motion. His walkthrough is quite thorough, and includes tutorials for each of the steps required to build the card. He discusses constructing your own etching tank, converting a laminator for PCB transfer purposes, building a solder reflow oven controller, as well as hacking an aquarium pump for use as a vacuum-powered pick and place.

The end result is a sharp looking business card that ensures you won’t forget meeting him. Keep reading to see a video of the card in action.

Continue reading “POV Business Card Is Guaranteed To Get You Noticed”

Simple Robot Knows Its Bounds

table_top_bot

The [Dallas Personal Robotics Group] recently put together a set of tutorials for their members, including the build process of a table-top robot, they call the Tiny Wanderer. The bot can be constructed pretty easily, and is meant as an introduction to robot building.

The small servo-driven bot uses simple edge sensors to ensure that it doesn’t fall off a raised surface. The sensors were built using a small IR LED and photo transistor, which is partially isolated from the LED by a piece of shrink tubing. An ATiny micro-controller takes two measurements of the amount of IR light entering the photo transistor – one with the LED on, the other with the LED off. The difference of these measurements is compared to determine if the edge sensors are hanging off the side of the table. The logic used here is pretty simple – the difference will be high if the sensors are hovering over a surface, due to reflected light, and low if the sensors are hanging over open space.

The writeup contains templates for building the bot’s structure, as well as source code and schematics for all of the electronic bits.

Be sure to stick around to see a video of the robot in action.

Continue reading “Simple Robot Knows Its Bounds”

Third Time’s A Charm – 512 LED Cube Kicks It Up A Notch With RGB LEDs

rgb_led_cube

In the comments section of our 512-LED cube post from the other day, several people suggested that to take the project up a notch, building a similar cube using RGB LEDS was the next logical step. It seems that Hack-a-Day reader [vespine] was way ahead of the curve, as he sent us the build details of his 8x8x8 RGB cube shortly after the other story was published.

His cube, which was finished earlier this year, uses 512 10mm RGB LEDs, arranged on top of a simple elevated stand. The stand conceals all of the circuitry he uses to control the cube, the centerpiece of which is a PIC32 MCU. A dozen TLC5940 16-channel PWM drivers are used alongside the PIC in order to adjust the color output of the LEDs, each of which can be addressed and colored individually.

The end result is just about as amazing as you would imagine. He has created several quick demonstration animations, which you can view in the video below. Be sure to stop by his site to see all of his build details – there’s quite a lot there.

Continue reading “Third Time’s A Charm – 512 LED Cube Kicks It Up A Notch With RGB LEDs”