No doubt that every hacker has already heard of Digi-Key, the electronic component distributor that makes it just as possible to order one of something as it is to order a thousand of it. As an essential business, Digi-Key has been open during the duration of the lockdown since they support critical manufacturing services for virtually every industry on the planet including the medical industry.
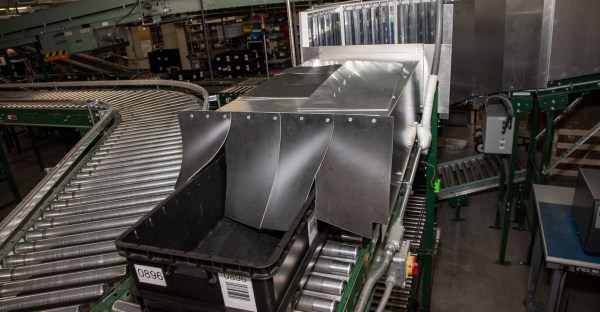
Ensuring their workforce stays healthy is key to remaining open and as part of their efforts they hacked together a nice addition to their sanitation regime. They use around 8,000 plastic totes to transport components around the distribution center and devised a way to sanitize tote coming in from the receiving area using a UV light tunnel. From their sanitation plan we can see this is in addition to the fogging system (likely a vaporized hydrogen peroxide system) used to regularly sanitize the totes passing throughout the warehouse.
They developed a UV light tunnel that wraps around the conveyor rollers. The design includes a sensor and a timer to control when and how long the UV lights are on. The totes are a frequent touch point for employees, and running incoming shipments through the UV light tunnel helps decrease the chance of exposure.
Thinking of using UV as a sanitation tool? Make sure you do your research on the wavelengths you need and vet the source of critical components. [Voja] ran into UV lamps that were anything but germicidal.