The logo for the United States Postal Service is a mean-looking eagle. But a true fluid dynamics geek might look at it and realize that eagle is moving so fast it’s causing a shock wave. But just how fast is it moving? [Andrew Higgins] asked and answered this question, posting his analysis of the logo’s supersonic travel. He claims it’s Mach 4.9, but, how do we know? Science!
It turns out if something is going fast enough, you can tell just how fast with a simple picture! We’ve all seen pictures of jets breaking the sound barrier, this gives us information about the jet’s speed.
How does it work?
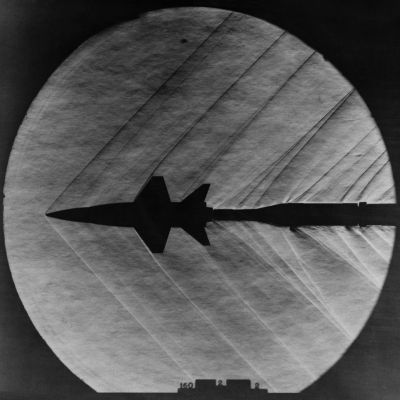
Think about it like this: sound moves at roughly 330 m/s on Earth at sea level. If an object moves through air at that velocity, the air disturbances are transmitted as sound waves. If it’s moving faster than sound, those waves get distributed downstream, behind the moving object. The distance of these waves behind the moving object is dependent on the object’s speed.
This creates a line of these interactions known as a “Mach line.” Find the angle difference of the Mach line and the direction of travel and you have the “Mach angle” (denoted by α or µ).
There is a simple formula for determining the speed of an object using the Mach angle, the speed of sound (a), and an object’s velocity (v): sin(µ) = a / v. The ratio of v to a is known as the Mach number, (M). If an object is going exactly the speed of sound, it’s going Mach 1 (because v = a).
Since Mach number (M) is v / a, we can plug it into the formula from above as 1 / M and use [Andrew]’s calculation shown in the image at the top of the article for a Mach angle (µ) of ~11.7°:

The real question is, did the USPS chose Mach 4.93 as a hint to some secret government postal project? Or, was it simply a 1993 logo designer’s attempt to “capture the ethos of a modern era which continues today”?