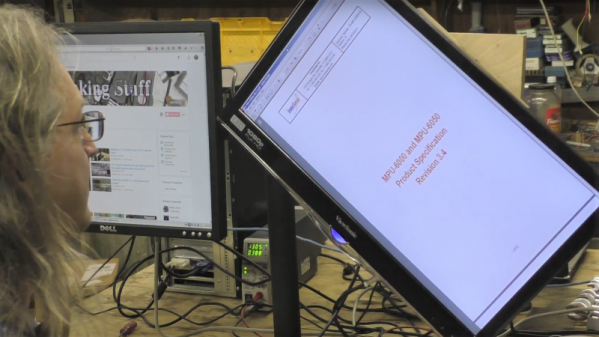
Scrap Wood And Metal Combined For DIY Mecanum Wheels

Some scrap wood, a few pieces of sheet metal, a quartet of old gear motors, and a few basic hand tools. That’s all it takes to build an omni-bot with Mecanum wheels, if you’ve got a little know-how too.

For the uninitiated, Mecanum wheels can rotate in any direction thanks to a series of tapered rollers around the circumference that are canted 45° relative to the main axle.  [Navin Khambhala]’s approach to Mecanum wheel construction is decidedly low tech and very labor intensive, but results in working wheels and a pretty agile bot. The supports for the rollers are cut from sheet steel and bent manually to hold the wooden rollers, each cut with a hole saw and tapered to a barrel shape on a makeshift lathe. Each wheel is connected directly to a gear motor shaft, and everything is mounted to a sheet steel chassis. The controls are as rudimentary as the construction methods, but the video below shows what a Mecanum-wheeled bot can do.

There’s a lot of room here for improvement, but mainly in the manufacturing methods. The entire wheel could be 3D printed, for instance, or even laser cut from MDF with a few design changes. But [Navin] scores a win for making a working wheel and a working bot from almost nothing.

Continue reading “Scrap Wood And Metal Combined For DIY Mecanum Wheels”

Automatic Deploying Lightning Rod

As hackers, hams, and builders of all sorts of things that go in our yards or are attached to our houses we often encounter resistance from building associations and by-laws regarding what to us are harmless necessities but to others are risks to their sight-lines, property values, or are seen as safety hazards. A student at the Bergen County Academies Mechatronics Research Lab has identified this same issue with lightning rods for homes, monuments, and buildings of fine architecture; people don’t want to add unsightly lightning rods despite their proven protections. Her solution? Detect when a storm is approaching and automatically deploy the lightning rod for the duration of the storm.

To detect the approaching storm she’s monitoring the changing barometric pressure using an Adafruit BMP085 barometric pressure, temperature and altitude sensor (now replaced by the BME280) connected to an Arduino with a motor shield. If the pressure is low and the trend has been decreasing then she pivots the lightning rod up using a motor salvaged from a satellite dish. When the risk abates, she pivots the rod back down again. Admittedly the lightning rod has yet to be attached and care will have to be taken with how the discharge cable is deployed but it’s a start. You can see it in action in the video below.

Continue reading “Automatic Deploying Lightning Rod”

Supersonic Speed Measurement With A Sound Card

You might think that if you have a need to measure the speed of a projectile that is too fast for your high-speed camera, you would have to invest in some significantly expensive equipment.

That was the problem facing [Nick Moore], and the solution he arrived at is extremely elegant in its simplicity. He’s arranged a pair of foil tapes in the path of the projectile, as it passes through them they break, and he measures the time between those breaks. The clever bit though lies not in the tapes, but in how he measures the timing. Instead of relying on a lab stuffed with equipment, he’s using his computer sound card. The outputs send a tone through each tape to the inputs, and using Audacity he can capture both tones and measure the time between the end of each one on left and right channels.

In the video below the break he demonstrates measuring the speed of a supersonic particle at 496.5 metres per second, which for such relatively simple equipment is rather an achievement. He could certainly improve his resolution by increasing the sampling frequency, but we are guessing that the choice of 48 kHz owes much to the quality of his sound card. Still, to achieve this with such a relatively basic piece of equipment is a neat achievement.

Continue reading “Supersonic Speed Measurement With A Sound Card”

Control Alexa Echo From Anywhere In The World

If you are not within ear-shot of your Alexa Echo, Dot or Tap device and need to command it from anywhere in the world, you’d most likely use the handy mobile app or web interface to control it. For some strange reason, if you’d rather use voice commands from anywhere in the world, you can still do it using apps such as Alexa Listens or Reverb, among many others. We’d be the first ones to call these out and say “It’s not a hack”. But [pat dhens] approach is above reproach! He has posted details on how to Remote Control the Alexa Echo from Anywhere in the World. Short version of the hack — he’s using a Raspberry Pi with a speaker attached to it which commands his Alexa Tap using a text-to-speech converter program.

The long version is short as well. The user uses a VPN, such as OpenVPN, to log in to their home network where the Alexa device is located. Then, use VNC to connect to the Raspberry Pi to access its shell. Finally, the user issues a text command which is converted to speech by the ‘festival‘ program on the Raspberry Pi. The output goes to an external speaker via the Raspberry Pi’s 3.5 mm audio out jack. And that’s all there is to it. You’ve just issued a voice command to your Alexa from across the world.

Maybe it will save your vocal chords from damage due to excessive hollering, we guess. He’s even made a short video to prove that it works. Now all it needs is a microphone to listen to Alexa, convert speech-to-text, and then transmit it back to you across the world to complete the cycle.

We’re not sure, but he thinks this hack will lead him to world domination. Good Luck with that.

Continue reading “Control Alexa Echo From Anywhere In The World”

Magnetic Stir Plate Is A Hack

If you’ve ever spent any time around a lab, you’ve doubtless seen one of those awesome combination magnetic stirrer and heater plates that scientists use to get liquids mixed and up to temperature. If you’ve ever etched your own PCBs using ammonium persulfate, you’ve experienced the need for both heating and agitation firsthand. Using a stirrer plate for PCB etching is putting two and two together and coming up with four. Which is to say, it’s a good idea that’s not amazingly novel. [acidbourbon] built his own, though, and there’s almost no part of this DIY heater/stirrer that isn’t a hack of some kind or another.

Start off with the temperature controller. Instead of buying a thermocouple or using an LM75 or similar temperature-measurement IC, [acidbourbon] uses a bog-standard 1n4148 diode. The current passed through a diode, at a given voltage, is temperature dependent, which means that adding a resistor and a microcontroller’s ADC yields a quick hacked temperature sensor. [acidbourbon] glued his straight onto the casserole that he uses as an etching tray.

Does the type of person who saves $0.25 by using a diode instead of a temperature sensor go out and buy a stirrer motor? No way. Motor and gears come from a CD-ROM drive. The “fish” — the magnetic bar that spins in the etchant — is made of neodymium magnets lengthened by shrink-wrapping heat-shrinking them together with some capacitors. Who knew that shrinkwrap heat-shrink, fused with pliers, was waterproof? Is that a wall-wart in that box, with the prongs wired to mains electricity?

Anyway, this just goes to show that etching equipment need not be expensive or fancy. And the project also provides a showcase for a bevy of tiny little hacks. And speaking of [acidbourbon]’s projects, this semi-automatic drill press mod has been on our to-do list for two years now. Shame on us! Continue reading “Magnetic Stir Plate Is A Hack”

A Command-Line Stepper Library With All The Frills

When you already know exactly where and how you’d like your motor to behave, a code-compile-flash-run-debug cycle can work just fine. But if you want to play around with a stepper motor, there’s nothing like a live interface. [BrendaEM]’s RDL is a generic stepper motor driver environment that you can flash into an Arduino. RDL talks to your computer or cell phone over serial, and can command a stepper-driver IC to move the motor in three modes: rotary, divisions of a circle, and linear. (Hence the acronumical name.) Best of all, the entire system is interactive. Have a peek at the video below.

The software has quite a range of capabilities. Typing “?” gets you a list of commands, typing “@” tells you where the motor thinks it is, and “h” moves the motor back to its home position. Rotating by turns, degrees, or to a particular position are simple. It can also read from an analog joystick, which will control the rotation speed forward and backward in real time.

Division mode carves the pie up into a number of slices, and the motor spins to these particular locations. Twelve, or sixty, divisions gives you a clock, for instance. Acceleration and deceleration profiles are built in, but tweakable. You can change microstepping on the fly, and tweak many parameters of the drive, and then save all of the results to EEPROM. If you’re playing around with a new motor, and don’t know how quickly it can accelerate, or what speeds it’s capable of, nothing beats playing around with it interactively.

Continue reading “A Command-Line Stepper Library With All The Frills”

See The Weather At A Glance With This WiFi Wall Mounted Display

Whether you’re lodged in an apartment with a poor view of the sky like [Becky Stern] or are looking for an at-a-glance report of the current weather, you might consider this minimalist weather display instead of checking your computer or your phone every time you’re headed out the door.

The first order of business was to set up her Feather Huzzah ESP8266 module. [Becky] started with a blink test to ensure it was working properly. Once that was out of the way, she moved on to installing a few libraries. Temperature data fetched by an IFTTT feed is displayed on a seven-segment display, while additional feeds separately retrieve information for each basic weather type: sunny, overcast, rain, snow.

All it took to create the sleek display effect was a few pieces of cardboard inside a shadow box frame, a sheet of paper as a diffuser, and twelve Neopixel RGB LEDs hidden inside. Trimming and securing everything in place as well as notching out the back of the frame for the power cable finished the assembly. Check out the build video after the break.

Continue reading “See The Weather At A Glance With This WiFi Wall Mounted Display”