DIY Matchhead Cannon Brings The Heat

If your local surplus store is fresh out of supercapacitors but you’re just really in the mood to fire stuff at other stuff, check out [austiwawa]’s step-by-step guide to building a thermal cannon. It shoots whatever will fit into a 1/2″ copper pipe, propelled by cut-up matchheads and lit by a propane torch. [austiwawa] demonstrates it by firing an AA battery at an unsuspecting pumpkin. For what it’s worth, we don’t necessarily condone applying this much heat to alkaline cells.

[austiwawa] used a copper pipe for the barrel because it provides the fastest heat transfer. One end of it is flattened and folded over to form the propellant chamber. A couple of packs worth of match heads are tamped down into the folded end with a paper towel serving as wadding. [austiwawa] tosses in his battery, lights the torch, and then runs away.

This whole dangerous contraption is secured to a wooden base with a u-bolt and a couple of pipe straps, and suspended between more pieces of wood with a length of threaded rod for stability and aiming.

We’ll let the safety-conscious readers do our work for us in the comments, but in the meantime, note that this thing is not safe. As [austiwawa] demonstrates, the copper gets brittle and will split open along the folded edge.

But kudos anyway to [austiwawa] for showing shot after shot of the cannon in action at the end of his video. You know where to find it.

If it’s a stronger, more beautiful barrel you’re after, just machine one by hand.

Continue reading “DIY Matchhead Cannon Brings The Heat”

Self Folding Graphene Paper

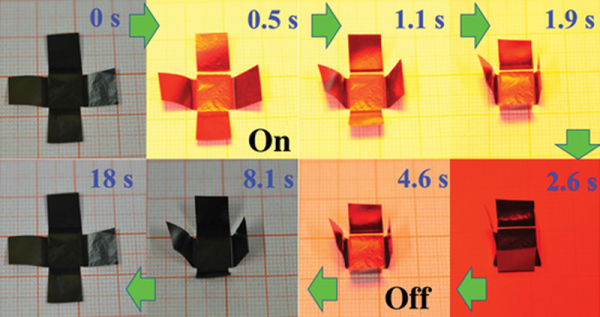
Origami, the art of folding paper into shapes, is the latest craft to fall to automation. Researchers in China have published a paper in Science Advances describing how they created graphene-based paper that can fold itself. According to their paper (that is, the paper they wrote, not their graphene paper), the new material can adopt a predefined shape, walk, or even turn a corner.

Active materials like shape memory polymers, aren’t new. But there are many practical problems with using such materials. Using MGMs (Macroscopic Graphene Materials), the researchers created paper that can change shape based on light. temperature, or humidity.

The video below shows a few uses including a self-folding box, a worm-like motion device, and a hand-like piece of paper making a grasping motion. The creators mention that there are a wide range of applications including robotics, artificial muscles, and sensing devices. After watching the video, we couldn’t help but wonder how cool a paper flower that opened in the sunlight would be.

We’ve covered how to make your own graphene in a home lab and even inside a DVD burner. We’ll be interested to see who is the first to hack some graphene paper and what you’ll use it for.

Continue reading “Self Folding Graphene Paper”

Act Now And Receive The Prong Saver For Only $0.00!

Well, actually, you can’t buy this. But for [TVmiller’s] latest project he decided to have some fun with the video — so he made an infomercial for it.

Called the Prong Saver, the device clips onto any appliance’s electrical cord to help prevent you from accidentally pulling too hard and bending the electrical prongs. It’s basically a cord-tension alarm. The question is — can you hear it over the vacuum cleaner?

And just because he could, it’s solar powered. Because why the heck not? He built it using scraps he found around the workshop. That included a solar powered LED key chain, a small piezo speaker, an eyebolt and a compression spring. Anyway, check out the commercial after the break. It had us in stitches.

Continue reading “Act Now And Receive The Prong Saver For Only $0.00!”

Heat Duct Rover Explores Stink, Rescues Flashlight

It all started with a bad smell coming from the heat register. [CuddleBurrito] recalled a time when something stinky ended up in the ductwork of his folks’ house which ended up costing them big bucks to explore. The hacker mindset shies away from those expenditures and toward literally rolling your own solution to investigating the funk. In the process [CuddleBurrito] takes us on a journey into the bowels of his house.

Continue reading “Heat Duct Rover Explores Stink, Rescues Flashlight”

The Running Cat

Cats are great to have around, but they need exercise. If you’re not in a position to let the cat outdoors, you need to look to something else when kitty wakes up bored from her 23 hour nap. Cat playscapes are useful diversions, but this is the first time we’ve considered real exercise equipment. Let’s get our feline friends their exercise fix with a hamster-esque cat exercise wheel.

[bbarlowski]’s design is simple but very clever, and almost looks like something you’d find flat-packed at IKEA. Built of CNC-milled birch plywood, the wheel rims snap together like puzzle pieces while the floor has tabs that slot into the rims. The tension of the bent floor panels locks everything together and makes for a smart looking wheel. The video after the break shows [Kuna the Maine Coon cat] in action on the wheel, and outlines a few plans for expansion, including adding an Arduino to monitor kitty’s activity and control both an RGB LED strip for mood lighting and a cat treat dispenser for positive reinforcement of the exercise regimen.

The project mounted an unsuccessful campaign in March and they’ve made the DXF cutting files available for download. Of course if it’s too much plywood and not enough Arduino for you, just build the Arduspider to torture – err, entertain your cat.

Continue reading “The Running Cat”

Adding Range (and Bling) To An Electric Skateboard

Long-time Hackaday reader [Andrew Rossignol] bought a Boosted-brand electric skateboard while he was living in NYC. While the batteries more than sufficed for his commute in the Big Apple, he ran out of juice when he moved to the Left Coast, leaving him three miles short of a ten mile trip.

Faced with the unthinkable fate of pushing his skateboard like a Neanderthal, [Andrew] added more batteries. There’s great detail about how he chose the battery chemistry and the particulars of charging and something about load balancing, so it’s definitely worth a read if you’re building an electric vehicle.

IMG_3927But once [Andrew] had some surplus battery capacity on board (tee hee!) he thought of ways to waste it. The natural solution: tons of RGB LED underlighting.

Still not content with an off-the-shelf solution (which wouldn’t let him recharge the batteries without unplugging the lights), he ended up rolling his own with an Arduino and some WS2812s. The nicest touch? Keeping it all out of the elements in a sweet aluminum box, hiding the cable salad within.

There’s a lot to be said for the good industrial design of something like the Boosted skateboard, but if you’d rather DIY, we’ve been covering electric skateboard for a while now. It’s nice to see how battery and motor technology have changed since then, too. Compare and contrast this recent build with that old-school version and with [Andrew’s] build that was covered in this post. We live in good times.

Low Power And Pin-Constrained

We’ve all been there. You’re building up a microcontroller project and you wish that you could just add “one more feature” but you’re limited by the hardware. Time to start thinking. (Or, arguably, buy the next model up.)

[Sam Feller] found himself in this position, adding a knob to set the time and a button to arm the alarm for his Analog Voltmeter Clock, and he came up with a way to implement an on-off switch, and poll a button and a potentiometer with only two pins of a microcontroller.

The problem with potentiometers in low-power designs is that they’re always leaking power. That is, unless you switch them off when you’re not using them. So the ideal solution is to power the potentiometer from one GPIO pin on the microcontroller, and read its value with another. That’s two GPIO pins just for the potentiometer. But [Sam] needed to read input from a button too, and he was out of pins.

His clever solution is to switch two resistors in or out of the circuit depending on the status of the pushbutton, so that the voltage range at the potentiometer is between either VCC and VCC/2 when the switch is pressed, or between VCC/2 and GND when the switch is not pressed.

If the ADC reads something higher than VCC/2, the microcontroller knows that the button is pressed, and vice-versa. The potentiometer’s setting determines exactly where the voltage lies within either range.

Done and done. If you find yourself in the similar situation of needing to read in values from a whole bunch of buttons instead of a potentiometer, then you can try using an R-2R DAC wired up to the pushbuttons and reading the (analog) value to figure out which buttons are pressed. (If you squint your eyes just right, this solution is the same as the R-2R DAC one with the potentiometer replacing all but the most-significant bit of the R-2R DAC.)

Another tool for the toolbox. Thanks [Sam].