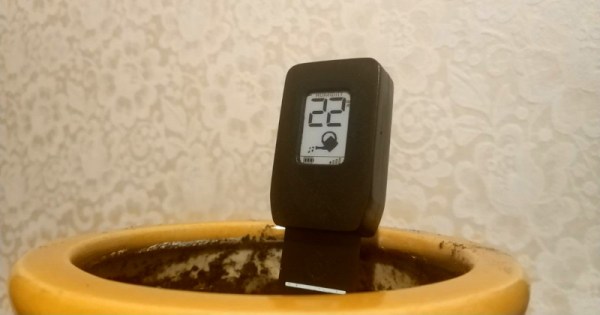
Increasing The Resolution Of The Electrical Grid

As a society in the USA and other parts of the world, we don’t give much thought to the twisting vines of civilization that entangle our skies and snake beneath our streets. The humming electrical lines on long poles that string our nations together are simply just there. Ever-present and immutable. We expect to flick the switch and power to come on. We only notice the electrical grid when something goes wrong and there is a seemingly myriad number of ways for things to go wrong. Lighting strikes, trees falling on lines, fires, or even too many people trying to crank on the A/C can all cause rolling blackouts. Or as we found out this month, cold weather can take down generation systems that have not been weatherized.

We often hear the electrical grid described as aging and strained. As we look to the future and at the ever-growing pressure on the infrastructure we take for granted, what does the future of the electrical grid look like? Can we move past blackouts and high voltage lines that criss-cross the country?

Continue reading “Increasing The Resolution Of The Electrical Grid”

30 FPS Flip-Dot Display Uses Cool Capacitor Trick

Most people find two problems when it comes to flip-dot displays: where to buy them and how to drive them. If you’re [Pierre Muth] you level up and add the challenge of driving them fast enough to rival non-mechanical displays like LCDs. It was a success, resulting in a novel and fast way of controlling flip-dot displays.

Gorgeous stackup of the completed display. [Pierre] says soldering the 2500 components kept him sane during lockdown.
If you’re lucky, you can get a used flip-dot panel decommissioned from an old bus destination panel, or perhaps the arrivals/departures board at a train station. But it is possible to buy brand new 1×7 pixel strips which is what [Pierre] has done. These come without any kind of driving hardware; just the magnetized dots with coils that can be energized to change the state.

The problem comes in needing to reverse the polarity of the coil to achieve both set and unset states. Here [Pierre] has a very interesting idea: instead of working out a way to change the connections of the coils between source and sink, he’s using a capacitor on one side that can be driven high or low to flip the dot.

Using this technique, charging the capacitor will give enough kick to flip the dot on the display. The same will happen when discharged (flipping the dot back), with the added benefit of not using additional power since the capacitor is already charged from setting the pixel. A circuit board was designed with CMOS to control each capacitor. A PCB is mounted to the back of a 7-pixel strip, creating modules that are formed into a larger display using SPI to cascade data from one to the next. The result, as you can see after the break, does a fantastic job of playing Bad Apple on the 24×14 matrix. If you have visions of one of these on your own desk, the design files and source code are available. Buying the pixels for a display this size is surprisingly affordable at about 100 €.

We’re a bit jealous of all the fun displays [Pierre] has been working on. He previously built a 384 neon bulb display that he was showing off last Autumn.

Continue reading “30 FPS Flip-Dot Display Uses Cool Capacitor Trick”

Retro Dreamcast Rhythm Game Controller Built From Scratch

Pop’n Music is a rhythm game which has had both arcade and home console releases over the years. [Charlie Cole] is a fan of the Dreamcast version, and decided to build his own controller for the game using the new hotness, the Raspberry Pi Pico.

The controller itself is built out of layers of lasercut MDF, along with an acrylic top and cork bottom to make it sit nicely on surfaces. Arcade buttons are installed to play the rhythm game, mimicking the design of the official cabinets seen in arcades. To run the controller, a Pico was pressed into service, with [Charlie] hoping to use the Pico’s PIO hardware to easily and effectively interface with the Dreamcast’s Maple bus. There were a few headaches along the way, and it didn’t quite live up to expectations, but with some clever use of dual cores, [Charlie] was able to get everything up and running.

Often, such vintage gaming hardware can be thin on the ground, so having the skills to build your own can come in handy. We’ve seen rhythm game hardware modded before too, like this repurposed DJ Hero controller. Video after the break.

DodowDIY Is A Homebrew Sleep Aid

The Dodow is a consumer device that aims to help users sleep, through biofeedback. The idea is to synchronise one’s breathing with the gentle rhythm of the device’s blue LEDs, which helps slow the heartrate and enables the user to more easily drift off to sleep. Noting that the device is essentially a breathing LED and little more, [Daniel Shiffman] set about building his own from scratch.

An ATTiny85 runs the show; no high-powered microcontrollers are necessary here. It’s hooked up to three 5mm blue LEDs, which are slowly ramped up and down to create a smooth, attractive breathing animation. The LEDs are directed upward so that their glow can be seen on the ceiling, allowing the user to lay on their back when getting ready for sleep. It’s all wrapped up in a 3D printed enclosure that is easily modifiable to suit a variety of battery solutions; [Daniel] chose the DL123A for its convenient voltage and battery life in this case. The design is available on Thingiverse for those looking to spin their own.

It’s a neat example of where DIY can really shine – reproducing a somewhat-expensive gadget that is overpriced for its fundamental simplicity. Now when it comes to waking up again, consider building yourself a nifty smart alarm clock.

Plasma Discharges Show You Where The Radiation Is

Depending on the context of the situation, the staccato clicks or chirps of a Geiger counter can be either comforting or alarming. But each pip is only an abstraction, an aural indication of when a particle or ray of ionizing radiation passed through a detector. Knowing where that happened might be important, too, under the right circumstances.

While this plasma radiation detector is designed more as a demonstration, it does a pretty good job at localizing where ionization events are happening. Designed and built by [Jay Bowles], the detector is actually pretty simple. Since [Jay] is the type of fellow with plenty of spare high-voltage power supplies lying around, he took a 6 kV flyback supply from an old build and used it here. The detector consists of a steel disk underneath a network of fine wires. Perched atop a frame of acrylic and powered by a 9 V battery, the circuit puts high-voltage across the plate and the wires. After a substantial amount of tweaking, [Jay] got it adjusted so that passing alpha particles from a sample of americium-241 left an ionization trail between the conductors, leading to a miniature lightning bolt.

In the video below, the detector sounds very similar to a Geiger counter, but with the added benefit of a built-in light show. We like the way it looks and works, although we’d perhaps advise a little more caution to anyone disassembling a smoke detector. Especially if you’re taking apart Soviet-era smoke alarms — you might get more than you bargained for.

Continue reading “Plasma Discharges Show You Where The Radiation Is”

LED Spectrum Visualizer Driven By Raspberry Pi

Back in the 1980s, spectrum displays on audio equipment were absolutely must have, and the aesthetic came to define the era. This lingered on through the 1990s, and remains a cool look even to this day. [Arduino Guy] decided to put together such a display using a Raspberry Pi and a large LED display.

The LED display in question is of the 64×64 RGB type, available from Aliexpress and other electronics suppliers online. To run the display, an Adafruit RGB Matrix Hat is used with the Raspberry Pi 3B, which makes driving the panel a cinch. The visual effect is run via a Python script, which plays a wave file and produces the spectrum graphics via a Fast Fourier Transform.

While the code isn’t able to act as a general-purpose equalizer display for any content played on the Raspberry Pi, creating such a script could be an entertaining exercise for the reader. Alternatively, the Pi could be hooked up to a microphone to run the display based on ambient room noise. In any case, we’ve seen great projects like this before, such as this laser-based display. Video after the break.

Continue reading “LED Spectrum Visualizer Driven By Raspberry Pi”

Custom Inlaid Retro Keycaps: Clay Is The Way

They say experience is the best teacher, and experience tells us they are right. When [Thomas Thiel] couldn’t find any resources about re-creating the groovy ‘caps of thocky old keebs like the Space Cadet and the C64 (or find any to buy), it was time for a little keycap experimentation.

These babies are printed in black resin and the inlay is made with white air-dry clay. After printing, they are sprayed with acrylic, and then [Thomas] works a generous amount of clay into the grooves and seals the whole thing with clear spray. [Thomas] soon figured out that the grooves had to be pretty deep for this to work right — at least 1 mm. And he had better luck thick fonts like Arial Black instead of thin fonts.

Of course, as [Thomas] mentions, you’re not restricted to white or even air-dry clay. You could go nuts with colored clay and make a retro-RGB clackable rainbow.

Still not tactile or custom enough for you? These hand-stitched keycaps are technically re-legendable, though it would take a considerable amount of time.