Smart Camera Based On Google Coral

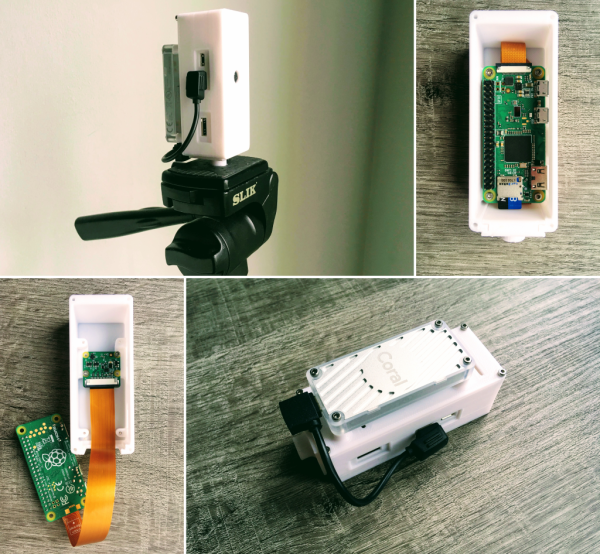
As machine learning and artificial intelligence becomes more widespread, so do the number of platforms available for anyone looking to experiment with the technology. Much like the single board computer revolution of the last ten years, we’re currently seeing a similar revolution with the number of platforms available for machine learning. One of those is Google Coral, a set of hardware specifically designed to take advantage of this new technology. It’s missing support to work with certain hardware though, so [Ricardo] set out to get one working with a Raspberry Pi Zero with this smart camera build based around Google Coral.

The project uses a Google Coral Edge TPU with a USB accelerator as the basis for the machine learning. A complete image for the Pi Zero is available which sets most of the system up right away including headless operation and includes a host of machine learning software such as OpenCV and pytesseract. By pairing a camera to the Edge TPU and the Raspberry Pi, [Ricardo] demonstrates many of its machine learning capabilities with several example projects such as an automatic license plate detector and even a mode which can recognize whether or not a face mask is being worn, and even how correctly it is being worn.

For those who want to get into machine learning and artificial intelligence, this is a great introductory project since the cost to entry is so low using these pieces of hardware. All of the project code and examples are available on [Ricardo]’s GitHub page too. We could even imagine his license plate recognition software being used to augment this license plate reader which uses a much more powerful camera.

MIT’s Knitted Keyboard Is Quite A Flexible MIDI Controller

There are only so many ways to make noise on standard instruments such as acoustic pianos. Their rigidity and inputs just don’t allow for a super-wide range of expression. On the other hand, if you knit your interface together, the possibilities are nearly endless. MIT’s new and improved knitted keyboard is an instrument like none other — it responds to touch, pressure, and continuous proximity, meaning that you can play it like a keyboard, a theremin, and something that is somewhere in between the two. Because it’s a MIDI interface, it can ultimately sound like any instrument you’ve got available in software.

The silver keys of this five-octave interface are made of conductive yarn, and the blue background is regular polyester yarn. Underneath that is a conductive knit layer to complete the key circuits, and a piezo-resistive knit layer that responds to pressure and stretch. It runs on a Teensy 4.0 and uses five MPR121 proximity/touch controllers, one per octave.

The really exciting thing about this keyboard is its musical (and physical) versatility. As you might expect, the keyboard takes discrete inputs from keystrokes, but it also takes continuous input from hovering and waving via the proximity sensors, and goes even further by taking physical input from squeezing, pulling, stretching, and twisting the conductive yarns that make up the keys. This means it takes aftertouch (pressure applied after initial contact) into account —  something that isn’t possible with most regular instruments. And since this keyboard is mostly yarn and fabric, you can roll it up and take it anywhere, or wrap it around your neck for a varied soundscape.

If you’re looking for more detail, check out the paper for the previous version (PDF), which also used thermochromic yarn to show different colors for various modes of play using a heating element. With the new version, [Irmandy Wicaksono] and team sought to improve the sensing modalities, knitted aesthetics, and the overall tactility of the keyboard. We love both versions! Be sure to check it out after the break.

Want to play around with capacitive touch sensors without leaving the house for parts? Make your own from paper and aluminum foil.

Continue reading “MIT’s Knitted Keyboard Is Quite A Flexible MIDI Controller”

Installing Linux Like It’s 1989

A common example of the sheer amount of computing power available to almost anyone today is comparing a smartphone to the Apollo guidance computer. This classic computer was the first to use integrated circuits so it’s fairly obvious that most modern technology would be orders of magnitude more powerful, but we don’t need to go back to the 1960s to see this disparity. Simply going back to 1989 and getting a Compaq laptop from that era running again, while using a Raspberry Pi Zero to help it along, illustrates this point well enough.

[befinitiv] was able to get a Raspberry Pi installed inside of the original computer case, and didn’t simply connect the original keyboard and display and then call it a completed build. The original 286 processor is connected to the Pi with a serial link, so both devices can communicate with each other. Booting up the computer into DOS and running a small piece of software allows the computer into a Linux terminal emulator hosted on the Raspberry Pi. The terminal can be exited and the computer will return back to its original DOS setup. This also helps to bypass the floppy disk drive for transferring files to the 286 as well, since files can be retrieved wirelessly on the Pi and then sent to the 286.

This is quite an interesting mashup of new and old technology, and with the Pi being around two orders of magnitude more powerful than the 286 and wedged into vacant space inside the original case, [befinitiv] points out that this amalgamation of computers is “borderline useful”. It’s certainly an upgrade for the Compaq, and for others attempting to get ancient hardware on the internet, don’t forget that you can always use hardware like this to access Hackaday’s retro site.

Continue reading “Installing Linux Like It’s 1989”

Machine-Vision Archer Makes You The Target, If You Dare

We’ll state right up front that it’s a really, really bad idea to let a robotic archer shoot an apple off of your head. You absolutely should not repeat what you’ll see in the video below, and if you do, the results are all on you.

That said, [Kamal Carter]’s build is pretty darn cool. He wisely chose to use just about the weakest bows you can get, the kind with strings that are basically big, floppy elastic bands that shoot arrows with suction-cup tips and are so harmless that they’re intended for children to play with and you just know they’re going to shoot each other the minute you turn your back no matter what you told them. Target acquisition is the job of an Intel RealSense depth camera, which was used to find targets and calculate the distance to them. An aluminum extrusion frame holds the bow and adjusts its elevation, while a long leadscrew and a servo draw and release the string.

With the running gear sorted, [Kamal] turned to high school physics for calculations such as the spring constant of the bow to determine the arrow’s initial velocity, and the ballistics formula to determine the angle needed to hit the target. And hit it he does — mostly. We’re actually surprised how many on-target shots he got. And yes, he did eventually get it to pull a [William Tell] apple trick — although we couldn’t help but notice from his, ahem, hand posture that he wasn’t exactly filled with self-confidence about where the arrow would end up.

[Kamal] says he drew inspiration both from [Mark Rober]’s dart-catching dartboard and [Shane Wighton]’s self-dunking basketball hoop for this build. We’d say his results put in him good standing with the skill-optional sports community.

Continue reading “Machine-Vision Archer Makes You The Target, If You Dare”

PinThing Mechanizes Pin Art

Pin art is one of those things that simply cannot be left alone if it’s within arms reach, and inevitably end up with a hand or face imprint. [hugs] is also fascinated by them, so he designed the PinThing, a mechanized pin art display.

The PinThing pin diameters are much larger than standard pin art, but this is to fit small geared DC motors. Each pin is a short 3D-printed lead screw mechanism. The motors are driven with a stack of motor driver shields on top of an Arduino Uno, which uses Firmata to receive instructions over serial from a Node.js app using the Johnny-Five library. This may be a simple 3×5 proof of concept, but then it could be used for everything from displays to interactive table surfaces.

One of the challenges with pixelated mechanical displays like this, the inFORM from MIT, or even flip dot displays, are the costs in actuators and driver electronics. A small 10×10 array requires 100 motors and drivers, which quickly adds up as you expand, even if individual components are quite cheap.

If you are willing to sacrifice instantaneous response from each pixel, you can use a mechanical multiplexer. It consists of some sort of moving carriage behind the display with mounted actuators, so you’ll only need an actuator per row, not for every pin. This also means the pins can be closer together since the actuators can be staggered on the carriage.

PinThing project was an entry to the Rethink Displays Challenge of the 2021 Hackaday Prize, for which the finalists were just announced.

Continue reading “PinThing Mechanizes Pin Art”

Adding A Gentle Touch To Prosthetic Limbs With Somatosensory Stimulation

When Nathan Copeland suffered a car accident in 2004, damage to his spinal cord at the C5/C6 level resulted in tetraplegic paralysis. This left him initially at the age of 18 years old to consider a life without the use of his arms or legs, until he got selected in 2014 for a study at the University of Pittsburgh involving the controlling of a robotic limb using nothing but one’s mind and a BCI.

While this approach, as replicated in various other studies, works well enough for simple tasks, it comes with the major caveat that while it’s possible to control this robotic limb, there is no feedback from it. Normally when we try to for example grab an object with our hand, we are aware of the motion of our arm and hand, until the moment when our fingers touch the object which we’re reaching for.

In the case of these robotic limbs, the only form of feedback was of the visual type, where the user had to look at the arm and correct its action based on the observation of its position. Obviously this is far from ideal, which is why Nathan hadn’t just been implanted with Utah arrays that read out his motor cortex, but also arrays which connected to his somatosensory cortex.

As covered in a paper by Flesher et al. in Nature, by stimulating the somatosensory cortex, Nathan has over the past few years regained a large part of the sensation in his arm and hand back, even if they’re now a robotic limb. This raises the question of how complicated this approach is, and whether we can expect it to become a common feature of prosthetic limbs before long. Continue reading “Adding A Gentle Touch To Prosthetic Limbs With Somatosensory Stimulation”

Astronomic Patio Light Timer

Not satisfied with the handheld remote control for his outdoor patio lights, [timabram] decided to build an automatic timer using an ESP8266. He’s using a set of string lights from Costco, but as you dig into his project you’ll see the method he uses can be applied to almost any set of lights that have a remote.

He does this by connecting GPIO pins from the ESP8266 GPIO into the remote control in order to simulate a user pressing the button. Both boards are packaged together in a 3D-printed enclosure that utilizes the front portion of the remote control, so that manual operation is still possible.

His firmware gets the date and time from an NTP server, and then makes an API call to an online service that returns the local sunrise and sunset times for a specific location. He tries to minimize the power consumption by experimenting with different intervals to wakeup from deep sleep and ping the time server. But in the end, he realizes the RF remote control carries quite some distance, and installed the unit inside a closet where it could be powered by adaptors connected to the mains.

We wondered how the remote control knows if the lights are on or off, and [timabram] notes this is a shortcoming which could be addressed in a future version. If you’ve ever seen a mechanical version of an astronomic timer switch, packed full of gears and dials and setting pins, you can really appreciate a no-moving-parts solutions like this project. If you want to make one that doesn’t use the internet, check out this Arduino-based solution that we wrote about back in 2013.