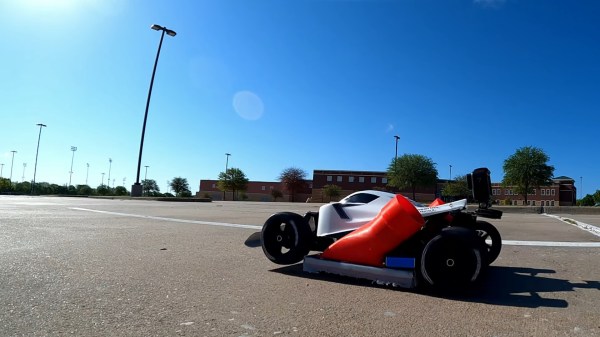
A Vacuum Battery Made For Looks And Learning

Looks and RGB LEDs are usually not a priority in tool batteries, but [Oleg Pevtsov] decided the battery for his DIY vacuum cleaner needed to be different. In the process, he learned some lessons in chemical etching, plating, machining, casting, and electronics. See the video after the break for the build compilation.

The core of the battery is just five 18650 cells in a 3D-printed holder with a BMS, but the real magic is in the external components. The outer body is a brass tube with the logo etched through the 0.6 mm wall. Getting the etching right took a few tries and a lot of frustration, but he eventually found success with a solution of sulfuric acid and nitric acid in a magnetically stirred container. For etch resist he sprayed lacquer on the outside and filled the inside with silicone. The inside was then coated with clear epoxy by allowing it to cure while spinning. The final touches were nickel plating, then gold plating, and a high polish.

The silver-plated connector on one end consists of a machined copper tip and ring, epoxied together for isolation. The tip has a multi-start external thread, allowing the female side of the connector to securely connect with a single twist. A set of RGB LEDs were added to the core to light up the battery from the inside. We have to hope the vacuum this is supposed to attach to is equally impressive.

This being Hackaday, we see a lot of custom power banks for all the custom electronics. These range from a small power bank for on-the-go soldering to a heavy metal beast with a built-in inverter.

Continue reading “A Vacuum Battery Made For Looks And Learning”

ShakeAlert Promises Earthquake Early Warning Of About 10 Seconds

Earthquakes are highly destructive when they strike, and unlike many other natural disasters, they often hit with minimal warning. Unlike hurricanes and floods, and even volcanoes to an extent, earthquakes can be very difficult to predict. However, in recent decades, warning networks have proliferated around the world, aiming to protect affected communities from the worst outcomes in the event of a large tremor.

ShakeAlert is the name of the earthquake monitoring project run by the United States Geological Survey, which has just announced that it now offers early warning services to the entire west coast of the United States. Let’s take a look at how earthquake monitoring works, how that feeds into early warnings, and how this can make a difference in the case of a major quake.

Continue reading “ShakeAlert Promises Earthquake Early Warning Of About 10 Seconds”

Building Fallout’s Super Sledge

The Fallout series of games has a variety of ridiculous weapons, not least the Super Sledge — a rocket propelled sledgehammer that looks about as dangerous for the wielder as it does for the opponent. [JAIRUS OF ALL] decided he had to recreate this build in real life, risks be damned.

Unwilling to go the single-use, solid rocket route for his build, [JAIRUS] instead elected to go with an electric ducted fan, supplemented with a propane supply for added flames. It’s not really a rocket of any form, and it’s unlikely the burning propane adds any real thrust, but it does shoot huge flames out the back and it is terrifying. The EDF idle speed can be set by a potentiometer on a servo tester hooked up to a speed controller, while there’s a valve for adjusting propane flow. A switch can then be used to boost the EDF speed higher and increase the propane flow, increasing the violence of the flow out the back of the hammer.

Notably, [JAIRUS] doesn’t actually demonstrate swinging the hammer at anything in particular. We’re kind of glad, as we suspect it might end with a sizable explosion, or burns at the very least. Nonetheless, it would easily be the most terrifying prop weapon at most any Halloween party you took it to. It’s in a similar vein to the fire vortex cannon [JAIRUS] also designed. Video after the break.

Continue reading “Building Fallout’s Super Sledge”

A Look Back On The Oroville Dam With Practical Engineering

Back when it first happened, we covered the Oroville Dam near-disaster. Heavier-than-expected rainfall in California back in early 2017 led to running the dam’s primary spillway at much higher-than-normal levels. February 17, 2017, the operators noticed something odd about the water flow down the spillway, and when they turned off water flowing down the spillway, it was made obvious that they had a major problem on their hands. Several chunks of concrete were missing, and the water had begun gouging into the earth beneath the spillway. It would need repairs before it was properly up to the task of discharging water, but it was still raining.

The rising water level in Lake Oroville put operators in a tricky situation, as they needed to discharge water in the least damaging way possible. They decided to use the emergency spillway to keep water levels at safe levels. Unfortunately, the secondary spillway began to deteriorate even more quickly than the primary had, and continued use could compromise the structure of the entire dam. The difficult decision was made to evacuate downstream residents, and sacrifice the primary spillway to drain the lake to 50 feet below the nominal full level. It worked, and effectively destroyed the bottom two-thirds of the spillway over those 3 months.

With the water at a safe level, the spillways could be repaired, a monumental nearly-2-year process in itself. We’ve covered all this before, but you may be left with the nagging question, what went wrong? [Grady Hillhouse], of the Practical Engineering channel, breaks it down for us in the video embedded below.

Continue reading “A Look Back On The Oroville Dam With Practical Engineering”

Thin Coatings Require An Impressive Collection Of Equipment And Know-How

Let’s be honest — not too many of us have a need to deposit nanometer-thick films onto substrates in a controlled manner. But if you do find yourself in such a situation, you could do worse than following [Jeroen Vleggaar]’s lead as he builds out a physical vapor deposition apparatus to do just that.

Thankfully, [Jeroen] has particular expertise in this area, and is willing to share it. PVD is used to apply an exceedingly thin layer of metal or organic material to a substrate — think lens coatings or mirror silvering, as well as semiconductor manufacturing. The method involves heating the coating material in a vacuum such that it vaporizes and accumulates on a substrate in a controlled fashion. Sounds simple, but the equipment and know-how needed to actually accomplish it are daunting. [Jeroen]’s shopping list included high-current power supplies to heat the coating material, turbomolecular pumps to evacuate the coating chamber, and instruments to monitor the conditions inside the chamber. Most of the chamber itself was homemade, a gutsy move for a novice TIG welder. Highlights from the build are in the video below, which also shows the PVD setup coating a glass disc with a thin layer of silver.

This build is chock full of nice details; we especially liked the technique of monitoring deposition progress by measuring the frequency change of an oscillator connected to a crystal inside the chamber as it accumulates costing material. We’re not sure where [Jeroen] is going with this, but we suspect it has something to do with some hints he dropped while talking about his experiments with optical logic gates. We’re looking forward to seeing if that’s true.

Continue reading “Thin Coatings Require An Impressive Collection Of Equipment And Know-How”

Bicycle Flywheel Stores A Bit Of Energy, Not Much

Kinetic energy recovery systems have often been proposed as a useful way to improve the efficiency of on-road vehicles, and even used to great effect in motorsports for added performance. [Tom Stanton] decided to build one of his own, outfitting a simple bicycle with a flywheel system for harvesting energy. (Video, embedded below.)

The system consists of a 300 mm steel flywheel mounted in the center of the bike’s frame. It’s connected to the rear wheel via a chain and a clutch which [Tom] assembled himself using bicycle disc brake components. The clutch is controlled by a handlebar lever, allowing the rider to slow the bike by charging the flywheel, or to charge the flywheel to maximum speed by pedalling hard with the clutch engaged.

The actual utility of the flywheel is minimal; [Tom] notes that even at its peak speed of 2200 RPM, the flywheel stores a small fraction of the energy content of a AA battery. Practical demonstration shows the flywheel is only able to deliver a small push to [Tom] when riding the bike, too.

Despite the lack of performance, it’s nonetheless an interesting project and one that demonstrates the basic principles of flywheel energy storage. The underwhelming results perhaps serve as a solid indication of why it’s not something we use particularly often, on bicycles at least. We’ve seen [Tom]’s bike experiments before, too. Video after the break.

Continue reading “Bicycle Flywheel Stores A Bit Of Energy, Not Much”

Reviving Old Recipe For Faraday Wax Keeps Vacuum Experiments Going

Science today seems to be dominated by big budgets and exotics supplies and materials, the likes of which the home gamer has trouble procuring. But back in the day, science was once done very much by the seats of the pants, using whatever was available for the job. And as it turns out, some of the materials the old-timers used are actually still pretty useful.

An example of this is a homemade version of “Faraday Wax”, which [ChristofferB] is using for his high vacuum experiments. As you can imagine, getting a tight seal on fittings is critical to maintaining a vacuum, a job that’s usually left to expensive synthetic epoxy compounds. Realizing that a lot of scientific progress was made well before these compounds were commercially available, [ChristofferB] trolled through old scientific literature to find out how it used to be done.

This led to a recipe for “Faraday Wax”, first described by the great scientist himself in 1827. The ingredients seem a little archaic, but are actually pretty easy to source. Beeswax is easy to come by; the primary ingredient, “colophony”, is really just rosin, pretty much the same kind used as solder flux; and “Venetian red” is a natural pigment made from clay and iron oxide that can be had from art suppliers. Melted and blended together, [ChristofferB] poured it out onto wax paper to make thin strips that are easily melted onto joints in vacuum systems, and reports are that the stuff works well, even down to 10-7 mbar.

We love this one — it’s the perfect example of the hacker credo, which has been driving progress for centuries. It also reminds us of some of the work by [Simplifier], who looks for similar old-time recipes to push his work in DIY semiconductors and backyard inductors forward.

[David Gustafik] dropped us the tip on this one. Thanks!