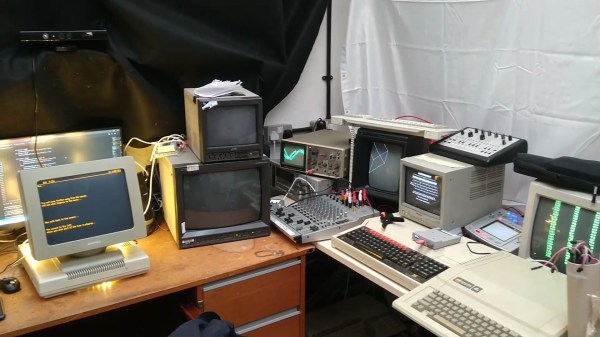
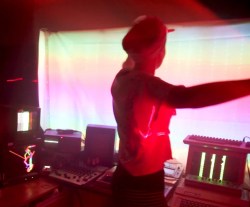
RCA Plug Plays Sixteen-Minute Chiptune Piece, All By Itself

Frequenters of arcades back in the golden age of video games will likely recall the mix of sounds coming from a properly full arcade, the kind where you stacked your quarters on a machine to stake your claim on being next in line to play. They were raucous places, filled with the simple but compelling sounds that accompanied the phosphor and silicon magic unfolding all around.

The days of such simple soundtracks may be gone, but they’re certainly not forgotten, with this chiptunes generator built into an RCA plug being both an homage to the genre and a wonderful example of optimization and miniaturization. It’s the work of [girst] and it came to life as an attempt to implement [Rob Miles]’ Bitshift Variations in C Minor algorithmically generated chiptunes composition in hardware. For the first attempt, [girst] chose an ATtiny4 as the microcontroller, put it and the SMD components needed for a low-pass filter on a flex PCB, and wrapped the whole thing around a button cell battery. Stuffed into the shell of an RCA plug, the generator detects when it has been inserted into an audio input jack and starts the 16-minute piece. [girst] built a second version, too, using the Padauk PSM150c “Three-Cent Microcontroller” chip.

This is quite an achievement in chiptunes minimization. We’ve seen chiptunes in 32 bytes, Altoids tin chiptunes, and an EP on a postage-stamp-sized PCB, but this one might beat them all on size alone.

Continue reading “RCA Plug Plays Sixteen-Minute Chiptune Piece, All By Itself”

Synth Gains Plug And Play Analog MUX

High school computer engineering teacher [Andy Birch] kept losing track of I/O pins on his home-built synth, so he made a custom plug and play addressable MUX system to solve the problem. [Andy]’s synth is based on the Teensy microcontroller, and he was already using CMOS analog 8:1 multiplexer chips (CD4051) to give him more I/O pins. But I/O pin expansion means that now there are more I/O pins to forget. Did I hook up that pitch potentiometer on U3 pin 13 or was it U10 pin 2?

He proceeds to design an addressing system for each I/O card using three bits (expandable to four) supporting eight cards, with a maximum of 16 possible in the future. Since each card may not use all eight signals, each card can tell the Teensy how many signals it has. [Andy] does his address decoding on each card using OR and XOR gates. We would have considered using a single 74HC85 four-bit magnitude comparator instead. That would require only one chip instead of two, but would deprive his students of the opportunity to learn gate level address decoding.

When seeing the term “I/O card”, you may be fooled like we were into thinking this was using PCBs and some kind of motherboard. [Andy]’s I/O cards are actually solderless breadboards mounted on the back of the synth control panel. We really like his bus technique — he removes the power strip sections from several breadboards and repurposes them as address and data buses. Check out the thorough documentation that [Andy] has prepared, and let us know if you have ever designed your own plug and play method for a project in the comments below.

[Ed Note: We love us some muxes!]

I/O Cards — Note the use of Power Strip Bars as Data / Address Buses


Ferrofluid Dances In Custom Bluetooth Speaker

Ferrofluids, as the name implies, are liquids that respond to magnetic fields. They were originally developed for use by NASA as rocket fuel but are available to the general public now for anyone who wants to enjoy their unique properties. For [Dakd Jung], that meant building a special chamber into a Bluetooth speaker that causes the ferrofluid inside to dance along with the rhythm of the music.

This project isn’t quite as simple as pushing the ferrofluid container against a speaker, though. A special electromagnetic device similar to a speaker was used specifically to manipulate the fluid, using a MSGEQ7 equalizer to provide the device with only a specific range of frequencies best tailored for the fluid’s movement. The project includes two speakers for playing the actual music that point upward, and everything is housed inside of a 3D-printed case. There were some additional hurdles to overcome as well, like learning that the glass needed a special treatment to keep the ferrofluid from sticking to it.

All in all it’s a unique project that not only brings sound to a room but a pleasing physical visualization as well. Being able to listen to music or podcasts on a portable speaker, rather than the tinny internal speakers of a phone or laptop, is the sort of thing you think you can live without until you get used to having higher quality sound easily and in every place you go. And, if there’s a way to improve on that small but crucial foundation with something like a dancing ferrofluid that moves with the music the speaker is playing, then we’re going to embrace that as well.

Music Production Studio In A Box

[Emil Smith] is an electronic music producer in the Greater London area. He spent a lot of time commuting in and out of central London, so he decided to put together COVERT-19, a portable music production studio. After making a couple of prototypes, [Emil] settled on what he needed from his portable studio: a sampler, a sequencer, a synthesizer, a mixer, and a way to record his work.

[Emil] didn’t overlook any details with his mechanical design. Taking the beautiful London weather into account, he designed a laser-cut plywood case that has a neoprene foam gasket to keep water out when closed and put all of the inputs and outputs on the interior of the case. Inside the case, he opted for machine screws with threaded inserts so he could disassemble and reassemble his creation as often as he liked, and he included gas springs to keep the studio open while he’s making music. [Emil] even thought to include ventilation slots to keep the built-in PC cool!

A portable studio is useless without a power supply, so [Emil] taught himself some circuit theory and bought his first soldering iron in order to create the custom power delivery system. Power is supplied by a battery of twelve 18650 cells with switching converters to supply the three different voltages his studio needs. Even with all of his music-making gear, he manages to get about four hours of battery life!

The music-making gear consists of a sequencer and synthesizer as well as a touch-screen NUC PC running Xubuntu. The built-in PC runs software that allows him to mix the audio, apply extra effects, record his creations, and save his patches when he’s done working. The system even has an extra MIDI output and audio input to allow it to incorporate an external synthesizer.

If you’re interested in getting started with MIDI synthesizers, but you’re more interested in building than buying, check out the KELPIE.

Sixteen Channel Retro Rotary Fader

Musician and electronic musical machine builder [Sam Battle] has recreated the unusual Crystal Palace Audio Fader over at Look Mum No Computer. The Crystal Palace was a rotary fader developed by engineer Dave Young at the BBC Radiophonic Workshop back in the late 1960s. Doctor Who fans might recognize it from the “The Krotons” series theme music. It’s a wild mechanical mixer, which fades between sixteen different inputs to produce its output by using a variable speed rotating pickup.

Dave Young’s Crystal Palace

After Young built the prototype, three of these were made and put into cases cut out of scrap plexiglass) from a dumpster — hence they became known as Crystal Palaces after the 1851 glass and iron structure of the same name.

[Sam] decides to build this using some inductors and an old tape head. After proving out the concept on a breadboard, he mounts sixteen inductors on a 3D-printed circular frame. The rotating pickup transfers the signal via slip-rings at the top. An array of input jacks and level pots are mounted on the enclosure’s face plate, which contains a vector board full of op amps that drive the coils. Strictly speaking, the original fader used capacitive coupling, not inductive, but that doesn’t detract at all from this project. And as he states upfront, he intentionally didn’t dig too deep into the original, so as to put his own spin on the design.

Continue reading “Sixteen Channel Retro Rotary Fader”

The Sixtyforgan Proves That Church Organs Are Definitely Chiptune

Church organs may be mechanically complicated and super old-school, but they share something in common with the earliest computer sound chips. In theory, and largely in practice, they produce very simple waveforms. The primary reason that church organs seem so full and rich compared to your old Commodore 64 is that they have the benefit of a whole church’s worth of reverb to fatten out the sound. [Linus] demonstrates this with the Sixtyforgan.

The Sixtyforgan is a Commodore 64 hooked up to a spring reverb tank. By running the relatively basic waveforms from the Commodore’s SID chip through this reverb, it’s possible to generate sounds that are eerily similar to those you might hear at your local Sunday service. While we won’t expect chiptune luminaries like [chipzel] to start busting out songs of praise at events like Square Sounds, it’s kind of awesome to think of the composers of antiquity rocking out to some mad Game Boy jams way back when.

It’s a great demonstration of the Commodore’s musical abilities, and we particularly like the application of the chromatic button layout borrowed from the accordion. We’d love to see this setup combined with an orchestra of the retro computers, like this demonstration playing The Sugar Plum Fairy. Alternatively, Billy Corgan on the Sixtyforgan playing Tiberius would be pretty great, too. Pretty sounding video after the break.

Continue reading “The Sixtyforgan Proves That Church Organs Are Definitely Chiptune”

Don’t Fret Over The Ukulele

A ukulele is a great instrument to pick to learn to play music. It’s easy to hold, has a smaller number of strings than a guitar, is fretted unlike a violin, isn’t particularly expensive, and everything sounds happier when played on one. It’s not without its limited downsides, though. Like any stringed instrument some amount of muscle memory is needed to play it fluidly which can take time to develop, but for new musicians there’s a handy new 3D printed part that can make even this aspect of learning the ukulele easier too.

Called the Easy Fret, the tool clamps on to the neck of the ukulele and hosts a series of 3D printed “keys” that allow for complex chord shapes to be played with a single finger. In this configuration the chords C, F, G, and A minor can be played (although C probably shouldn’t be considered “complex” on a ukulele). It also makes extensive use of compliant mechanisms. For example, the beams that hit the chords use geometry to imitate a four-bar linkage. This improves the quality of the sound because the strings are pressed head-on rather than at an angle.

While this project is great for a beginner learning to play this instrument and figure out the theory behind it, its creator [Ryan Hammons] also hopes that it can be used by those with motor disabilities to be able to learn to play an instrument as well. And, if you have the 3D printer required to build this but don’t have an actual ukulele, with some strings and tuning pegs you can 3D print a working ukulele as well.