Super Mario Sunburn Mod on TV Pexels Ricardo Ortiz

Super Mario Sunburn Mod Shines Up A GameCube Favorite

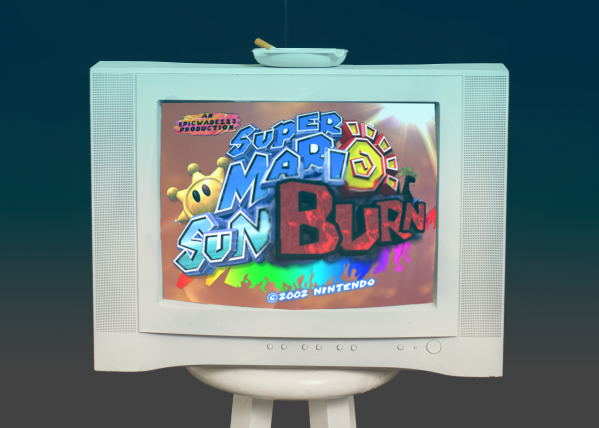
Super Mario Sunshine always felt a little under-baked when it came to 3D Mario games. Whether it was wonky camera controls, aggravating coin quotas, or the inclusion of a sentient super-soaker the game didn’t quite fulfill fan expectations. Seeking to wash-away that reputation [Wade] created a mod to revitalize the oft disparaged GameCube game. Over two years in the making, Super Mario Sunburn breaks Super Mario Sunshine wide open with new levels, more coins, and the freedom of a modern open-world game. Collecting in-game shine collectibles no longer automatically warps Mario back to the island hub, but rather allows Mario to keep filling those pockets.

In order to apply the Sunburn mod patch, a clean rip of Super Mario Sunshine for Nintendo GameCube is needed. The easiest method of ripping GameCube discs is actually with a Nintendo Wii — provided it can run CleapRip via the Homebrew Channel. With a clean game image, the Sunburn patch can be applied on Windows by running Delta Patcher. From there a Sunburn-patched image can be enjoyed via emulator with the optional HD Texture pack, or even real Nintendo hardware. A comprehensive mod like this is surely deserving of some WaveBird time.

The arrival of [Wade]’s mod comes at a crucial time for many Mario fans. Late last year Nintendo released an underwhelming compilation of 3D Mario games called Super Mario 3D All-Stars. The release brought with it the lightest of touches and failed to provide a suitable modernization of Super Mario Sunshine. The company didn’t even allow players to play in 16:9 widescreen (unlike Sunburn). At the end of March Nintendo will cram Super Mario 3D All-Stars into “Bowser’s Vault” thereby removing it from store shelves. All the more reason to give Super Mario Sunburn a try. Continue reading “Super Mario Sunburn Mod Shines Up A GameCube Favorite”

An Ancient 8 Inch Floppy, With A PC

Most of us may have gratefully abandoned the floppy disk a decade or more since, but even today many PCs and their operating systems retain the ability to deal with these data storage relics. The PC was widely fitted with either 5.25″ or 3.5″ disk drives, but other formats such as the older 8″ discs were not a fixture in the 16-bit desktop computing world. It’s something [Jozef Bogin] has taken aim at, with his exploits in connecting a variety of 8″ drives to a PC.

In the early 1970s there were a variety of different 8″ drive standards that weren’t all entirely compatible, but a de facto standard emerged as clones of the Shuggart drives used by IBM. It’s a modified version of this interface that can be found in a PC floppy controller. While there is enough electrical compatibility to connect the two there remains a variety of connectors used on the drives. There are also a wide range of power supplies, with drives requiring 5, 12, and 24 volts, and some of them even requiring AC mains with different versions for 50Hz and 60Hz mains frequencies.

With an 8″ drive hooked up to a PC, how might DOS, or even older Windows versions, interface with it? To that end he’s created a piece of software called 8format, which not only allows 8″ disks to be formatted for the PC, but also provides a driver that replaces the BIOS floppy settings for these drives. This doesn’t work for imaging disks from other older platforms, but he provides pointers to more capable floppy controllers for that.

If these drives interest you, there’s more to be gleaned from a tale of interfacing them with 8-bit retrocomputers.

Image Sensors Demystified By [IMSAI Guy]

The February 1975 issue of Popular Electronics had what was — at the time — an amazing project. The Cyclops, a digital camera with a 32 by 32 pixel resolution with 4 bits per pixel. It was hard to imagine then that we would now all carry around high-resolution color cameras that were also phones, network terminals, and so many other things. But how much do you know about how those cameras really work? If you want to know more, check out [IMSAI Guy’s] recent video on how image sensors work.

The video doesn’t cover any practical projects or circuits, but it has a good explanation of what goes on in modern digital cameras. If you don’t know what digital cameras have in common with an octopus, you might want to watch.

If you want to see what the state of the art in 1975 was, have a look at this post. The image sensor in that camera didn’t have much in common with the ones we use today, but you have to admit it is clever. Of course, 1975 was also the year Kodak developed a digital camera and failed to understand what to do with it. Like the Cyclops, it had little in common with our modern smartphone cameras, but you have to start somewhere.

Homebrew 68K Micro-ATX Computer Runs Its Own OS

We’re no stranger to home built Motorola 68000 computers here at Hackaday, but more often than not, they tend to be an experiment in retro minimalism. The venerable processor is usually joined by only a handful of components, and there’s an excellent chance they’ll have taken up residence on a piece of perfboard. Then [NotArtyom] sent in his Blitz, and launched the bar into the stratosphere.

Make no mistake, the Blitz isn’t just some simple demo of classic chips. The open hardware motherboard has onboard floppy, IDE, and PS/2 interfaces, with a trio of 8-bit ISA expansion slots for good measure. The  Motorola 68030 CPU is humming along at 50 MHz, with 4 MB of RAM and 512 KB of ROM along for the ride. Designed to fit the Micro-ATX motherboard standard, you can even mount the Blitz in a contemporary PC case and run it on a standard ATX power supply.

An earlier prototype of the Blitz motherboard.

As if the hardware wasn’t impressive enough, [NotArtyom] went ahead and created his own open source DOS-like operating system for it to run. Written in portable C, G-DOS can run on various m68k boards as well as ARM and PowerPC machines. It’s an incredible project in its own right. If you’re looking for something to show off your homebrew computer, you could certainly do worse than pulling down a copy of G-DOS. If you do port it to a new board, make sure to let [NotArtyom] know.

It’s taken [NotArtyom] three years to develop Blitz and G-DOS with his only goal being to better understand homebrew computers. He has no interest in monetizing the design or turning it into a kit, but instead hopes it will be a resource and inspiration for others with similar interests. Oh yeah, and he did all of this before he even graduated high school. If you weren’t questioning your life’s accomplishments before, now would be a great time to start.

Interested in building your own Motorola 68000 computer, but haven’t yet attained the wizarding level of [NotArtyom]? You could start with something a bit simpler like the 68k-nano, or if you’re really in a pinch, just dead bug a Dragonball 68328.

Archery Release Becomes Reusable Balloon Cutdown Mechanism

A cutdown in high-altitude balloon (HAB) parlance refers to detaching a payload, and can refer to the act of severing a line or to the mechanism itself. How is this done? The most common way is the “hot wire” method: a segment of wire is heated rapidly with a high current, causing it to melt through something like a nylon line.

But there’s more than one way to solve a problem, and while documenting different cutdown methods, [KI4MCW] found that a caliper-style archery release plus hobby servo could be used as a high strength cutdown mechanism. An archery release (or bow release) is a tool to assist in holding the string of a bow in the drawn position, and cleanly release it at the touch of a lever or button. It occurred to [KI4MCW] that these features might be made to serve as a payload release as well, and you can see here the crude but successful prototype for a reusable cutdown.

The archery release [KI4MCW] obtained opens its jaws when a trigger-style lever on the side is pulled. The force required to trigger this is remarkably low, and a low-torque economical hobby servo easily does the job. In fact, the force needed to trip the release is so low that [KI4MCW] added a short rubber band to provide some opposing tension on the lever, just to be sure no spontaneous triggers occurred. The device hasn’t flown yet, but the prototype looks promising. Maybe a mechanism like this would be appropriate for a payload like dropping a high-altitude RC glider from a balloon.

Putting Your Time In

I was absolutely struck by a hack this week — [Adam Bäckström]’s amazing robot arm built with modified hobby servos. Basically, he’s taken apart and re-built some affordable off-the-shelf servo motors, and like the 6-Million-Dollar Man, he’s rebuilt them better, stronger, faster. OK, and smoother. We have the technology.

The results are undeniably fantastic, and enable the experienced hacker to get champagne robot motion control on a grape-juice budget by employing some heavy control theory, and redundant sensors to overcome geartrain backlash, which is the devil of cheap servos. But this didn’t come out of nowhere. In his writeup, [Adam] starts off with “You could say this project started when I ordered six endless servos in middle school, more than 15 years ago.” And it shows.

Go check out this video of his first version of the modified servos, from a six-axis arm he built in 2009(!). He’s built in analog position sensors in the motors, which lets him control the speed and makes it work better than any other hobby servo arm you’ve ever seen, but there’s still visible backlash in the gears. A mere twelve years later, he’s got magnetic encoders on the output and a fast inner loop compensates for the backlash. The result is that the current arm moves faster and smoother, while retaining accuracy.

Twelve years. I assume that [Adam] has had some other projects on his plate as well, but that’s a long term project by any account. I’m stoked to see his work, not the least because it should help a lot of others who are ready to step up their desktop servo-arm projects. But the real take-home lesson here is that if you’ve got a tough problem that you’re hacking on, you don’t have to get it done this weekend. You don’t have to get it done next weekend either. Keep hammering on it as long as you need, but keep on hammering. When you get it done, the results will be all the better for the long, slow, brewing time. What’s the longest project that you’ve ever worked on?

Don’t Fret Over The Ukulele

A ukulele is a great instrument to pick to learn to play music. It’s easy to hold, has a smaller number of strings than a guitar, is fretted unlike a violin, isn’t particularly expensive, and everything sounds happier when played on one. It’s not without its limited downsides, though. Like any stringed instrument some amount of muscle memory is needed to play it fluidly which can take time to develop, but for new musicians there’s a handy new 3D printed part that can make even this aspect of learning the ukulele easier too.

Called the Easy Fret, the tool clamps on to the neck of the ukulele and hosts a series of 3D printed “keys” that allow for complex chord shapes to be played with a single finger. In this configuration the chords C, F, G, and A minor can be played (although C probably shouldn’t be considered “complex” on a ukulele). It also makes extensive use of compliant mechanisms. For example, the beams that hit the chords use geometry to imitate a four-bar linkage. This improves the quality of the sound because the strings are pressed head-on rather than at an angle.

While this project is great for a beginner learning to play this instrument and figure out the theory behind it, its creator [Ryan Hammons] also hopes that it can be used by those with motor disabilities to be able to learn to play an instrument as well. And, if you have the 3D printer required to build this but don’t have an actual ukulele, with some strings and tuning pegs you can 3D print a working ukulele as well.