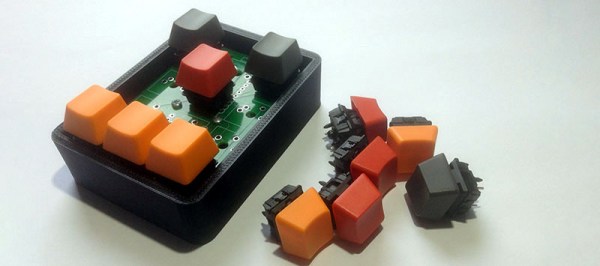
Owning a mechanical keyboard makes you a better person. It puts you above everyone else. Of course, owning a mechanical keyboard does come with some downsides. Carrying a mechanical keyboard around all the time to tell everyone else you’re better than them is usually impractical, but [cahbtexhuk Joric] has come up with a solution. It’s a miniature Bluetooth mechanical keyboard that’s also a keychain.
Peripherals Hacks1528 Articles
The Princess And The HDD: Poor Design Choices
You’ll all remember my grand adventure in acquiring a photocopier. Well, it’s been a rollercoaster, I tell ya. While I still haven’t found a modification worthy enough to attempt, I have become increasingly frustrated. From time to time, I like to invite my friends and family over for dinner, and conversation naturally turns to things like the art on the walls, the fish in the aquarium, or perhaps the photocopier in the living room. Now, I dearly love to share my passions with others, so it’s pretty darned disappointing when I go to fire off a few copies only to have the machine fail to boot! It was time to tackle this problem once and for all.
When powered up, the photocopier would sit at a “Please Wait…” screen for a very long time, before eventually coughing up an error code — SC990 — and an instruction to call for service. A bunch of other messages would flash up as well; Address Book Data Error, Hard Drive Data Error, and so on. In the end I realized they all centered around data storage.

Now, I’d already tried diving into the service menu once before, and selected the option to format the hard drive. That had led to the problem disappearing for a short period, but now it was back. No amount of mashing away at the keypad would work this time. The format commands simply returned “Failed” every time. What to do next? You guessed it, it was time for a teardown!
Thankfully, photocopiers are designed for easy servicing — someone’s paying for all those service calls. A few screws and large panels were simply popping off with ease; completely the opposite of working on cars. Spotting the hard drive was easy, it looked like some sort of laptop IDE unit. With only SATA laptops around the house to salvage parts from, I wasn’t able to come up with something to swap in.
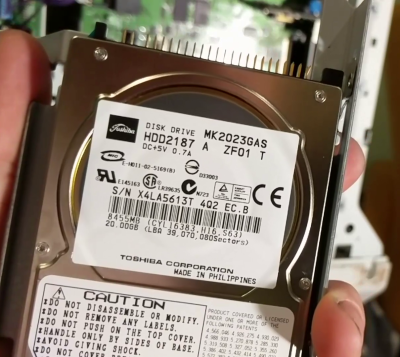
A bit of research (and reading the label) taught me that the drive was a Toshiba MK2023GAS/HDD2187. Replacements were available on eBay, but if I waited two weeks I’d probably be wrist deep in some other abandoned equipment. It had to be sorted on the night. In the words of [AvE], if you can’t fix it… well, you know how it goes. I yanked the drive and, lo and behold – the copier booted straight up! Just to be sure I wasn’t hallucinating, I churned out a few copies, and other than the continued jamming on all-black pages, everything was fine. Literally all it took to get the copier to boot was to remove the ailing drive. Suffice to say, I was kind of dumbfounded.

I’m happy to chalk up the win, but I have to draw issue with Ricoh’s design here. The copier is clearly capable of operating perfectly well without a hard drive. It will give up its document server and address book abilities, but it will still make copies and print without a problem.
Yet, when the copier’s drive fails, the unit fails completely and refuses to work. This necessitates a service call for the average user to get anything at all happening again — causing much lost work and productivity. A better design in my eyes would have the copier notify users of the lost functionality due to the failed drive and the need to call service, but let them copy! Any IT administrator will know the value of a bodged work around that keeps the company limping along for the day versus having a room of forty agitated workers with nothing to do. It’s a shame Ricoh chose to have the photocopier shut down completely rather than valiantly fight on.
Feel free to chime in with your own stories of minor failures that caused total shutdowns in the comments. Video below the break.
Continue reading “The Princess And The HDD: Poor Design Choices”
Wherein The Mechanical Keyboard Community Discovers Motorized Linear Potentiometers
Deep in the bowels of the Digikey and Mouser databases, you’ll find the coolest component ever. Motorized linear potentiometers are a rare, exotic, and just plain neat input device most commonly found on gigantic audio mixing boards and other equipment that costs as much as a car. They’re slider potentiometers with a trick up their sleeve: there’s a motor inside that can set the slider to any position.
The mechanical keyboard community has been pushing the boundaries of input devices for the last few years, and it looks like they just discovered motorized linear pots. [Jack] created a motorized sliding keycap for his keyboard. It’s like a scroll wheel, but for a keyboard. It’s beautiful, functional, and awesome.
The hardware for this build is just about what you would expect. A 60 mm motorized linear pot for the side-mount, or 100 mm mounted to the top of the keyboard, is controlled by an Arduino clone and a small motor driver. That’s just the hardware; the real trick here is the software. So far, [Jack] has implemented a plugin system, configuration software, and force feedback. Now, messing with the timeline in any Adobe product is easy and intuitive. This device also has a ‘not quite vibration’ mode for whenever [Jack] gets a notification on his desktop.
Right now, [Jack] is running a group buy for this in a reddit thread, with the cost somewhere between $55 and $75, depending on how many people want one. This is a really awesome product, and we can’t wait for Corsair to come out with a version sporting innumerable RGB LEDs. Until then, we’ll just have to drool over the video [Jack] posted below.
This Binary Keyboard Is For ASCII Purists
So, you’re a keyboard enthusiast. The ‘board that came from Dell, HP, or whoever made your computer is just not for you. You have an ancient IBM, a decal-free Das Keyboard, or another similarly esoteric text input device. Your typing can be heard three blocks away as the unmistakable clack of bent-spring switches reverberates around you, but you don’t care because you’re in the Zone.
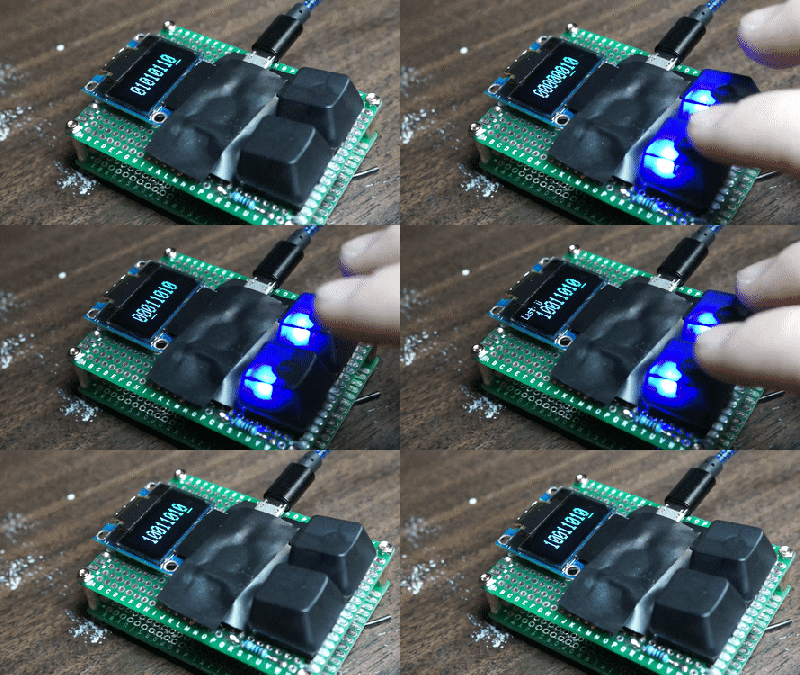
 No keyboard can be as high-end as the one you already have, your position in the hierarchy of text entry is assured. But then along comes [Chris Johnston] with his project, and suddenly your desktop looks very cluttered. It’s a binary keypad with only a 0 key, a 1 key, and an OLED display. All input is as a series of binary bytes, so as a hardcore binary typist you’ll need to know your ASCII.
Behind the keys is an Arduino Pro Micro acting in USB HID mode, and running the code you can download from the GitHub link above. It’s a gloriously pointless input device, but we’re sure you’ll agree it has something of the 00110001 00110011 00110011 00110111 about it.
If you think you may have seen this before on Hackaday then you’re not quite right. We have had a binary keypad in the past, but that one had a return key and thus had three keys. This one’s a 2-key ‘board for binary purists.
[via /r/mechanicalkeyboards/]
The Custom Clicky Shortcut Keypad
You’re not cool unless you have a mechanical keyboard. Case in point: if you were to somehow acquire an identical keyboard to the one I used to type this, it would set you back at least seven hundred dollars. Yes, it’s mechanical (Topre), and yes, I’m cooler than you. Of course, you can’t be as cool as me, but you can build your own mechanical keyboard. [Robin] is, I presume, a pretty cool dude so he built his own keyboard. It’s the amazing shortcut keyboard, and it can be programmed graphically.
The idea for this keyboard came when [Robin] was studying as an engineer. We assume this is code for wearing out the Escape key on AutoCAD, but many other software packages have the same problem. The solution to [Robin]’s problem was a shortcut keypad, a 3 by 4 matrix of Cherry switches that could be programmed for any task.
The design of this keyboard started out as an Adafruit Trellis matrix keypad. This was combined with some software written in Processing that assigned macros to each button. This was a sufficient solution, but the switches in the Adafruit trellis look squishy. These are not the right switches for someone who craves a soft snap under every fingertip. It’s not the keyboard of someone who desires the subtle thickness of laser etched PBT keycaps. The Adafruit keypad doesn’t have the graceful lines of a fully sculpted set of keycaps. Oh my god, it’s doubleshot.
[Robin]’s completed keyboard has gone through a few revisions, but in the end, he settled on PCB-mounted switches and a very clever 3D printed standoff system to hold an Arduino Pro Micro in place. The enclosure, too, is 3D printed, and the end result is a completely custom keyboard that’s perfect for mashing key combos.
You can check out a video of this keyboard in action below.
This WAV File Can Confuse Your Fitbit
As the devices with which we surround ourselves become ever more connected to the rest of the world, a lot more thought is being given to their security with respect to the internet. It’s important to remember though that this is not the only possible attack vector through which they could be compromised. All devices that incorporate sensors or indicators have the potential to be exploited in some way, whether that is as simple as sniffing the data stream expressed through a flashing LED, or a more complex attack.
Researchers at the University of Michigan and the University of South Carolina have demonstrated a successful attack against MEMS accelerometers such as you might find in a smartphone. They are using carefully crafted sound waves, and can replicate at will any output the device should be capable of returning.
MEMS accelerometers have a microscopic sprung weight with protruding plates that form part of a set of capacitors. The displacement of the weight due to acceleration is measured by looking at the difference between the capacitance on either side of the plates.
The team describe their work in the video we’ve put below the break, though frustratingly they don’t go into quite enough detail other than mentioning anti-aliasing. We suspect that they vibrate the weight such that it matches the sampling frequency of the sensor, and constantly registers a reading at a point on its travel they can dial in through the phase of their applied sound. They demonstrate interference with a model car controlled by a smartphone, and spurious steps added to a Fitbit. The whole thing is enough for the New York Times to worry about hacking a phone with sound waves, which is rather a predictable overreaction that is not shared by the researchers themselves.
Das Fix
There was a time when the desktop peripherals such as your keyboard and mouse were expensive items that you hung on to and cared for. But several decades of PC commoditization and ever-cheaper manufacturing have rendered each of them to an almost throwaway level, they are so cheap that when one breaks you can simply reach for another without thought.
This is not to say that there is no longer a space for a more costly specialist keyboard. You’ll find enthusiasts still clinging to their treasured vintage IBM Model Ms and Model Fs, or typing on a range of competing high end ‘boards. You might say that a cheap keyboard is pretty high quality these days, but for some people only the feel of a quality switch will do.
[Mac2612] was given a particularly nice example of this class of peripheral, a Das Keyboard 4C complete with trademark missing key decals. There was a snag though, it has suffered a spill at some time in its life, and would issue random keypresses which rendered it useless. His marathon investigation and repair of the fault makes for an interesting read, and gives us some insight into why these keyboards cost the extra money.

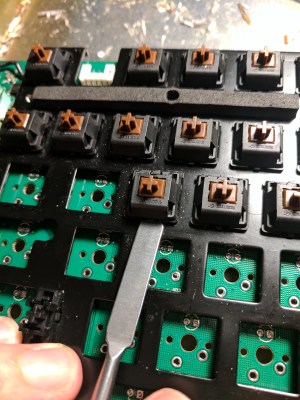
At first it seemed as though corrosion on the board might be the issue, so he gave it a clean with IPA. All to no avail, and so began a succession of further dismantlings and cleanups which culminated in the desoldering of all the key switches. This lengthy task shows us in detail the construction of a high-end ‘board, but sadly it didn’t reveal the fault, and phantom keypresses kept appearing.
Following the board traces back to the microcontroller, he eventually found that moisture had corroded the end of a 10K surface mount resistor, leaving it with a resistance in the MOhms. Since it was a pulldown for one of the keyboard rows, he’d found the source of the problem. Having spent a long time fault-finding a board with an SMD part with a mechanical failure, we feel his pain.
Replacing the SMD parts and reassembly gave him a rather sweet keyboard, albeit for a lot of work.
This is the first Das Keyboard teardown we’ve brought you, but not the first keyboard hack. There are the people remanufacturing the Model F, for example, or the most minimalist keyboard possible.
[Thanks Graham Heath, via /r/MechanicalKeyboards]


