In the movies, the most-high tech stuff is always built into a briefcase. It doesn’t whether whether it’s some spy gear or the command and control system for a orbiting weapons platform; when an ordinary-looking briefcase is opened up and there’s an LCD display in the top half, you know things are about to get interesting. So is it any surprise that hackers in the real-world would emulate the classic trope?
 As an example, take a look at the NightPi by [Sekhan]. This all-in-one mobile penetration testing rig has everything you need to peek and poke where you aren’t supposed to, all while maintaining the outward appearance of an regular briefcase. Well, admittedly a rather utilitarian aluminum briefcase…with antennas sticking out. OK, so it might not be up to 007’s fashion standards, but it’s still pretty good.
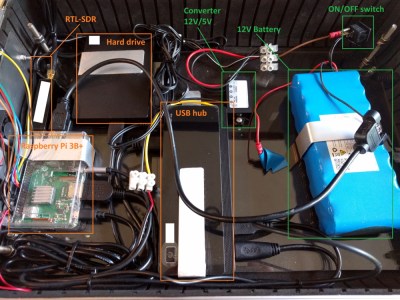
[Sekhan] has crammed a lot of gear into the NightPi beyond the eponymous Raspberry Pi 3B+. There’s an RFID reader, an RTL-SDR dongle, an external HDD, plus the 12V battery and 5V converter to power everything. All told, it cost about $500 USD to build, though that figure is going to vary considerably depending on what your parts bins look like.
To keep things cool, [Sekhan] has smartly added some vent holes along the side of the briefcase, and a couple of fans to get the air circulating. With these cooling considerations, we imagine you should be able to run the NightPi with the lid closed without any issue. That could let you hide it under a table while you interact with its suite of tools from your phone, making the whole thing much less conspicuous. The NightPi is running Kali Linux with a smattering of additional cools to do everything from gathering data from social media to trying to capture keystrokes from mechanical keyboards with the microphone; so there’s no shortage of things to play with.
If you like the idea of carrying around a Pi-powered security Swiss Army knife but aren’t too concerned with how suspicious you look, then the very impressive SIGINT tablet we covered recently might be more your speed. Not that we think you’d have any better chance making it through the TSA unscathed with this whirring briefcase full of wires, of course.