We’d Like, Totally Carry This Retro Boombox Cyberdeck On Our Shoulder

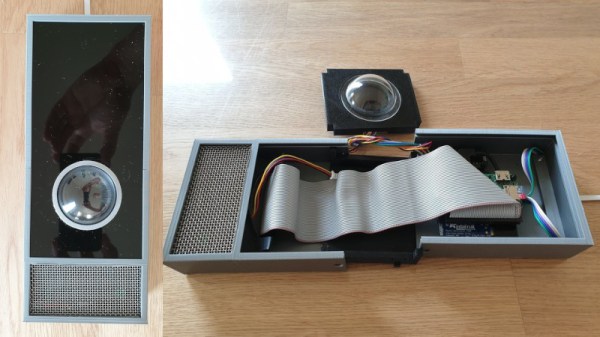
Cyberdeck. For those of a certain age, the ‘deck’ part conjures visions of tape decks, be they cassette, 8-track, or quarter-inch, and we seriously have to wonder why haven’t seen this type of build before. But here we are, thanks to [bongoplayingmonkey]’s Sanyo Cyberdeck, a truly retro machine built into a cool old boombox.

According to [bongoplayingmonkey], this was a unicorn of a build wherein everything more or less came together, soup to nuts. Right now, [bongoplayingmonkey] is cracking the nuts of a few remaining issues, like calibrating the analog VU meter that inspired the build in the first place. The plan is to use that to indicate various analog things such as battery power and the WiFi signal.

Luckily, everything survived the teardown, parts-wise. That huge knob has a new life has a rotary encoder for scrolling and middle click. And the VU meter made it too, thank Zod. This baby has full mouse controls thanks to a PS/2 joystick and a pair of vintage momentary buttons are likely chrome and bakelite to round out the look.

So apparently [bongoplayingmonkey]’s personal jury is still out on whether this is a blasphemous build or a divine ‘deck, but we say one thing is for sure: this is definitely art.

Unfortunately, the cassette deck didn’t survive. Otherwise, we might have to question its categorization — is it still a boombox if the tape deck works? This, however, is definitely a laptop that grew up to be a cyberdeck.

Thanks for the tip, [Blasto]!

What’s Cooler Than A 7-Segment Display? A 7200-Segment Display!

If you look around your desk right now, odds are you’ll see a 7-segment display or two showing you some vital information like the time or today’s weather. But think of how much information you could see with over 1,100 digits, like with [Chris Combs’] 7200-segment display.

For [Chris], this project started the same way that many of our projects start; finding components that were too good of a deal to pass up on. For just “a song or two plus shipping”, he was the proud owner of two boxes of 18:88 7-segment displays, 500 modules in total. Rather than sitting and using up precious shelf space, [Chris] decided to turn them into something fancy he could hang on the wall.

the 7200 segment display grayscaling to show the time
The IS31FL3733 can produce 8 levels of dimming 8-bit PWM, allowing [Chris] to display in grayscale
The first challenge was trying to somehow get a signal to all of the individual segments. Solutions exist for running a handful of displays in one device, but there are certainly no off-the-shelf solutions for this many. Even the possible 16 addresses of the IS31FL3733 driver IC [Chris] chose for this project were not enough, so he had to get creative. Fearing potential capacitance issues with simply using an i2C multiplexer, he instead opted to run 3 different i2C busses off of a Raspberry Pi 4, to interface with all 48 controllers.

The second challenge was how to actually wire everything up. The finished display comes out to 26 inches across by 20.5 inches tall, much too large for a single PCB. Instead, [Chris] opted to design a series of self-contained panels, each with 6 of the display modules and an IS31FL3733 to drive them. While the multiplexing arrangement did leave space for more segments on each panel, he opted to go for this arrangement as it resulted in a nice, clean, 4:3 aspect ratio for the final display.

The end result was a unique and beautiful piece, which Chris titled “One-to-Many”. He uses it to display imagery and art related to the inevitability of automation, machines replacing humans, and other “nice heartwarming stuff like that”, as he puts it. There’a video after the break, but if you are interested in seeing the display for yourself, it will be on display at the VisArt’s Concourse Gallery in Rockville, MD from September 3 to October 17, 2021. More info on [Chris’s] website.

This isn’t [Chris’s] first adventure in using 7-segment displays in such a unique way, click here to read about the predecessor to this project that we covered last year.

Continue reading “What’s Cooler Than A 7-Segment Display? A 7200-Segment Display!”

3d printed GLaDOS home assistant

GLaDOS Voice Assistant Passive-Aggressively Automates Home

With modern voice assistants we can tell a computer to play our favorite music, check the weather, or turn on a light. Like many of us, [nerdaxic] gave in to the convenience and perceived simplicity of various home automation products made by Google and Amazon. Also like many of us, he found it a bit difficult to accept the privacy implications that surround such cloud connected devices. But after selling his Home and Echo, [nerdaxic] missed the ability to control his smart home by voice command. Instead of giving in and buying back into the closed ecosystems he’d left behind, [nerdaxic] decided to open his home to a murderous, passive aggressive, sarcastic, slightly insane AI: GLaDOS, which you can see in action after the break.

Using open source designs from fellow YouTube creator [Mr. Volt], [nerdaxic] 3d printed as much of the GLaDOS animatronic model as he was able to, and implemented much of the same hardware to make it work. [nerdaxic] put more Open Source Software to use and has created a functional but somewhat limited home AI that can manage his home automation, give the weather, and tell jokes among other things. GLaDOS doesn’t fail to deliver some great one liners inspired by the original Portal games while heeding [nerdaxic]’s commands, either.

A ReSpeaker from Seeed Studio cleans up the audio sent to a Raspberry Pi 4, and allows for future expansion that will allow GLaDOS to look in the direction of the person speaking to it. With its IR capable camera, another enhancement will allow GlaDOS to stare at people as they walk around. That’s not creepy at all, right? [nerdaxic] also plans to bring speech-to-text processing in-house instead of the Google Cloud Speech-To-Text API used in its current iteration, and he’s made everything available on GitHub so that you too can have a villainous AI hanging on your every word.

Of course if having GLaDOS looming isn’t enough, you could always build a functional life size Portal turret or listen to the radio on your very own Portal Radio.

Continue reading “GLaDOS Voice Assistant Passive-Aggressively Automates Home”

Breadboard containing speech synthesis chip

RPi Python Library Has Retro Chiptunes And Speech Covered

The classic SP0256-AL2 speech chip has featured a few times on these pages, and if you’ve not seen the actual part before, you almost certainly have heard the resulting audio output. The latest Python library from prolific retrocomputing enthusiast [Nick Bild] brings the joy of the old chip to the Raspberry Pi platform, with an added extra trick; support for the venerable AY-3-8910 sound generator as well.

The SP0256-AL2 chip generates vaguely recognisable speech using the allophone system. Allophones are kind of like small chunks of speech audio which when reproduced sequentially, result in intelligible phonemes that form the basis of speech. The chip requires an external device to feed it the allophones at a regular rate, which is the job of his Gi-Pi library.

This speech synthesis technology is based on Linear-predictive coding, which is used to implement a human vocal tract model. This is the same coding method utilized by the first generation of GSM digital mobile phones, implementing a system known as Full-Rate. Both an LPC encoder and an LPC decoder are present on the handset. The LPC encoder takes audio in from the user, breaks it into the tiny constituent parts of speech, and then simply sends a code representing the audio block, but not the actual audio. Obviously there are a few more parameters sent as well to adjust the model at the receiving side. The actual decoding side is therefore not all that dissimilar to what the AY-3-8910 and related devices are doing, except you the user have to create the list of audio blocks up-front and feed the chip at the rate it demands.

Continue reading “RPi Python Library Has Retro Chiptunes And Speech Covered”

Espresso maker with added nixie flair

AI Powered Coffee Maker Knows A Bit Too Much About You

People keep warning that Skynet and the great robot uprising is not that far away, what with all this recent AI and machine-learning malarky getting all the attention lately. But we think going straight for a terminator robot army is not a very smart approach, not least due to a lack of subtlety. We think that it’s a much better bet to take over the world one home appliance at a time, and this AI Powered coffee maker might just well be part of that master plan.

Raspberry Pi Zero sitting atop the custom nixie tube driver PCB
PCB stackup with Pi Zero sat atop the driver / PSU PCBs

[Mark Smith] has taken a standard semi-auto espresso maker and jazzed it up a bit, with a sweet bar graph nixie tube the only obvious addition, at least from the front of the unit. Inside, a Raspberry Pi Zero sits atop his own nixie tube hat and associated power supply. The whole assembly is dropped into a 3D printed case and lives snuggled up to the water pump.

The Pi is running a web application written with the excellent Flask framework, and also an additional control application written in python. This allows the user to connect to the machine via Ethernet and see its status. The smarts are in the form of a simple self-grading machine learning algorithm, that takes a time series as an input (in this case when you take your shots of espresso) and after a few weeks of data, is able to make a reasonable prediction as to when you might want it in the future. It then automatically heats up in time for you to use the machine, when you usually do, then cools back down to save energy. No more pointless wandering around to see if the machine is hot enough yet – as you can just check the web page and see from the comfort of your desk.

But that’s not all [Mark] has done. He also improved the temperature control of the water boiler, and added an interlock that prevents the machine from producing a shot until the water temperature is just so. Water level is indicated by the glorious bar graph nixie tube, which also serves a few other user indication duties when appropriate. All in all a pretty sweet build, but we do add a word of caution: If your toaster starts making an unreasonable number of offers of toasted teacakes, give it a wide berth.

A Raspberry Pi next to a small circuit board

An Inexpensive FM Receiver For The Raspberry Pi

At this point, there are no shortage of impressive hacks for the Raspberry Pi. [Dilshan Jayakody] recently documented his experience in designing and building an inexpensive FM Stereo Receiver for the Pi platform, and the results are impressive.

Quite a few FM receiver projects center around the RDA5807 or TEA5767 ICs, however [Dilshan] has used the QN8035 by Quintic Corporation in his build. A handful of discrete components on a pleasing single-sided PCB is all that is needed to interface the QN8035 with the Pi’s I2C bus.

After demonstrating that the FM tuner could be, well, tuned at the command line, [Dilshan] then coded a smart looking GUI application that makes tuning a breeze. The software allows the listener to manually and automatically scan through FM stations, decode program service data, control the volume, and display the RSSI and SNR readings from the tuner.

As we reported earlier, FM radio is on a slow decline into obsolescence. This latest project isn’t aiming to break new ground, however its simplicity and inexpensive components are the perfect combination for beginner hackers and radio enthusiasts alike. More details can be found over on Hackaday.io. The schematic, source code and bill of materials can be found on GitHub.

Continue reading “An Inexpensive FM Receiver For The Raspberry Pi”

Upgrade Board Adds GPIO Pins To Your Replica PDP-11

Like many Hackaday readers, [Steven Stallion] has had his eyes on the replica PDP-11 created by [Oscar Vermeulen] for some time now, and this summer he finally got the opportunity to build one himself. But while most owners might be content to just watch the Raspberry Pi based faux-retro computer blink away on a shelf, he wanted to explore putting the machine to more practical use. The end result is the PiDP-11 I/O Expander,  an add-on that lets the modern minicomputer interact with the world around it.

Developed after some discussion with [Oscar] himself, the Microchip MCP23016 based expander board fits neatly onto the PiDP-11 PCB, and [Steven] has made sure his installation guide meshes well with the replica’s documentation. The Pi’s I2C bus is actually broken out on the original PCB, so you just need to solder a header on and run some jumpers to where the expander is mounted. You’ll need to pull 5 V as well, and the installation guide has a few tips on convenient connection points.

The installed PiDP-11 I/O Expander

Each expander board gives you 16 GPIO pins which can be accessed over I2C, including support for interrupts which has been connected to GPIO 19 on the Raspberry Pi. [Steven] notes that you should be able to stack multiples of his expander up should you need even more free pins, though some fiddling with pull-up resistors and I2C addresses will likely be necessary.

The PCBs for the expander have been released under the two clause BSD license, so you’re free to spin up your own copies however you see fit. But if you’d like to save some time, [Steven] is offering assembled boards on Tindie.

Since [Oscar] first teased it at the 2015 Hackaday Supercon, we’ve been enamored with his fantastic PDP-11 replica. We’re always glad to see when somebody has picked up one of these wonderful kits, and doubly so when they’ve figured out a way to expand it in unexpected ways.