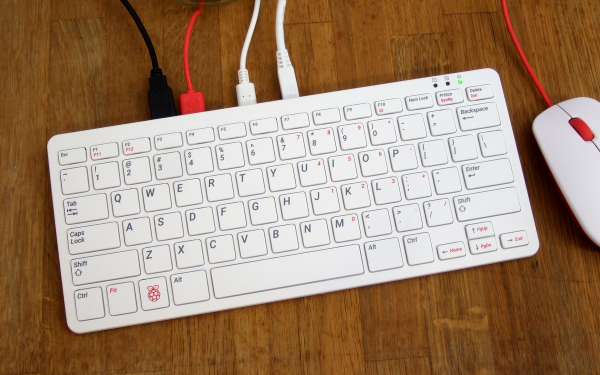
3D Printed Pi Laptop Honors The Iconic GRiD Compass

If you’re familiar with vintage portable computers, you know about the GRiD Compass. Even if you’re not into computers of yesteryear, there’s a good chance you’ve seen a Compass or two without realizing it. From battling xenomorphs in Aliens to making the trip to orbit aboard the Space Shuttle, the trendsetting clamshell computer seemed to be everywhere in the 1980s. While far too expensive for the average consumer to afford back then, its no-compromise design and sleek looks helped lay the groundwork for today’s ubiquitous laptops.

Getting your hands on a working GRiD Compass in 2021 isn’t a whole lot easier than it was in 1982, so [Mike] decided to do the next best thing and build his own. His GRIZ Sextant certainly isn’t a replica, but the family resemblance is strong enough to get the point across. The Raspberry Pi powered machine has a greatly reduced “trunk” section in the back as you might expect, but the overall layout is very similar. The Commodore 64 inspired color scheme is probably the biggest departure from the source material, but it’s hard to argue with the results.

It’s clear at a glance that a lot of thought was put into the external aesthetics of the Sextant, but a peek under the hood shows the internal details are equally impressive. [Mike] tells us he has a background in product design, and it shows. Rather than approaching this project as a one-off creation, he’s clearly taken great pains to ensure the design is as reproducible as possible.

All of the individual components of the 3D printed frame and enclosure have been carefully designed so they’ll fit within the build volume of the average desktop machine. Electronic components are screwed, not glued, to the internal framework; making future repairs and maintenance much easier. When combined with the ample internal volume available, this modular approach should make adding custom hardware a relatively painless process as well.

So when will you be able to build a GRIZ Sextant of your own? Hopefully, very soon. [Mike] says he still needs to work some kinks out of the power supply and finalize how the speakers will get mounted into the case. Once those last tweaks are locked in, he plans to release all the STL files and a complete Bill of Materials. For those who want to get a sneak peek before they start warming up the extruder, he’s also started documenting the assembly of the Sextant on his YouTube channel. Continue reading “3D Printed Pi Laptop Honors The Iconic GRiD Compass”

Retro Terminals Bring Some Style To Your Desktop

It wasn’t so long ago that a desktop computer was just a beige box with another, heavier, beige box sitting next to it or maybe perched on top. They’re a bit more visually exciting these days, with even mass produced PCs now shipping with RGB lighting and clear side panels. But even so, few could really look at a modern desktop computer and call it objectively beautiful.

But [Oriol Ferrer Mesià] wonders if we couldn’t improve on things a bit. Over the last few months, he’s been experimenting with small 3D printed enclosures that reimagine the traditional desktop computer aesthetic. With their distinctively retro-futuristic style, they look like the kind of gadgets science magazines in the 1960s thought would be dotting kitchens, living rooms, and space stations by the year 2000. But unlike those fanciful creations, each one of these beauties is a fully functional computer.

A few of the designs are relatively conservative, and not entirely unlike some of the old “dumb terminals” of the 1970s. With a Raspberry Pi 4 and a tablet-sized screen, these diminutive terminals would be perfectly usable for light desktop work or some retro gaming.

But we particularly like the ultra-widescreen design that [Oriol] has come up with. With a fairly unusual 4:1 aspect ratio LCD, the printed enclosure for this one was so large that it had to be done in two pieces on his Ender 3. To keep the 8″ 1920 x 480 panel well fed, this design uses a Jetson Nano 2GB which has considerably more graphical punch than other Linux SBCs of similar size and price.

As part of the recent cyberdeck craze, we’ve seen plenty of people recreating the look and feel of vintage portable computers with 3D printed cases and modern components. Desktop creations have been far less common, but with gorgeous designs like these to serve as inspiration, that may change.

A Tubular Fairy Tale You Control With Your Phone

At first glance, this might appear to be a Rube Goldberg machine made of toys. The truth isn’t far off — it’s a remote-control animatronic story machine driven by its spectators and their phones. [Niklas Roy] and a team of volunteers built it in just two weeks for Phaenomenale, a festival centered around art and digital culture that takes place every other year.

A view of the tubes without the toys.

A red ball travels through a network of clear acrylic tubes using 3D printed Venturi air movers, gravity, and toys to help it travel. Spectators can change the ball’s path with their phones via a local website with a big picture of the installation. The ball triggers animations along its path using break beam detection and weaves a different story each time depending on the toys it interacts with.

Here’s how it works: a Raspberry Pi 4 is responsible for releasing the ball at the beginning of the track and for controlling the track switches. The Pi also hosts a server for smartphones and the 25 Arduino Nanos that control the LEDs and servos of the animatronics. As a bonus animatronic, there’s a giant whiteboard that rotates and switches between displaying the kids’ drawings and the team’s plans and schematics. Take a brief but up-close tour after the break.

This awesome art project was a huge collaborative effort that involved the people of Wolfsburg, Germany — families in the community donated their used and abandoned toys, groups of elementary school kids were brought in to create stories for the toys, and several high school kids and other collaborators realized these drawings with animatronics.

Toys can teach valuable lessons, too. Take this body-positive sushi-snarfing Barbie for example, or this dollhouse of horrors designed to burn fire safety into children’s brains.

Continue reading “A Tubular Fairy Tale You Control With Your Phone”

The Last Component Storage System You’d Ever Need

Think you’ve seen the best component storage system? This system could only be better if you could walk up and talk to it. [APTechnologies] was tired of using a hodgepodge of drawers and boxen for storing their components. What they needed was an all-purpose solution for storing all kinds of small-to-medium-sized goodies, be they through hole or SMT.

This one happens to have a software interface as well that is searchable with short, crisp expressions that find parts by ID or with parameters. It’s a Python 3 script running on a Raspberry Pi 4B that’s hiding behind the HDMI display. [APTechnologies] printed a special arm for that, and you can find all the files on GitHub. Not only does the LED above the corresponding drawer light up, it lights up in a color that represents the inventory levels. We assume green/yellow/red, but [APTechnologies] doesn’t specify.

Don’t know what to do with some of your components? If they’re really old, they may be no good anymore. It just depends.

New Micro YARH.IO Designed For Skilled Operators

A few months back we brought you word of the YARH.IO, an extremely impressive Raspberry Pi portable that featured rugged good looks and a unique convertible design made possible by a removable keyboard. One of the most appealing aspects of the design was that everything was built from off-the-shelf modules; it only took a couple jumper wires and some scrap perfboard to get everything wired up inside the 3D printed enclosure.

The downside of this construction style was that the finished product was a bit chunkier than was strictly necessary. But that’s not the case with the new YARH.IO Micro. The palm-sized portable looks almost exactly like the original, though it had to ditch the removable keyboard in the shrinking process. Gone as well is the touch pad, though with the touch screen capabilities of the Pimoroni Hyper Pixel four inch IPS display, that’s not much of a problem.

What’s the catch? Well, at a glance we can tell you this one is considerably harder to build. For one thing, you’ll need to remove the Ethernet and USB connectors from the Pi 3B+. The USB ports get relocated, but Ethernet understandably has to be left on the cutting room floor. Nothing to worry about with the GPIO pins, the display takes up all of those, but you’ll probably want to wire the I2C lines to the female header on the side of the case so you can add external hardware and sensors.

You also need to nestle an Arduino Pro Micro in there to communicate status information about the battery to the operating system over I2C. If you wanted to save a little wiring you could probably leave off the DS3231 RTC module, but it depends on how often you’ll be able to sync up with NTP.

While it may be more difficult to assemble than its predecessor, it’s certainly not unapproachable. Once again, no custom PCBs or exotic components are required. You might be doing a lot more soldering (and desoldering) than you would have before, but it’s nothing that the average Hackaday reader isn’t capable of. For your troubles, you’ll get a exceptionally portable Linux machine that’s ripe for hacking and modification.

If the time and effort it will take to put together a YARH.IO is a bit more than you’re willing to invest right now, there’s always commercial alternatives like the DevTerm. But whether you go with the original or this new Micro edition, we think the satisfaction of having built the whole thing yourself will be more than worth it.

Raspberry Pi Tally Lights

Running a camera studio is a complicated affair from pretty much every angle. Not only is the camera gear expensive but the rest of the studio setup takes care and attention down to the lighting as well. When adding multiple cameras to the mix, like for a television studio, the level of complexity increases exponentially. It’s great to have a few things that simplify the experience of running all of this equipment too, without the solution itself causing more problems than it solves, like these network-operated Raspberry Pi-powered tally lights.

A tally light is the light on a camera that lets the person being recorded know which camera is currently in use. Networking them all together often requires complex wiring or at least some sort of networking solution, which is what this particular build uses. However, the lights are controlled directly over HTTP rather than using a separate application which might need a port open on a firewall or router, which not only simplifies their use but doesn’t decrease network security.

The HTTP interface, plus all of the software and schematics for this build, are available on the project’s GitHub page. We imagine the number of people operating a studio and who are in need of a tally light system to be fairly low, but the project is interesting from a networking point-of-view regardless of application. If you do have a studio like this and are looking for other ways to improve it, we do have a simple teleprompter hack that might be right up your alley.

A Novel Micro Desktop Display For Your Raspberry Pi

Since its debut back in 2012 there have been a variety of inventive displays used with the Raspberry Pi. Perhaps you remember the repurposed Motorola phone docks, or you have one of those little displays that plugs into the expansion port. Inevitably the smaller options become disappointing as desktop displays, because while the advert triumphantly shows them sporting a Raspberry Pi OS desktop the reality is almost unusable. Until now.

Along comes [igbit] with a solution in the form of a little SPI display with a different approach to displaying a desktop. Instead of displaying a matchbox-sized desktop over the whole screen it divides into two halves. At the top is a representation of the desktop, while below it is a close-up on the area around the mouse pointer.

Unexpectedly its mode of operation is very accessible to the non-Linux guru, because it works through a Python script that takes screenshots of both areas and passes them as a composite to the display. An area the size of the magnified window is drawn around the mouse pointer, allowing it to be easily located on the tiny desktop. It relies on the main display being pushed to the HDMI output, so if the Pi is otherwise headless then its configuration has to be such that it forces HDMI use. The result isn’t something that would help you with the more demanding desktop tasks, but it provides a neat solution to being able to use a Pi desktop on a tiny screen.

Of course, in a pinch you can always use your mobile phone.