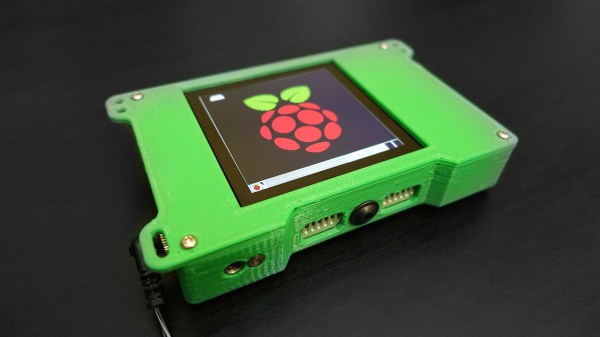
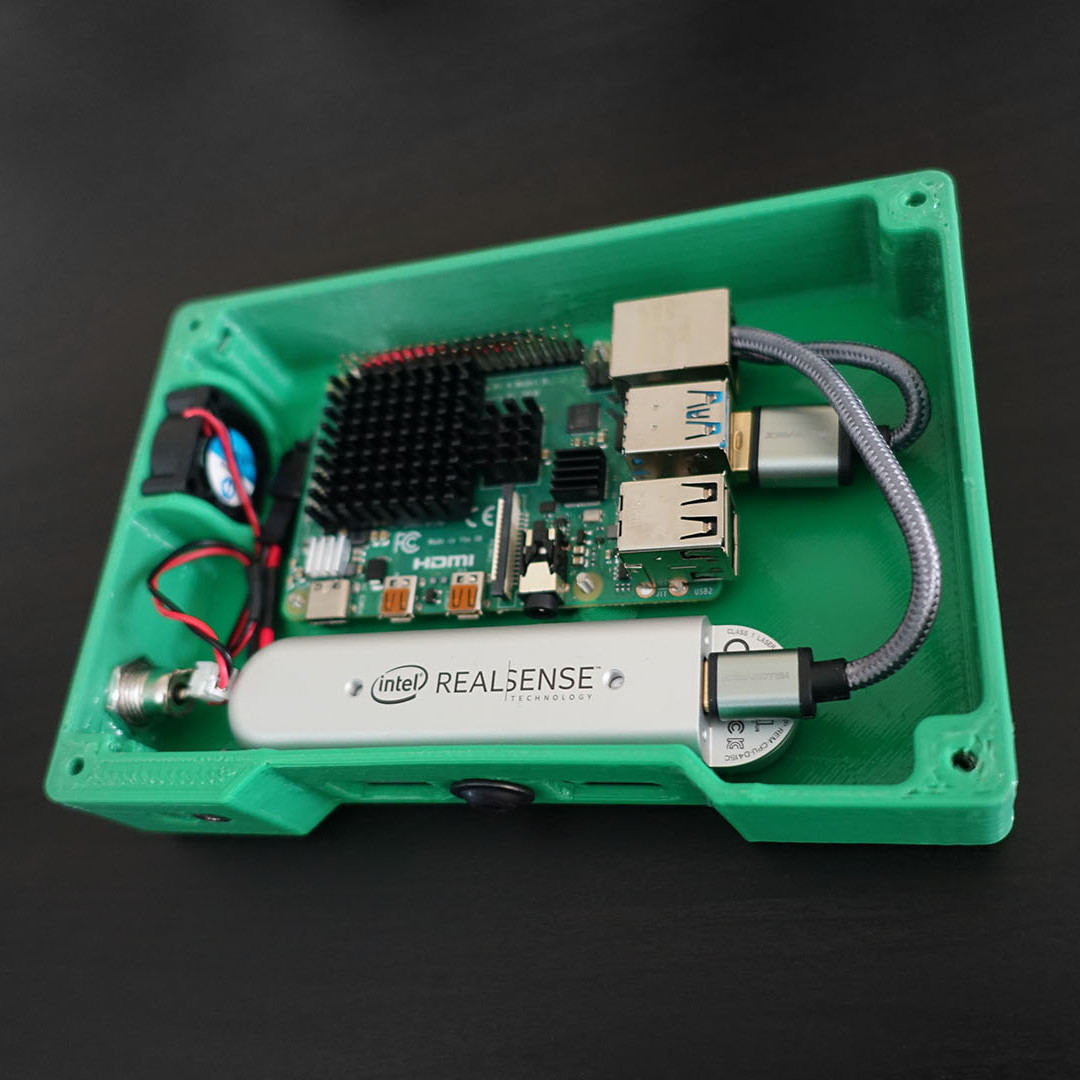
The Future’s So Bright, I Gotta Wear LCDs

Whether it was rays from the Sun that made a 150 million kilometer trip just to ruin your day or somebody’s unreasonably bright aftermarket headlights, at some point or another we’ve all experienced the discomfort of bright spots in our eyes. But short of wearing welder’s goggles all the time, what can we do? Luckily for us, [Nick Bild] has come up with a solution. Sort of.

Modifying the LCD so it can be seen through.

By adding LCDs to a pair of standard sunglasses, [Nick] has created something he’s calling “Light Brakes”. The idea is that the LCDs, having their backings removed, can essentially be used as programmable shutters to block out a specific part of the image that’s passing through them. With the addition of a Raspberry Pi and a camera, the Light Brakes can identify an unusually bright source of light and block it from the wearer’s vision by drawing a sufficiently large blob on the LCDs.

At least, that’s the idea. As you can see in the video after the break, the LCDs ability to block out a moving source of light is somewhat debatable. It’s also unclear what, if any, effect the “blocking” would have on UV, so you definitely shouldn’t try looking at the sun with a pair of these.

That said, a refined version of the concept could have some very interesting applications. For instance, imagine a pair of glasses that could actively block out advertisements or other unpleasant images from your field of vision. If this all sounds a bit like something out of an episode of Black Mirror, that’s because it is.

Attentive readers may have noticed that this isn’t the first time these fashionable frames have graced the pages of Hackaday. Over the summer they were used in a very interesting field of view home automation project that [Nick] was working on. This also isn’t the first time he’s stuck a pair of small LCDs in front of his eyes in the name of progress. We’re starting to identify something of a trend here, though we certainly aren’t complaining.

Continue reading “The Future’s So Bright, I Gotta Wear LCDs”

Advertise Your Conference Schedule Via SSID

Whether it’s been a Python script running on a Linux box or an ESP8266, abusing using WiFi SSIDs to convey messages is hardly a new trick. But for DerbyCon 2019, [vgrsec] wanted to do put together something a little unique. Dare we say, even useful. Rather than broadcast out SSID obscenities or memes, this Raspberry Pi created fake WiFi networks that told everyone what talks were coming up.

The concept here is fairly simple: there’s a text file in /boot that contains the truncated names of all the talks and workshops in the schedule, one per line, and each line starts with the time that particular event is scheduled for. The script that [vgrsec] wrote opens this text file, searches for the lines beginning with the current time, and generates the appropriate SSIDs. With the number of tracks being run at DerbyCon, that meant there could be as many as five SSIDs generated at once.

Now in theory that would be enough to pull off this particular hack, but there’s a problem. The lack of an RTC on the Raspberry Pi means it can’t keep time very well, and the fact that the WiFi adapter would be busy pumping out SSIDs meant the chances of it being able to connect to the Internet and pull down the current time over NTP weren’t very good.

As the system was worthless without a reliable way of keeping time, [vgrsec] added an Adafruit PiRTC module to the mix. Once the time has been synchronized, the system could then run untethered via a USB battery bank. We might have put it into an enclosure so it looks a little less suspect, but then again, there were certainly far more unusual devices than this to be seen at DerbyCon.

Of course, if you’re OK with just dumping the entire schedule out at once and letting the user sift through the mountain of bogus SSIDs themselves, that’s even easier to accomplish.

Vintage Transistor Radio Gets Internet Transplant

The invention of the transistor revolutionized radio, allowing receivers to be made far more compact and portable than ever before. In the middle of the 20th century, the devices exploded in popularity, and pocket transistor radios took the market by storm. [MisterM] had fond memories of such times, and when he found a 1970s Flirt radio at a car boot sale, it led to a cute little build.

The radio was stripped of its original hardware, with [MisterM] preferring internet radio to the terrestrial variety. In its place, a Raspberry Pi Zero was installed. This was fitted with a cavalcade of off-the-shelf modules to make it fit for pumping out the tunes. A Speaker PHAT was used for audio, while an Adafruit Micro Lipo board handled battery charging and a Pimoroni Lipo Shim served as the power supply. All this was bundled up inside the original casing.

The radio’s controls are a neat hack. The original volume and tuning dials were removed, sliced up, and glued onto two lever microswitches. This allows them to act as buttons instead. A new power switch was installed behind the original, and the Speaker PHAT’s LEDs were placed behind the tuning dial to act as a rudimentary display.

It’s a tidy build that repurposes an attractive vintage artefact into a device of the internet age, while remaining externally the same. [MisterM] has form in this space, with his vintage radio console build and video doorbell being particular highlights. Video after the break.

Continue reading “Vintage Transistor Radio Gets Internet Transplant”

A Low-Power Solution To Streamlining Sensor Data For IoT

For home use IoT systems, getting sensor data from tons of physical locations centralized to a single Raspberry Pi can be a difficult job, especially when considering the power consumption that’s necessary for doing it all over WiFi. When you’re using an ESP8266, for instance, swapping out batteries and accounting for connectivity issues can be a major hassle for a long-term solution. The NoCAN platform, created by [Alain Pannetrat], solves this problem using a wired approach that improves the use of the CAN bus.

Since SPI and I2C only work for short distances, approaches like RS-485 and CAN bus are a better bet for this type of setup. For systems with one centralized point, RS-485 works best – thus, the CAN bus is the better approach when you’re considering using multiple masters in a single environment.

CAN devices typically need a static address, so messaging involves sending data to the known address of the destination device. With NoCAN, a dynamic address assignment scheme allows nodes to request an address from a node manager on boot-up (similar to DHCP). A command line application also allows users to send and receive message from nodes using a pub/sub implementation – a device sends messages to a channel, and every device subscribed to the channel receives the message.

The hardware for the NoCAN platform consists of a Raspberry Pi with a “PiMaster” HAT and an Arduino-compatible CANZERO board. The PiMaster HAT uses an STM32F042 ARM Cortex M0 MCU, acting as an interface between the Pi and the CAN bus as well as preventing over-current events with a software-controlled smart switch. The CANZERO is based on the the SAMD21G18 ARM Cortex M0+ running at 48MHz, similar to the Arduino MKR Zero, with CAN bus networking using the STM32F042 ARM Cortex M0. The double MCU design allows the secondary MCU to reset the primary if it gets stuck due to a programming error, with the messages sent over the CAN bus.

To join the network together, a four-wire cable daisy-chains the nodes in the bus network, providing connectivity for up to 1000 feet. Either 12V or 24V DC power runs through the network, stepping down to 5V or 3.3V at each node. The approach is similar to PoE (power over Ethernet), although it is slower and lower in cost. Overall, it seems like a good solution for environments where wireless connectivity simply doesn’t cut it.

Robot Allows Remote Colleagues To Enjoy Office Shenanigans

[Esther Rietmann] and colleagues built a Telepresence Robot to allow work at home teammates to have a virtual, but physical presence in the office. A telepresence robot is like a tablet mounted on a Roomba, providing motion capability in addition to an audio/video connection. Built during a 48 hour hackathon, it is a bit crude under the hood and misses out on some features, such as a bidirectional video feed. But overall, it pretty much does what is expected from such a device.

The main structure is build from cheap aluminium profiles and sheets. A Raspberry Pi is at the heart of the electronics hardware, with a servo mounted Pi-camera and speaker-microphone pair taking care of video and audio. The two DC motors are driven by H-bridges controlled from the Pi and an idle swivel caster is attached as the third wheel. The whole thing is powered by a power bank. The one important thing missing is an HDMI display which can show a video feed from the remote laptop camera. That may have been due to time constraints, but this feature should not be too difficult to add as a future upgrade. It’s important for both sides to be able to see each other.

The software is built around WebRTC protocol, with the WebRTC Extension from UV4L doing most of the heavy lifting. The UV4L Streaming Server not only provides its own built-in set of web applications and services, but also embeds a general-purpose web server on another port, allowing the user to run and deploy their own custom web apps. This allowed [Esther Rietmann]’s team to build a basic but functional front-end to transmit data from the remote interface for controlling the robot. The remote computer runs a Python control script, running as a system service, to control the drive motors and camera servo.

The team also played with adding basic object, gesture and action recognition features. This was done using PoseNet – a machine learning model, which allows for real-time human pose estimation in the browser using TensorFlowJS – allowing them to demonstrate some pose detection capability. This could be useful as a “follow me” feature for the robot.

Another missing feature, which most other commercial telepresence robots have, is a sensor suite for collusion avoidance, object detection and awareness such as micro switches, IR / ultrasonic detectors, time of flight cameras or LiDAR’s. It would be relatively easy to add one or several sensors to the robot.

If you’d like to build one for yourself, check out their code repository on Github and the videos below.

Continue reading “Robot Allows Remote Colleagues To Enjoy Office Shenanigans”

DIY Video Microscopy

Owning a Microscope is great fun as a hobby in general, but for hackers, it is a particularly useful instrument for assembly and inspection, now that we are building hardware with “grain of sand” sized components in our basements and garages. [voidnill] was given an Eduval 4 microscope by a well-meaning friend during a holiday trip. This model is pretty old, but it’s a Carl Zeiss after all, made in Jena in the erstwhile GDR. Since an optical microscope was of limited use for him, [voidnill] set about digitizing it.

He settled on the Raspberry-Pi route. The Pi and a hard disk were attached directly to the frame of the microscope, and a VGA display connected via a converter. Finally, the Pi camera was jury-rigged to one of the eyepieces using some foam. It’s a quick and dirty hack, and not the best solution, but it works well for [voidnill] since he wanted to keep the original microscope intact.

The standard Pi camera has a wide angle lens. It is designed to capture a large image and converge it on to the small sensor area. Converting it to macro mode is possible, but requires a hack. The lens is removed and ‘flipped over’, and fixed at a distance away from the sensor – usually with the help of an extension tube. This allows the lens to image a very small area and focus it on the (relatively) large sensor. This hack is used in the “OpenFlexure” microscope project, which you can read about in the post we wrote earlier this year or at this updated link. If you want even higher magnification and image quality, OpenFlexure provides a design to mate the camera sensor directly to an RMS threaded microscope objective. Since earlier this year, this open source microscope project has made a lot of progress, and many folks around the world have successfully built their own versions. It offers a lot of customisation options such as basic or high-resolution optics and manual or motorised stages, which makes it a great project to try out.

If the OpenFlexure project proves to be an intimidating build, you can try something easier. Head over to the PublicLab where [partsandcrafts] shows you how to “Build a Basic Microscope with Raspberry Pi”. It borrows from other open source projects but keeps things simpler making it much easier to build.

In the video embed below, [voidnill] gives a brief overview (in German) of his quick hack. If you’ve got some microscope hacks, or have built one of your own, let us know in the comments section.

Continue reading “DIY Video Microscopy”

Recreating Lord Nikon’s Laptop From Hackers

The outlandish computers from 1995’s Hackers are easily one of the most memorable elements of the iconic cult classic. In the film, each machine is customized to reflect the individual hacker that operates it, and feature everything from spray painted camouflage paint schemes to themed boot animations based on the owner’s personal iconography. But what might not be so obvious is that the real-life props took a considerable amount of hardware hacking before they were ready for their big-screen debut.

A group of dedicated Hackers fans have created a website to document, and ideally recreate, all the custom work that went into the various pieces of tech featured in the film. As explained by [Nandemoguy], the group’s latest triumph is a screen-accurate build of Lord Nikon’s laptop. The final product not only looks just like the machine used in the film, but thanks to the internal Raspberry Pi, is far more powerful than the original computer would have been.

Unless you’re on the team over at HackersCurator.com, you might not know that the laptops in the film were handmade chimeras that combined the external cases of various PCs with (usually) the internals of an Apple Powerbook 180c. Why the prop masters of the film would have gone through so much trouble to create the character’s computers is not immediately clear, but if we had to guess, presumably it was due to the requirements of the over-the-top graphical interfaces that are featured so heavily in the film.

At any rate, the replica created by [Nandemoguy] is built in much the same way. At least for the parts you can see on the outside, anyway. He goes through the considerable case modifications required to replace the original keyboard on the Toshiba Satellite T1850 with a Powerbook keyboard, which as you might have guessed, has been converted into a USB HID device with a Teensy microcontroller. He even cuts the ports off the back of the Mac’s motherboard and glues them in place around the backside of the machine. But everything else, including the LCD, is all new hardware. After all, who really wants to go through all that trouble just to have a fancy Powerbook 180c in 2019?

Even if you weren’t a fan of Hackers, the level of detail and effort put into this build it absolutely phenomenal. It’s interesting to see the parallels between this replica and the burgeoning cyberdeck scene; it seems like with a Teensy, a Raspberry Pi, and enough Bondo, anything can be turned into a functional computer.

Continue reading “Recreating Lord Nikon’s Laptop From Hackers