Building A K9 Toy

[James West] has a young Doctor Who fan in the house and wanted to build something that could be played with without worrying about it being bumped and scratched. So, instead of creating a replica, [James] built a simple remote controlled K9 toy for his young fan.

K9 was a companion of the fourth Doctor (played by Tom Baker) in the classic Doctor Who series. He also appeared in several spin-offs. A robotic dog with the infinite knowledge of the TARDIS at hand, as well as a laser, K9 became a favorite among Who fans, especially younger children. [James] wanted his version of K9 to be able to be controlled by a remote control and be able to play sounds from the TV show.

Using some hand-cut acrylic, [James] built K9’s body, then started on plans for the motion control and brains. [James] selected the Raspberry Pi Zero for the controller board, a Speaker pHat for the audio, a couple of motors to move K9 around, and a motor controller. K9 is controlled by a WiiMote and has a button on his back to start pairing with the WiiMote (K9 answers with “Affirmative” when the pairing is successful.) When it came to the head, [James] was a little overwhelmed by trying to make the head in acrylic, so he got some foam board and used that instead. A red LED in the head lights up through translucent red acrylic.

It’s a great little project and [James] has put the Python code up on Github for anyone interested. We’ve had a couple of robot dog projects on the site over the years, like this one and this one.

Continue reading “Building A K9 Toy”

Converting A Robotic Motor For Lego Blocks

The Internet has brought a lot of advantage to life, not the least of which is access to really cheap electronic parts. [KarelK166] was buying cheap geared motors for projects, but they didn’t easily work with Lego blocks. He found an easy way to adapt them and–lucky for us–decided to share.

The process is pretty simple. The gearbox has two screws and an elastic band holding it together. Once the gears are exposed, you can drill a hole in two of them with a 4.8mm drill bit. This might take a little practice since the gear needs to hold still, but you also don’t want to crush the plastic teeth. You also need to enlarge a hole in the casing, but that’s easier to clamp down in a vise.

Continue reading “Converting A Robotic Motor For Lego Blocks”

Robot Draws Using Robust CNC

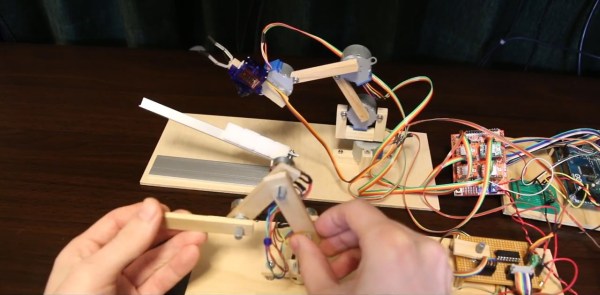
While initially developed for use in large factory processes, computer numeric control (CNC) machines have slowly made their way out of the factory and into the hands of virtually anyone who wants one. The versatility that these machines have in automating and manipulating a wide range of tools while at the same time maintaining a high degree of accuracy and repeatability is invaluable in any setting. As an illustration of how accessible CNC has become, [Arnab]’s drawing robot uses widely available tools and a CNC implementation virtually anyone could build on their own.

Based on an Arudino UNO and a special CNC-oriented shield, the drawing robot is able to execute G code for its artistic creations. The robot is capable of drawing on most flat surfaces, and can use almost any writing implement that will fit on the arm, from pencils to pens to brushes. Since the software and hardware are both open source, this makes for an ideal platform on which to build any other CNC machines as well.

In fact, CNC is used extensively in almost everything now, and are so common that it’s not unheard of to see things like 3D printers converted to CNC machines or CNC machines turned into 3D printers. The standards used are very well-known and adopted, so there’s almost no reason not to have a CNC machine of some sort lying around in a shop or hackerspace. There are even some art-based machines like this one that go much further beyond CNC itself, too.

Continue reading “Robot Draws Using Robust CNC”

Controlling A Robot Over The Internet Grows Up

Since the beginning of the Internet people have been controlling robots over it, peering at grainy gifs of faraway rec rooms as the robot trundles around. RunMyRobot.com has taken that idea and brought it fully into the teens. These robots use wifi or mobile connections, are 3D printed, and run Python.

The site aims to provide everything to anyone who wants to participate. If you’re just an anonymous visitor, you can still play with the robots, but anyone can also play with the same one, and sometimes a whole bunch of visitors create a cacophony of commands that makes it not fun—but you can always move to a different robot. Logged-in members of the site have the option to take over a robot and not allow anyone else to use it.

If you want to build a robot and add it to the site, the creators show how to do that as well, with a Github code repository and 3D-printable designs available for download, as well as YouTube instructions on how to build either the printed robot or one made with off-the shelf parts. They’re also looking for patrons to help with development, with the first item on their list being a mobile app.

Thanks to [Sim] for the link.


ESP32 Mini Robot Packs Sensors And 4WD

[Stefan]’s Mini WiFi/BLE 4WD robot platform (seen next to a matchbox above) packs an impressive capability into a tiny rover. It’s based on a SparkFun ESP32 Thing, a very compact way to add wireless control to your project. Compare it to some giant old UNO with a WiFi shield, these boards are small but powerful, as well as an easy adoption for Arduino fans.

[Stefan] beefed up the robot with a BNO055 module to determine orientation, an APDS-9930 proximity sensor, as well as four CNY70 IR proximity sensors on the bottom, used for line-following. A pair of 6 V motors move the robot, with a DC-DC step up converter boosting the LiPo’s 3.7 V. It’s impressive how many components [Stefan] crammed inside the shell; they’re all packed in there snugly.

The concept behind the robot is that it’s a generic platform that could be customized as needed, and [Stefan] has versions with a LEGO dart gun as well as a camera. The robot’s code resides on GitHub and the custom 3D-printed chassis is up on Thingiverse.

If you like ESP32 projects you should be sure to check out the Monster Board and the Hamster Tracker we posted recently.

Biped Bob Walks And Dances

If you have a few servo motors, an Arduino, and a Bluetooth module, you could make Biped Bob as a weekend project. [B. Aswinth Raj] used a 3D printer, but he also points out that you could have the parts printed by a service or just cut them out of cardboard. They aren’t that complex.

Each of Bob’s legs has two servo motors: one for the hip and one for the ankle. Of course, the real work is in the software, and the post breaks it down piece-by-piece. In addition to the Arduino code, there’s an Android app written using Processing. You can build it yourself, or download the APK. The robot connects to the phone via BlueTooth and provides a simple user interface to do a few different walking gaits and dances. You can see a few videos of Biped Bob in action, below.

This wouldn’t be a bad starter project for a young person or anyone getting started with robotics, especially if you have a 3D printer. However, it is fairly limited since there are no sensors. Then again, that could be version two, if you were feeling adventurous.

We have mixed feelings about the BlueTooth control. BlueTooth modules are cheap and readily available, but so are ESP8266s. It probably would not be very difficult to put Bob on WiFi and let him serve his own control page to any web browser.

If Bob meets Jimmy, he may find himself envious. However, Jimmy would be a little more challenging to build. We’ve actually seen quite a few walking ‘bots over the years. Continue reading “Biped Bob Walks And Dances”

Universal Robots Vision-Based LEGO Stacker

[Thomas Kølbæk Jespersen] and his classmates at Aalborg University’s Robot Vision course used MATLAB code and URscript to program a Universal Robots UR5 to stack up Duplo bricks. The Duplo bricks are stacked into low-fi Simpsons characters — yellow for Homer’s head, white for his shirt, and blue for his pants, for example.

The bricks are scattered randomly on a nearby table, while a camera mounted above the table scans the bricks and assists in determining the location, color, and orientation of the elements. This involves blob analysis which helps the computer decide what pixel is part of a brick and what isn’t. After running a recursive grassfire algorithm with 4-connectivity, the computer gives each pixel a number and assigns it to a blob.

To determine the orientation (the bricks are all assumed to be stud-side up and not overlapping) the blob is divided into quadrants and within each quadrant, the distance between the center of the blob and its farthest pixel is measured. This technique is not likely to work as well with a brick that isn’t square. Each brick’s location in pixels is translated into Cartesian coordinates, making it a cinch for the robot to pick it up. See [Thomas]’s GitHub for MATLAB and URscript code.

Looking for more UR5 projects? Check out the Sewbo garment-making robot we published last year.

Continue reading “Universal Robots Vision-Based LEGO Stacker”