This “security” is so outrageous we had to look for hidden cameras to make sure we’re not being pranked. We don’t want to ruin the face-palming realization for you, so before clicking past the break look closely at the image above and see if you can spot the exploit. It’s plain as day but might take a second to dawn on you.
My printer has other issues that I’m still tuning out, but the warping in PLA and excessive surface roughness has all the signs of over extrusion.
I have an old Prusa i2 that, like an old car, has been getting some major part replacements lately after many many hours of service. Recently both the extruder and the extruder motor died. The extruder died of brass fill filament sintering to the inside of the nozzle (always flush your extruder of exotic filaments). The motor died at the wires of constant flexing. Regardless, I replaced the motors and found myself with an issue; the new motor and hotend (junk motor from the junk bin, and an E3D v6, which is fantastic) worked way better and was pushing out too much filament.
The hotend, driver gear, extruder mechanics, back pressure, motor, and plastic type all work together to set how much plastic you can push through the nozzle at once. Even the speed at which the plastic is going through the nozzle can change how much friction that plastic experiences. Most of these effects are somewhat negligible. The printer does, however, have a sort of baseline steps per mm of plastic you can set.
The goal is to have a steps per mm that is exactly matched to how much plastic the printer pushes out. If you say 10mm, 10mm of filament should be eaten by the extruder. This setting is the “steps per mm” in the firmware configuration. This number should be close to perfect. Once it is, you can tune it by setting the “extrusion multiplier” setting in most slicers when you switch materials, or have environmental differences to compensate for.
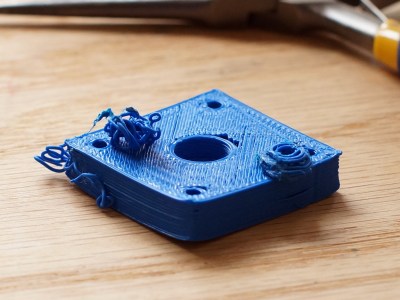
This little guy lets you tune the steps per mm exactly.
The problem comes in measuring the filament that is extruded. Filament comes off a spool and is pulled through an imprecisely held nozzle in an imprecisely made extruder assembly. On top of all that, the filament twists and curves. This makes it difficult to hold against a ruler or caliper and get a trustworthy measurement.
I have come up with a little measuring device you can make with some brass tubing, sandpaper, a saw (or pipe cutter), a pencil torch, solder, and some calipers. To start with, find two pieces of tubing. The first’s ID must fit closely with the filament size you use. The second tube must allow the inside tubing to slide inside of it closely. A close fit is essential.
We never have enough peripherals on a microcontroller. Whether it’s hardware-driven PWM channels, ADCs, or serial communication peripherals, we always end up wanting just one more of these but don’t really need so many of those. Atmel’s new version of the popular ATmega328 series, the ATmega328PB, seems to have heard our pleas.
We don’t have a chip in hand, but the datasheet tantalizes. Here’s a quick rundown of the new features:
Two more 16-bit timer/counters. This is a big deal when you’re writing code that’s not backed up by an operating system and relies on the hardware for jitter-free timing.
Two of each USART, SPI, and I2C serial instead of one of each. Good when you use I2C devices that have limited address spaces, or when you need to push the bits out really fast over SPI.
Ten PWM channels instead of six. This (along with the extra 16-bit timers) is good news for anyone who uses PWM — from driving servos to making music.
Onboard capacitive sensing hardware: Peripheral Touch Controller. This is entirely new to the ATmega328PB chip, and looks like it’ll be interesting for running capacitive sense buttons without additional ICs. It relies on Atmel’s QTouch software library, though, so it looks like it’s not a free-standing peripheral as much as an internal multiplexer with maybe some hardware-level filtering. We’ll have to look into this in detail when we get our hands on one of the chips.
So what does this mean for you? A quick search of the usual suspects shows the chips in stock and shipping right now, and there’s an inexpensive dev kit available as well. If you write your own code in C, taking advantage of the new features should be a snap. Arduino folks will have to wait until the chips (and code support) work their way into the ecosystem.
It’s difficult to say if [Aaron Barr], then CEO of software security company HBGary Federal, was in his right mind when he targeted the notorious hacking group known as Anonymous. He was trying to correlate Facebook and IRC activity to reveal the identities of the group’s key figures. In the shadowy world of black-hat hacking, getting your true identity revealed is known as getting doxed, and is something every hacker fears. Going after such a well-known group would be sure to get his struggling company some needed publicity. It would also have the most unfortunate side effect of getting the hacking groups attention as well.
Aaron Barr
Perhaps [Aaron Barr] expected Anonymous to come after him…maybe he even welcomed the confrontation. After all, he was an ‘expert’ in software security. He ran his own security company. His CTO [Greg Hoglund] wrote a book about rootkits and maintained the website rootkits.com that boasted over 80 thousand registered users. Surely he could manage a few annoying attacks from a couple of teenage script kiddies playing on their parent’s computer. It would have been impossible for him to know how wrong he was.
It took the handful of hackers less that 24 hours to take complete control over the HBGary Federal website and databases. They also seized [Barr’s] Facebook, Twitter, Yahoo and even his World of Warcraft account. They replaced the HBGary Federal homepage with this declaration – with a link to a torrent file containing some 50,000 emails resting ominously at the bottom. At the same time, they were able to use social engineering techniques to SSH into the rootkit.com site and delete its entire contents.
It became clear that these handful of Anonymous hackers were good. Very good. This article will focus on the core of the HBGary hackers that would go on to form the elite LulzSec group. Future articles in this new and exciting Dark Arts series will focus on some of the various hacking techniques they used. Techniques including SQL injection, cross-site scripting, remote file inclusion and many others. We will keep our focus on how these techniques work and how they can be thwarted with better security practices.
[Jake Davis] – aka [Topiary] – might have been the least technically skilled of the group, but he made up for it in his ability with words. He was by far the most articulate of the group and commanded the official LulzSec Twitter feed, where he taunted the group’s victims and appeased their ever-growing fan base. [Topiary] goes back to the days of Anonymous and its origin on the popular image board 4chan. Being articulate and quick-witted, he was exceptionally good at doing prank calls while streaming them live to eager fans. His talent did not go unrecognized and the role of “mouthpiece” for Anonymous was his for the taking. Whenever a home page was defaced and replaced with an official Anonymous message, he was the author. The hacked HBGary homepage linked above was [Topiary’s] work.
Lest we leave you with the impression that [Topiary] was not a hacker, he learned a great deal of technical skills during his involvement with Anonymous and later Lulzsec. When he was arrested at his home on the Shetland Islands, he had 17 virtual machines running on an encrypted drive. His last tweet before his arrest – “You cannot arrest an idea”.
[Mustafa Al-Bassam] – aka [Tflow] – was a bit socially awkward, but you would have never known it based on his demeanor in the secluded chat rooms of the Lulzsec hackers. Cool, calm and collected, [Tflow] never got involved with the many arguments that took place. The ability to check his emotions combined with advanced coding skills led his fellow hackers to believe he was much older than he really was. [Pwnsauce], another Lulzsec member whom we will not cover due to lack of information, believed he was at least 30 years old.
It was [Tflow] who first shed light on [Aaron Barr’s] plans to dox the Anonymous “leaders”. It was [Tflow] who wrote an advanced piece of code that allowed the citizens of Tunisia to get past their government’s ISP restrictions during the Arab Spring and post on social media. Let that sink in for a minute…a 16-year-old teenager had empowered an entire nation of people with a PHP script. [The Jester], a hacker who commanded a massive bot-net, once tried to hoodwink [Tflow] and his fellow hackers with a malicious script. [Tflow] took the script, reduced it from a few dozen lines to only two lines without limiting functionality, and sent it back to [The Jester] with the following note: Try this instead.
[Ryan Ackroyd] was big into computer video games as a teen. He liked hacking them and hung out online with other like-minded people. A girl by the name of [Kayla] joined their circle of friends and [Ryan] enjoyed her company. A rival video game hacking group tried to hack [Ryan’s] group, and targeted the weakest link – 16-year-old [Kayla]. They destroyed her social networks and even got into her parent’s bank account. [Ryan] and his friends were furious. They all went after their rival, using the alias [Kayla] in her honor. Their retribution was so devastating that “Kayla” earned a reputation across this particular corner of the internet as someone not to cross. Over the years, the group fell apart, but [Ryan] remained and kept the alias of a 16 year old girl named [Kayla] who shouldn’t be messed with.
It was [Kayla] who socially engineered her way into rootkit.com. It was [Kayla] who discovered the SQL injection insecurity on the HBGary Federal website. She later wrote a program that scanned URLs many times per second looking for zero days. She’s a self-taught reverse engineer and was arguably the most skilled hacker on the Lulzsec team. She even had a trip wire in her apartment that wiped all hard drives when the police entered, and was branded by the courts as “highly forensically aware”. That’s legalese for “This guy knows his stuff”. She has some wise words in this reddit thread.
[Hector Monsegur] – aka [Sabu] – was the oldest and most mature of the Lulzsec hackers. He was the recognized leader of the group. He drove daily operations and squashed arguments. He was also a very skilled hacker himself, coming from a background of hacking government websites in his native Puerto Rico. [Sabu] was a hactivist, and believed in hacking for a social cause, while many of his team were still beholden to their 4chan/b/ days of hacking “for the lulz”. [Sabu] was not only a hacker of computers, he was a hacker of people, and highly skilled in the art of social engineering. Using his skills, he was able to steer LulzSec in the direction he wanted it to go.
[Sabu] was the first of the LulzSec hackers to get doxxed. When he was confronted by the FBI with a 100+ year prison sentence, he could not bear the idea of his kids growing up without him and turned informant. He has only recently returned to twitter, much to the annoyance of Anonymous.
Now What?
You have met the core of the LulzSec hackers. There are two more that we did not talk about due to lack of information: [Pwnsauce] and [AVUnit]. As of today, no one knows the true identity of [AVUnit]. It’s possible there are even more that we don’t know about. However, it is generally recognized that the hackers covered here were the core members.
Now that we know a little bit about the people behind some of the most remarkable hacks of modern times, we will go into detail about how they were able to carry these hacks out. If you’re looking for a “How to Hack a Website 101” tutorial, this series of articles will disappoint you. But if you want to know how these former hackers were able to do what they did, you will find this series quite enjoyable. We’re not just going to talk about the various techniques used, we’re going to understand how they work on a fundamental level. So stay tuned and keep your virtual machines on standby.
Sources
We Are Anonymous: Inside the Hacker World of LulzSec, Anonymous, and the Global Cyber Insurgency, by Parmy Olsen. ISBN-978-0316213523
[NightHawkInLight] has been playing around with the diamagnetic properties of bismuth. Diamagnetic materials get a lot of attention due to their strange ability to produce the opposite of the magnetic field going through them. In simpler terms, metals like iron are attracted to magnets; metals like bismuth repel them.
[NightHawkInLight] built his own interpretation of a common lab example used to demonstrate this remarkable property, a levitator. A levitator is made by sandwiching a magnet between two plates of diamagnetic material. One of the plates is given a magnetic field opposite of the magnet underneath it by a stronger magnet placed some distance away. When this is done, the magnet in between wants to repel away from the plate above, only to find that as it gets closer to the plate below it is equally repelled, creating a stable system.
If you could actually buy 16 Raspberry Pi Zeros, you might be able to build your very own Raspberry Pi Cluster for only $80! Well… minus the cost of the board to tie them all together…
A Japanese company called Idein is developing a Raspberry Pi module called the Actbulb for computational sensing and data analysis. In order to perform internal testing they decided to make things easier for themselves by developing a board to allow them to plug in not one, not two, but sixteen Raspberry Pi Zeros:
Since we will use Pi’s GPU for image processing, deep learning, etc. We need real Pis but not just Linux machines. Another reason. It can be used for flashing eMMCs of our devices via USB ports when we have to do that by ourselves.
As some of you may or may not know, I’m interested in everything exoskeleton related. I’ve been messing around with my own designs for the past year or so, and just this past weekend, tested out the latest lower body design. There are a lot of boring (and some would say safe) ways to test this. But that’s no fun. For my test I used the lower-half of the exoskeleton to pick up a Mini Cooper.
You might remember my original upper-body design which was something I threw together in my garage as a proof of concept. It worked well for what it was, and surprisingly, took the internet by storm — amassing over a million views in a single week for a video of me curling 170lbs in my backyard. The fire had started — I knew I had to make something better. And that was the beginning of my quest to build a full-body powered exoskeleton.
The biggest problem with the original was a lack of back support — it didn’t matter how much weight I could lift, it was still my feeble human skeleton taking the weight. So it was time to go back to the drawing board, and start the design from the ground up. Continue reading “Homemade Exoskeleton Lifts Mini Cooper With Ease”→


 Name: Jake Davis

 Name: Hector Monsegur


 You might remember


