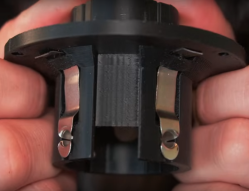
How To Make A 13 Mm Hole With A 1/2″ Drill Bit

As everyone knows, no matter how many drill bits one owns, one inevitably needs a size that isn’t on hand. Well, if you ever find yourself needing to drill a hole that’s precisely 13 mm, here’s a trick from [AvE] to keep in mind for doing it with a 1/2″ bit. It’s a hack that only works in certain circumstances, but hey, it just may come in handy some day.

So the first step in making a 13 mm hole is to drill a hole with a 1/2″ bit. That’s easy enough. Once that’s done, fold a few layers of tinfoil over into a small square and lay it over the hole. Then put the drill bit onto the foil, denting it into the hole (but not puncturing it) with the tip, and drill at a slow speed until the foil wraps itself around the bit like a sheath and works itself into the hole. The foil enlarges the drill bit slightly and — as long as the material being drilled cooperates — resizes the hole a tiny bit bigger in the process. The basic idea can work with just about any drill bit.

It’s much easier demonstrated than described, so watch it in action in the video around the 2:40 mark which will make it all very clear.

It’s not the most elegant nor the most accurate method (the hole in the video actually ends up closer to 13.4 mm) but it’s still something worth keeping in the mental toolbox. Just file it away along with laying your 3D printer on its side to deal with tricky overhangs.

Continue reading “How To Make A 13 Mm Hole With A 1/2″ Drill Bit”

Half The Reflow Oven You Expected

Toaster oven reflow projects are such a done deal that there should be nothing new in one here in 2025. Take a toaster oven, an Arduino, and a thermocouple, and bake those boards! But [Paul J R] has found a new take on an old project, and better still, he’s found the most diminutive of toaster ovens from the Australian version of Kmart. We love the project for the tiny oven alone.

The brains of the operation is an ESP32, in the form of either a TTGO TTDisplay board or an S3-Zero board on a custom carrier PCB, with a thermistor rather than a thermocouple for the temperature sensing, and a solid state relay to control mains power for the heater. All the resources are in a GitHub repository, but you may have to make do with a more conventionally-sized table top toaster oven if you’re not an Aussie.

If you’re interested, but want a better controller board, we’ve got you covered.

Metal Detector Built With Smartphone Interface

If you think of a metal detector, you’re probably thinking of a fairly simple device with a big coil and a piercing whine coming from a tinny speaker. [mircemk] has built a more modern adaptation. It’s a metal detector you can use with your smartphone instead.

The metal detector part of the project is fairly straightforward as far as these things go. It uses the pulse induction technique, where short pulses are fired through a coil to generate a magnetic field. Once the pulse ends, the coil is used to detect the decaying field as it spreads out. The field normally fades away in a set period of time. However, if there is metal in the vicinity, the time to decay changes, and by measuring this, it’s possible to detect the presence of metal.

In this build, an ESP32 is in charge of the show, generating the necessary pulses and detecting the resulting field. It’s paired with the usual support circuitry—an op-amp and a few transistors to drive the coil appropriately, and the usual smattering of passives. The ESP32 then picks up the signal from the coil and processes it, passing the results to a smartphone via Bluetooth.

The build is actually based on a design by [Neco Desarrollo], who presents more background and other variants for the curious. We’ve featured plenty of [mircemk]’s projects before, like this neat proximity sensor build. Continue reading “Metal Detector Built With Smartphone Interface”

Rolling Foam Cutter Gives Mattress A Close Shave

There’s many different reasons why somebody might have to hack together their own solution to a problem. It could be to save money, or to save time. Occasionally it’s because the problem is unique enough that there might not be an accepted solution, so you’re on your own to create one. We think the situation that [Raph] recently found himself in was a combination of several of these aspects, which makes his success all the sweeter.

The problem? [Raph] had a pair of foam mattresses from his camper van that needed to be made thinner — each of the three inch (7.62 cm) pieces of foam needed to have one inch (2.5 cm) shaved off as neatly and evenly as possible. Trying to pull that off over the length of a mattress with any kind of manual tools was obviously a no-go, so he built a low-rider foam cutter.

With the mattresses laying on the ground, the idea was to have the cutter simply roll across them. The cutter uses a 45″ (115 cm) long 14 AWG nichrome wire that’s held in tension with a tension arm and bungee cords, which is juiced up with a Volteq HY2050EX 50 V 20 A variable DC power supply. [Raph] determined the current experimentally: the wire failed at 20 A, and cutting speed was too low at 12 A. In the end, 15 A seemed to be the sweet spot.

The actual cutting process was quite slow, with [Raph] finding that the best he could do was about 1/8″ (3 mm) per second on the wider of the two mattresses. While the result was a nice flat cut, he does note that at some point the mattresses started to blister, especially when the current was turned up high. We imagine this won’t be a big deal for a mattress though, as you can simply put that side on the bottom.

In the end, the real problem was the smell. As [Raph] later discovered, polyurethane foam is usually cut mechanically, as cutting it with a hot wire gives off nasty fumes. Luckily he had plenty of ventilation when he was making his cuts, but he notes that the mattresses themselves still have a stink to them a couple days later. Hopefully they’ll finish outgassing before his next camping trip.

As you can imagine, we’ve covered a great number of DIY foam cutters over the years, ranging from the very simple to computerized marvels. But even so, there’s something about the project-specific nature of this cutter that we find charming.

Aluminum Business Cards Make Viable PCB Stencils

[Mikey Sklar] had a problem—namely, running low on the brass material typically used for making PCB stencils. Thankfully, a replacement material was not hard to find. It turns out you can use aluminum business card blanks to make viable PCB stencils.

Why business card blanks? They’re cheap, for a start—maybe 15 cents each in quantity. They’re also the right thickness, at just 0.8 mm 0.18 mm, and they’re flat, unlike rolled materials that can tend to flip up when you’re trying to spread paste. They’re only good for small PCBs, of course, but for many applications, they’ll do just fine.

To cut these, you’ll probably want a laser cutter. [Mikey] was duly equipped in that regard already, which helped. Using a 20 watt fiber laser at a power of 80%, he was able to get nice accurate cuts for the stencils. Thanks to the small size of the PCBs in question, the stencils for three PCBs could be crammed on to a single card.

If you’re not happy with your existing PCB stencil material, you might like to try these aluminium blanks on for size. We’ve covered other stenciling topics before, too.

Continue reading “Aluminum Business Cards Make Viable PCB Stencils”

A Decade Resistance Box From PCBs

One of those useful things to have around on your bench is a decade resistance box, essentially a dial-a-resistance instrument. They used to be quite expensive in line with the cost of close-tolerance resistors, but the prices have come down and it’s within reach to build your own. Electronic design consultancy Dekimo have a nice design for one made from a series of PCBs which they normally give out at trade fairs, but now they’ve released the files for download.

It’s released as Gerbers and BOM with a pick-and-place file only, and there’s no licence so it’s free-as-in-beer [Editor’s note: the license has been updated to CC-BY-SA], but that should be enough if you fancy a go. Our Gerber viewer is playing up so we’re not entirely sure how reliable using PCBs as wafer switches will be long-term, but since the pictures are all ENIG boards we’d guess the gold plating will be much better than the HASL on all those cheap multimeters.

We like this as a conference giveaway, being used to badges it’s refreshing to see a passive take on a PCB artwork. Meanwhile this isn’t the first resistance box we’ve seen with unconventional switches.

I2C Sniffing Comes To The Bus Pirate 5

While the Bus Pirate 5 is an impressive piece of hardware, the software is arguably where the project really shines. Creator [Ian Lesnet] and several members of the community are constantly working to add new features and capabilities to the hardware hacking multi-tool, to the point that if your firmware is more than a few days old there’s an excellent chance there’s a fresher build available for you to try out.

One of the biggest additions from the last week or so of development has been the I2C sniffer — a valuable tool for troubleshooting or reverse engineering devices using the popular communications protocol. [Ian] has posted a brief demo video of it in action.

It’s actually a capability that was available in the “classic” versions of the Bus Pirate, but rather than porting the feature over from the old firmware, [Ian] decided to fold the MIT licensed pico_i2c_sniffer from [Juan Schiavoni] into the new codebase. Thanks to the RP2040’s PIO, the sniffer works at up to 500 kHz, significantly outperforming its predecessor.

Admittedly, I2C sniffing isn’t anything you couldn’t do with a cheap logic analyzer. But that means dealing with captures and making sure the protocol decoder is setup properly, among other bits of software tedium. In comparison, once you start the sniffer program on the Bus Pirate 5, I2C data will be dumped out to the terminal in real-time for as long as you care to see it. For reverse engineering, it’s also very easy to move quickly from sniffing I2C packets to replaying or modifying them within the Bus Pirate’s interface.

If you already have a Bus Pirate 5, all you need to do is flash the latest firmware from the automated build system, and get sniffing. On the fence about picking one up? Perhaps our hands-on review will help change your mind.