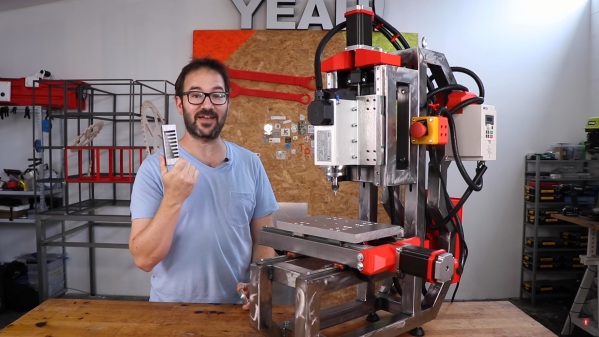
Clever Gas Mixer Gets Just The Right Blend For Homebrew Laser Tubes

[Lucas] over at Cranktown City on YouTube has been very busy lately, but despite current appearances, his latest project is not a welder. Rather, he built a very clever gas mixer for filling his homemade CO2 laser tubes, which only looks like a welding machine. (Video, embedded below.)

We’ve been following [Lucas] on his journey to build a laser cutter from scratch — really from scratch, as he built his own laser tube rather than rely on something off-the-shelf. Getting the right mix of gas to fill the tube has been a bit of a pain, though, since he was using a party balloon to collect carbon dioxide, helium, and nitrogen at measuring the diameter of the ballon after each addition to determine the volumetric ratio of each. His attempt at automating the process centers around a so-called AirShim, which is basically a flat inflatable bag made of sturdy material that’s used by contractors to pry, wedge, lift, and shim using air pressure.

[Lucas]’ first idea was to measure the volume of gas in the bag using displacement of water and some photosensors, but that proved both impractical and unnecessary. It turned out to be far easier to sense when the bag is filled with a simple microswitch; each filling yields a fixed volume of gas, making it easy to figure out how much of each gas has been dispensed. An Arduino controls the pump, which is a reclaimed fridge compressor, monitors the limit switch and controls the solenoid valves, and calculates the volume of gas dispensed.

Judging by the video below, the mixer works pretty well, and we’re impressed by its simplicity. We’d never seriously thought about building our own laser tube before, but seeing [Lucas] have at it makes it seem quite approachable. We’re looking forward to watching his laser project come together.

Continue reading “Clever Gas Mixer Gets Just The Right Blend For Homebrew Laser Tubes”

Review: Sequre SQ-D60 Temperature Controlled Soldering Iron

Over the past few years a new class of soldering iron has arisen: a temperature controlled iron no longer tied to a bulky mains-powered base station, but using low-voltage DC power and with all electronics concealed in a svelte handle. First came the Miniware TS100, and then  many more, with slightly different feature sets and at varying price points. We’ve reviewed a few of them over the years, and today we have the most recent contender in the Sequre SQ-D60. It follows the formula closely, but costs only £20 (about $26). This price puts it in an attractive budget category, and its USB-C power option makes it forward-looking over models with barrel jacks. Description over, it’s time to plug it in and put it through its paces.

What’s In The Box?

That's a lot of extra bits for a budget iron!
That’s a lot of extra bits for a budget iron!

In the box, aside from the handle containing the electronics, were a surprisingly comprehensive array of parts and accessories. The handle itself is similarly-sized to its competitors, being only slightly longer than that of Pine64’s Pinecil. The tip supplied was unexpectedly a slanted chisel, so I may have managed to order incorrectly, though since it shares the same tip design as both the TS100 and the Pinecil I have plenty of alternative tips should I need one. Otherwise there was a little bag of hex screws along with a key and a driver for them, a little stand with a sponge, a set of Sequre stickers, a USB-C to barrel jack cable, and a barrel jack-to-XT60 connector for use with LiPo battery packs. These last two cables are a particularly useful addition.

At first sight the tip doesn’t seem to have any means of being fixed into its socket, but a closer inspection reveals that there is a hex screw hiding underneath a silicone finger sleeve that holds it securely when tightened. The handle has a simple enough interface, with just two buttons and a 3-digit, 7-segment display. Powering it up from a 45 W USB-PD power supply, and it heats up to 300 °C in around ten seconds after pressing one of the buttons. My usual soldering temperature is 360 °C, and it has an interface involving long presses of one of the buttons before they become up and down buttons to select the temperature. In prolonged use the handle doesn’t become noticeably warm, and aside from a slight new-electronics-getting-hot smell there was no immediate concern that it might release magic smoke. Continue reading “Review: Sequre SQ-D60 Temperature Controlled Soldering Iron”

The Evil Crow Is Ready To Cause Some RF Mayhem

There’s no doubt that the RTL-SDR project has made radio hacking more accessible than ever, but there’s only so far you can go with a repurposed TV tuner. Obviously the biggest shortcoming is the fact that you can only listen to signals, and not transmit them. If you’re ready to reach out and touch someone, but don’t necessarily want to spend the money on something like the HackRF, the Evil Crow RF might be your ideal next step.

This Creative Commons licensed board combines two CC1101 radio transceivers and an ESP32 in one handy package. The radios give you access to frequencies between 300 and 928 MHz (with some gaps), and the fact that there are two of them means you can listen on one frequency while transmitting on another; opening up interesting possibilities for relaying signals. With the standard firmware you connect to a web interface running on the ESP32 to configure basic reception and transmission options, but there’s also a more advanced RFQuack firmware that allows you to control the hardware via Python running on the host computer.

Using the Evil Crow RF without a computer.

One particularly nice feature is the series of buttons located down the side of the Evil Crow RF. Since the device is compatible with the Arduino IDE, you can easily modify the firmware to assign various functions or actions to the buttons.

In a demonstration by lead developer [Joel Serna], the physical buttons are used to trigger a replay attack while the device is plugged into a standard USB power bank. There’s a lot of potential there for covert operation, which makes sense, as the device was designed with pentesters in mind.

As an open source project you’re free to spin up your own build of the Evil Crow RF, but those looking for a more turn-key experience can order an assembled board from AliExpress for $27 USD. This approach to hardware manufacturing seems to be getting popular among the open source crowd, with the Open-SmartWatch offering a similar option.

[Thanks to DJ Biohazard for the tip.]

Pneumatic Can Crusher Awaits Your Command

A powerful robot awaiting for a verbal command to crush its foes might sound like something from a science fiction film, but now it’s a permanent fixture of the [Making Stuff] garage.  (Video, embedded below.) Thankfully this robot’s sworn enemy are aluminum cans, and the person controlling it with their voice isn’t a maniacal scientist, just a guy who’s serious about recycling. Well, we hope so anyway.

The star of the show is a heavy duty wall-mounted can crusher that [Making Stuff] built from some scrap steel and a pneumatic cylinder hooked up to the garage’s compressed air system. A solenoid operated valve allows an Arduino with attached ESP-01 to extend the cylinder whenever the appropriate command comes over the network. In this case, the goal was to tie the crusher into Google Assistant so a can would get smallified whenever one of Google’s listening devices heard the trigger phrase.

Note the ejector air line.

Obviously, those who’d rather keep Big Data out of their recycling bin don’t have to go down the same path. But that being said, having to give a specific voice command to activate the machine does provide a certain level of operational safety. At least compared to trusting some eBay sensor to tell the difference between an aluminum can and a fleshy appendage.

After crushing a few cans with his new toy, [Making Stuff] noticed a fairly troubling flaw in the design. Each time a can was crushed he had to reach into the maw of the machine to push its little flattened carcass out of the way. In other words, he was one bad line of code away from having one good hand.

The solution ended up being a new hose that runs from the exhaust port of the valve to the crushing chamber: once the cylinder retracts, the air exiting the valve pushes the crushed can out the rear of the machine and into a waiting pail underneath. Very slick.

Even if you’re not interested in the voice control aspect, this is a great design to base your own can crusher on. While it’s always a treat when a fully automatic crusher comes our way, we’ll admit the challenges of getting one to work reliably probably aren’t worth the hassle.

Continue reading “Pneumatic Can Crusher Awaits Your Command”

Building A Gas-Powered Pressure Washer

While you can always buy the tools you need, there’s something to be said for the satisfaction gained when you pick up a tool you built yourself. [Workshop From Scratch] has built a following out of building his own gear, the latest of which involved putting together a gas-powered pressure washer.

The key to the build was to keep things completely self-contained. All the consumables – water, soap, and wax – are kept onboard the washer to avoid having to run hoses and so on. A small gas engine is the heart of the build, hooked up to a high-pressure water pump. It even comes complete with a starter motor, making it a certified luxury garden tool. It’s also hooked up to two tanks holding cleaning solutions for car washing purposes, which feed into the pump via an auxiliary port for mixing. It’s all assembled on a custom steel frame welded together from rectangular hollow sections.

It’s a build that demonstrates how you can use your skills to build tools that suit your workflow, rather than just putting up with whatever is available off-the-shelf. We’ve seen his work before, too – building other tools like this motorised plasma cutter. Video after the break.

Continue reading “Building A Gas-Powered Pressure Washer”

Woofer-Based Parts Cleaner Bounces To The Beat

Is there anything more satisfying than building a useful machine from mostly junk? We think not. [ke4mcl] is a big fan of reusing and repurposing things before settling for the recycle bin, and was in the market for a vibratory parts tumbler to quickly clean off old, rusty bits and bobs in the course of repairing old electronics. For just $10, most of which went into a new tube of RTV silicone, [ke4mcl] built their own tumbler and came away with a reusable amplifier setup in the process.

We’ve all seen speaker cones dance, and they are definitely our favorite way to observe non-Newtonian fluids. This old woofer can still move, so it’s got a second life shaking sand and screws around until they’re somewhat shiny. The ideal woofer for this purpose has a rubber surround — that’s the ring that connects the speaker cone to the frame. [ke4mcl]’s foam-surrounded woofer works just as well, though it may not last as long.

After scrounging a container with a screw-top lid that fits the woofer perfectly, [ke4mcl] joined them together with a bead of RTV silicone. Since there weren’t any amplifiers lying around, [ke4mcl] spent a few bucks on a class D amplifier board and found a spare laptop brick to power it. An old phone with a tone generator app gets the sand churning with a friendly sine wave, which you can see in the videos after the break.

We think it’s particularly nice to keep things like fire extinguishers out of the landfill. If you don’t need a parts tumbler, why not use one to make your own refillable, re-pressurizable solvent container?

Continue reading “Woofer-Based Parts Cleaner Bounces To The Beat”

Adjustable, Piston-Damped Hammer

When all you have is a hammer, every problem is a constant quest for an even better hammer, as the popular saying goes. At least, that seems to be [Ebenisterie Éloïse]’s situation. She wanted a deadblow hammer that not only had an aesthetically pleasing wood and brass construction, but also one that included adjustable dampers to make sure that each hammer swing is as efficient as possible.

For those unfamiliar with specialty hammers, dead blow hammers typically have some movable mass such as sand or lead shot within the hammer head. This mass shifts forward when the hammer strikes an object, reducing rebound of the hammer off of the object and transferring more energy into each strike. This hammer omits a passive mass in favor of four custom-machined brass tubes, each of which holds a weighted fluid, a spring, and brass weight. Each piston acts as a damper in a similar way to a shock absorber on a vehicle, and a screw and o-ring at the top of each one allows them to be adjustable by adding different weight fluids as needed. Some detailed testing of the pistons shows a marked improvement over any of the passive mass varieties as well.

Not only is this an incredible amount of detail and precision for a tool that is often wielded in a non-precise way (at least among those of us for who aren’t skilled craftspeople), but it is also made out of wood, leather, and brass which gives it an improved look and feel over a plastic and fiberglass hammer that is typical of most modern deadblow hammers. It even rivals this engineer’s hammer with its intricate custom engraving in craftsmanship alone.

Continue reading “Adjustable, Piston-Damped Hammer”