Cheap, high-quality PCBs are truly a wonder of our age. That a professionally fabricated board with silkscreen and solder mask can be ordered online and delivered to your door has lowered the bar between a hobbyist project and a polished product. But the wait can be agonizing, and it can throw a wrench into the iterative design process. What to do?
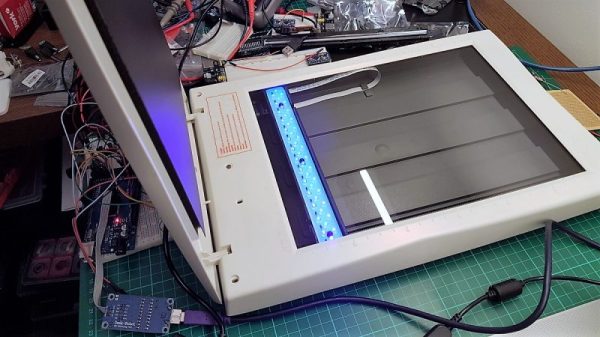
[Andras Kabai] knows the answer to that, and this former flatbed scanner turned into a UV exposer is the centerpiece of his DIY board fab. The old Mustek scanner was a couple of bucks secondhand, and provided not only the perfect form-factor for a board scanner but a trove of valuable parts to reuse. [Andras] replaced the original fluorescent light bar with a long, narrow PCB stuffed with UV LEDs, and added an Arduino Mega to control the original stepper drive. The project looks like it went through a little feature creep, with an elaborate menu system and profiles that include controls for exposure time, the brightness of the LED array via PWM, and the length of board that gets exposed. It’s clearly a work in progress, but early results are encouraging and we’ll be watching to see how [Andras]’ in-house fab shapes up.
This approach to PCB fab is only one of many, of course. You can turn a budget 3D-printer into a PCB machine, or even use an LCD to mask the boards during exposure. The latter intrigues us — an LCD mask and a scanning UV light source could make for a powerful PCB creation tool.