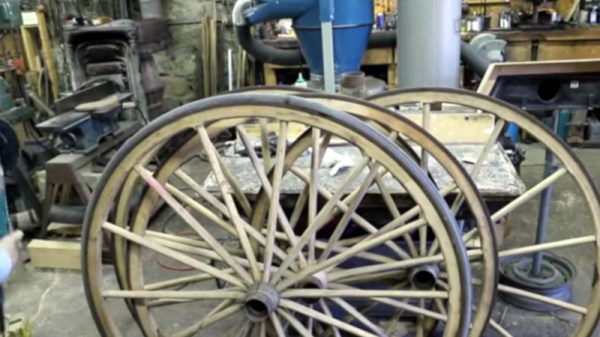
Reducing The Risk Of Flying With Hydrogen Fuels

Flight shaming is the hot new thing where people who take more than a handful of trips on an airplane per year are ridiculed for the environmental impact of their travels. It’s one strategy for making flying more sustainable, but it’s simply not viable for ultimately reducing the carbon impact that the airline industries have on the environment.

Electric planes are an interesting place to look for answers. Though carbon-free long haul travel is possible, it’s not a reality for most situations in which people travel today. Current battery technology can’t get anywhere near the energy density of fossil fuels and larger batteries aren’t an option since every pound matters when designing aircraft.

Even with land travel and electric grids improving in their use of renewables and electric power, aviation tends to be difficult to power with anything other than hydrocarbons. Student engineers in the AeroDelft program in the Netherlands have created Project Phoenix to develop an aircraft powered by a liquid hydrogen fuel cell, producing a primary emission of water vapor. So it is an electric plane, but leverages the energy density of hydrocarbons to get around the battery weight problem.

While the project may seem like an enormous reach peppered with potential safety hazards, redundant safety features are used such as sensors and vents in case of a hydrogen leakage, as well as an electric battery in case of failure. Hydrogen produced three times more energy per unit than kerosene, but is six times the volume in gas form and requires cumbersome compression tanks.

Even though hydrogen fuel only produces water vapor as a byproduct, it can still cause greenhouse effects if it is released too high and creates clouds. The team is exploring storage tanks for slow release of the water vapor at more optimal altitudes. On top of that, most hydrogen is produced using steam methane reforming (SMR), creating up to 150g of greenhouse gases per kWh, and electrolysis tends to be more costly and rarely carbon neutral. Alternatives such as solar power, biofuels, and electric power are looking to make headwind as well, but the technology is still far from perfected.

While it’s difficult to predict the success of the project so early on, the idea of reducing risk in hydrogen fuels may not be limited to a handful of companies for very long.

Continue reading “Reducing The Risk Of Flying With Hydrogen Fuels”

At Three Grand A Tail Light, There’s An Opportunity For A Hacker

It can be amusing sometimes, to read an incredulous reaction from outside our community to something that would be bread-and-butter in most hackerspaces. Take the sorry saga of the Cadillac XLR tail light, as reported by Jalopnik. This car was a more-expensive Corvette with a bit of lard around its midriff, and could appear a tempting pick for a bit of inexpensive luxury rubber-burning were it not for the revelation that a replacement second-hand tail light for one of these roadsters can set you back as much as three grand. The trusty auto on the drive outside where this is being written cost around a tenth that sum, so what on earth is up? Is it because a Caddy carries some cachet, or is something else at play?

It appears that the problem lies in the light’s design. It’s an LED unit, with surface mount parts and a set of fragile internal PCBs that are coated in something that makes reworking them a challenge. On top of that, the unit is bonded together, and instead of being a traditional on-off tail light it’s a microprocessor-controlled device that gets its orders digitally. This is all too much for XLR owners and for the Jalopnik hacks, who castigate General Motors for woefully inadequate design and bemoan the lack of alternatives to the crazy-expensive lights, but can’t offer an alternative.

Reading about the problem from a hardware hacker perspective they are right to censure the motor manufacturer for an appalling product, but is there really nothing that can be done? Making off-the-shelf microcontroller boards light up LEDs is an elementary introduction project for our community, and having the same boards talk to a car’s computer via CAN is something of a done deal. Add in LED strips and 3D printing to create a new backing for the tail light lens, and instead of something impossibly futuristic, you’re doing nothing that couldn’t be found in hackerspaces five years ago.

So what’s to be learned from the Cadillac XLR tail light? First of all, there’s scope for an enterprising hacker to make a killing on a repair kit for owners faced with a three grand bill. Then, there’s another opportunity for us to be acquainted with the reality that the rest of the world hasn’t quite caught up with repair culture as we might imagine. And finally there’s the hope that a badly designed automotive component might just be the hook by which the issue of designed-in obsolescence moves up the agenda in the public consciousness. After all, there will be other similar stories to come, and only bad publicity is likely to produce a change in behavior.

Of course, to get it really right you need a car that’s hackable in the first place. Or better still, one designed by and for hackers.

Thanks [str-alorman] for the tip.

Cadillac XLR header image:Rudolf Stricker [CC BY-SA 3.0].

Eight Motors Speed This Boat Along

Messing about in boats has always held a curious appeal for the hardware hacker. Perhaps that’s because it remains an approachable way to make something that moves under its own power with a bit of speed, and barring calamities, the worst that can happen to the unwary boater is a soaking. [NASAT Channel] is a Vietnamese hacker who is a serial producer of small motorised boats, and one of his latest is a particularly impressive example.

The boat itself is a relatively conventional expanded polystyrene hull covered with fiberglass, but the motive power is something a little special. He’s taken eight of the ubiquitous 775 DC brushed motors and used them in a star configuration with beveled gears, which in turn drives a flexible shaft which goes straight to a propeller under the craft. Each motor shares a water cooling pipe serviced by a small pump, and the drive comes from a pair of cheap PWM motor controllers. We see him zipping up and down a stretch of river next to some moored boats, and if we’re honest, we wouldn’t mind a go ourselves.

We’re not entirely convinced such a rough-and-ready eight-way gearbox will be reliable for long-term use, and we’d be interested to know just how equally so many motors are actually sharing the load. But we like it for its sheer audacity, and we think you will too. Take a look at the video below the break, and if you’re inspired then grab a hammock, some friends, and have a go.

Continue reading “Eight Motors Speed This Boat Along”

Dashboard Dongle Teardown Reveals Hardware Needed To Bust Miles

Progress and the proliferation of computers in automotive applications have almost made the shade tree mechanic a relic of the past. Few people brave the engine compartment of any car made after 1999 or so, and fewer still dive into the space behind the dashboard. More’s the pity, because someone may be trying to turn back the odometer with one of these nefarious controller area network (CAN bus) dongles.

Sold through the usual outlets and marketed as “CAN bus filters,” [Big Clive] got a hold of one removed from a 2015 Mercedes E-Class sedan, where a mechanic had found it installed between the instrument cluster and the OEM wiring harness. When the dongle was removed, the odometer instantly added 40,000 kilometers to its total, betraying someone’s dishonesty.

[Big Clive]’s subsequent teardown of the unit showed that remarkably little is needed to spoof a CAN bus odometer. The board has little more than an STM32F microcontroller, a pair of CAN bus transceiver chips, and some support circuitry like voltage regulators. Attached to a wiring harness that passes through most of the lines from the instrument cluster unmolested while picking off the CAN bus lines, the device can trick the dashboard display into showing whatever number it wants. The really interesting bit would be the code, into which [Clive] does not delve. That’s a pity, but as he points out, it’s likely the designers set the lock bit on the microcontroller to cover their tracks. There’s no honor among thieves.

We found this plunge into the dark recesses of the automotive world fascinating, and [Big Clive]’s tutelage top-notch as always. If you need to get up to speed on CAN bus basics, check out [Eric Evenchick]’s series on automotive network hacking.

Continue reading “Dashboard Dongle Teardown Reveals Hardware Needed To Bust Miles”

3D Print Your Way To A Glass Cockpit Simulator

Today’s commercial aircraft are packed to the elevators with sensors, computers, and miles and miles of wiring. Inside the cockpit you’re more than likely to see banks of LCDs and push buttons than analog gauges. So what’s that mean for the intrepid home simulator builder? Modern problems require modern solutions, and this 3D printed simulator is about as modern as it gets.

Published to Thingiverse by the aptly named [FlightSimMaker], this project consists of a dizzying number of 3D-printed components that combine into a full-featured desktop simulator for the Garmin G1000 avionics system. Everything from the parking brake lever to the push buttons in the display bezels was designed and printed: over 200 individual parts in all. Everything in this X-Plane 11 compatible simulator is controlled by an Arduino Mega 2560 with the SimVim firmware.

To help with connecting dozens of buttons, toggle switches, and rotary encoders to the Arduino, [FlightSimMaker] uses five CD74HC4067 16-channel multiplexers. The display is a 12.1 inch 1024 x 768 LCD panel with integrated driver, and comes in at the second most expensive part of the build behind the rotary encoders. All told, the estimated cost per display is around $250 USD.

Even if you aren’t looking to build yourself a high-tech flight simulator, there’s plenty of ideas and tips here that could be useful for building front panels. We particularly like the technique used for doing 3D-printed lettering: the part is printed in white, spray painted a darker color, and then the paint is sanded off the faces of the letters to reveal the plastic. Even with a standard 0.4 mm nozzle, this results in clean high-contrast labels on the panel with minimal fuss.

Of course, while impressive, these panels are just the beginning. There’s still plenty more work to do if you want to build an immersive simulation experience. Including, in the most extreme cases, buying a Boeing 737 cockpit.

A Modular System For Building Heavy Duty 18650 Battery Packs

With 18650 cells as cheap and plentiful as they are, you’d think building your own custom battery packs would be simple. Unfortunately, soldering the cells is tricky, and not everyone is willing to invest in a spot welding setup just to put the tabs on them. Of course that’s only half the battle, you’ll still want some battery protection and management onboard to protect the cells.

The lack of a good open source system for pulling all this together is why [Timothy Economu] created DKblock. Developed over the last three years, his open source system allows users to assemble large 18650 battery packs for electric vehicles or home energy storage, complete with integrated intelligent management and protection systems. Perhaps best of all there’s no welding required, the packs simply get bolted together.

Each block of batteries is assembled using screws and standoffs in conjunction with ABS plastic cell holders. A PCB is placed on each side of the stack, and with tabs not unlike what you’d see in a traditional battery compartment, all the cells get connected without having to solder or weld anything to them. This allows for the rapid assembly of battery packs from 7.2 VDC all the way up to 150 VDC , and means individual cells can easily be checked and replaced in the future should the need arise.

For monitoring the cells, a “Block Manager” board is installed on each block, which communicates wirelessly to a “Pack Supervisor” board that monitors the overall health of the system. Obviously, such a robust system is probably a bit overkill if you’re just looking to build a pack for your quadcopter, but if you’re looking to build a DIY Powerwall or juice up a custom electric vehicle, this could be the battery management system you’ve been looking for.

Testing Carbon Fibre Reinforced Filament By Building An Over-Engineered Skateboard

Advances in filaments for FDM 3D printers have come in leaps and bounds over the past few years, and carbon fibre (CF) reinforced filament is becoming a common sight. Robotics extraordinaire [James Bruton] got his hands on some CF reinforced PLA, and ended up building a completely over-engineered 3D printed skateboard. (Video, embedded below.)

[James] started by printing some test pieces with a 0.5 mm and a big 1.2 mm nozzle with and without the CF, which he subjected to cantilever deflection tests. The piece with CF was 20% stiffer than without.

[James] then built an extremely strong and cool looking skateboard deck with alternating section of the CF PLA and toughened PLA, totalling 2.7 kg of filament. It was extremely strong, so after bolting on a set of trucks and wheels, he did some mild riding at a local skate park, where it survived without any problems. He admits it was completely over-engineered, but points out in that the internal cavities in the deck is the perfect place for batteries on an electric long board.

Designing something from the ground up with the strength and weaknesses 3D printing in mind, leads to some very interesting and innovative designs, of which this is a perfect example, and we hope to see many more like it. We’ve featured a number of [James]’ project, including the remote controlled bowling ball he built for [Mark Rober] and his impressive OpenDog and Start Wars robots.

Continue reading “Testing Carbon Fibre Reinforced Filament By Building An Over-Engineered Skateboard”