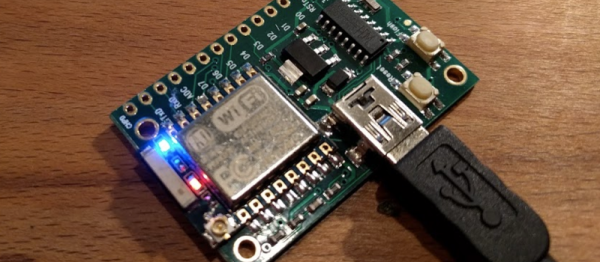
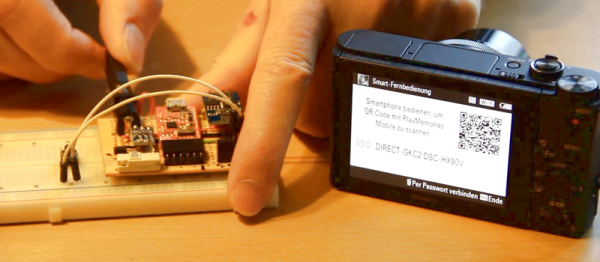
Hacking An SD Slot For WiFi

Back in the 1990’s moving files via a floppy disk was known as “sneaker net.” While floppies are a thing of the past, SD Cards are the modern equivalent and they still lend themselves to sneaker net operations.

But why? WiFi is everywhere now. Wouldn’t it be great if you could hack those devices with SD slots to use WiFi? Apparently 3D printer [extrud3d] thought the same thing and found a way to reconfigure a Toshiba FlashAir card to put his 3D printer on the network.

The card is aimed at consumers, so by default it creates a hotspot and waits for a connection, a rudimentary web app allows you to move files back and forth over the network to the SD card which is then read by the host device. However, [extrud3d] shows how to modify a file on the SD card’s file system to allow the device to hook up to an existing wireless network and also provides a Python script to make the file transfer easier.

Although this hack is for a 3D printer, it ought to work with most devices that have a full sized SD slot (or can be adapted to take a full sized card). Since the hack is nothing more than changing a text file, it is a lot easier than some other SD hacks we’ve covered. Over on hackaday.io, [Chris Jones] has recently done some hacking on the FlashAir and has a list of its shell commands if you want to go beyond the text file hacks.

Continue reading “Hacking An SD Slot For WiFi”

Hacking A NRF24L01 Radio For Longer Range

[RonM9] wasn’t happy with his 50 foot range on his NRF24L01 project. The RF had to cut through four walls, but with the stock modules, the signal was petering out after two or three walls.  A reasonably simple external dipole antenna managed to increase the range enough to do the job.

[RonM9’s] instructions show where to cut away the existing PCB antenna and empirically tune the 24 gauge wire for best performance. He even includes an Arduino-based test rig so you can perform your own testing if you want.

Continue reading “Hacking A NRF24L01 Radio For Longer Range”

Fisher Price Bluetooth Speaker Hack

A good hacker hates to throw away electronics. We think [Matt Gruskin] must be a good hacker because where a regular guy would see a junky old 1980’s vintage Fisher Price cassette player, [Matt] saw a retro stylish Bluetooth speaker. His hack took equal parts of electronics and mechanics. It even required some custom 3D printing.

You might think converting a piece of old tech to Bluetooth would be a major technical challenge, but thanks to the availability of highly integrated modules, the electronics worked out to be fairly straightforward. [Matt] selected an off the shelf Bluetooth module and another ready-to-go audio amplifier board. He built a custom board to convert the stereo output to mono and hold the rotary encoder he used for the volume control. An Arduino (what else?) reads the encoder and also provides 3.3V to some of the other electronics.

The really interesting part of the hack is the mechanics. [Matt] managed to modify the existing mechanical buttons to drive the electronics using wire and hot glue. He also added a hidden power switch that doesn’t change the device’s vintage look. Speaking of mechanics, there’s also a custom 3D printed PCB holder allowing for the new board to fit in the original holder. This allows [Matt] to keep the volume control in its original location

Continue reading “Fisher Price Bluetooth Speaker Hack”

LightBlue Bean+ Adds Battery, Connectors, Price

PunchThrough, creators of the LightBlue Bean, have just launch a Kickstarter for a new version called LightBlue Bean+. The tagline for the hardware is “A Bluetooth Arduino for the Mobile Age” which confirms that the hardware is targeted at a no-hassle, get it connected right now sort of application.

lightblue-bean-plus-thumbFor those unfamiliar, the original LightBlue Bean is a single board offering meant to marry Bluetooth connectivity (think Cellphones with BTLE) to the capabilities of a microcontroller-based hardware interface. The Bean+ augments this hardware with a 300m+ range increase, an integrated LiPo (600mAh or more), and headers/connectors where there were only solder pads before.

On the software side of things the Bean+ has four firmware options that make it speak MIDI, ANCS, HID, or Peer-to-Peer, only not all at the same time. The good news is that these are ecosystem upgrades and will work for existing Bean hardware too. The entire thing comes with online-platform integration and easy to use Smartphone tools to guide you through connecting and making something useful.

The board includes a battery tending circuit that allows it to be charged via the USB port but can run over a year between recharges if you use it judiciously. There is a slider switch near the pin sockets marked “A3, A4, A5” which toggles between 3.3v and 5v so that no level shifters are needed for sensors and other hardware you might use with it. The white connectors seen near the bottom of this image are Grove connectors. These provide I2C and Analog support to that ecosystem of add-on boards.

All in all this is a pretty sweet upgrade. The MSRP will be $45 but early backers can get in around 10-25% less than that. The price doesn’t mean it’s a no-brainer to pick one up, but the header options make this much more versatile and reusable than the original Bean and we like the idea of a rechargeable battery of the coin cells used by Bean+’s predecessor. It is an each choice for drop-in no hassle connectivity when bottom line isn’t your top concern.

Original LightBlue Bean is available in the Hackaday Store.

Wireless Power Transfer Using Capacitive Plates

It seems like wireless power transfer is all the rage these days. There’s wireless charging mats, special battery packs, heck, even some phones have it built in! And they all use inductive coils to transfer the power — but what if there was another way? Coils of copper wire aren’t always that easy to fit inside of a product…

As an experiment, [Josh Levine] decided to try making a proof of concept for capacitive power transfer.

He first demonstrates inductive power transfer using two coils of copper wire to power up an LED. The charging coil is supplied with 15V peak-to-peak at 1MHz which is a fairly typical value for inductive charging. He then shows us two glass plates with some tinfoil taped to it. Two LEDs bridge the gap alternating polarity — since the power is oscillating, so we need a path for electrons to flow in both directions. There is no connection through the glass, but when it is set on the charging plate, the LEDs light up. The charging plate is supplied with 30V peak-to-peak at 5MHz.

Continue reading “Wireless Power Transfer Using Capacitive Plates”

Transmitting MIDI Signals With XBEE

What do you do when you want to rock out on your keytar without the constraints of cables and wires? You make your own wireless keytar of course! In order to get the job done, [kr1st0f] built a logic translator circuit. This allows him to transmit MIDI signals directly from a MIDI keyboard to a remote system using XBEE.

[kr1st0f] started with a MIDI keyboard that had the old style MIDI interface with a 5 pin DIN connector. Many new keyboards only have a USB interface, and that would have complicated things. The main circuit uses an optoisolator and a logic converter to get the job done. The MIDI signals are converted from the standard 5V logic to 3.3V in order to work with the XBEE.

The XBEE itself also needed to be configured in order for this circuit to work properly. MIDI signals operate at a rate of 31,250 bits per second. The XBEE, on the other hand, works by default at 9,600 bps. [kr1st0f] first had to reconfigure the XBEE to run at the MIDI bit rate. He did this by connecting to the XBEE over a Serial interface and using a series of AT commands. He also had to configure proper ID numbers into the XBEE modules. When all is said and done, his new transmitter circuit can transmit the MIDI signals wirelessly to a receiver circuit which is hooked up to a computer.

DNS Tunneling With An ESP8266

There’s a big problem with the Internet of Things. Everything’s just fine if your Things are happy to sit around your living room all day, where the WiFi gets four bars. But what does your poor Thing do when it wants to go out and get a coffee and it runs into a for-pay hotspot?

[Yakamo]’s solution is for your Thing to do the same thing you would: tunnel your data through DNS requests. It’s by no means a new idea, but the combination of DNS tunneling and IoT devices stands to be as great as peanut butter and chocolate.

DNS tunneling, in short, relies on you setting up your own DNS server with a dedicated subdomain and software that will handle generic data instead of information about IP addresses. You, or your Thing, send data encoded in “domain names” for it to look up, and the server passes data back to you in the response.

DNS tunneling is relatively slow because all data must be shoe-horned into “domain names” that can’t be too long. But it’s just right for your Thing to send its data reports back home while it’s out on its adventure.

Oh yeah. DNS tunneling may violate the terms and conditions of whatever hotspot is being accessed. Your Thing may want to consult its lawyer before trying this out in the world.