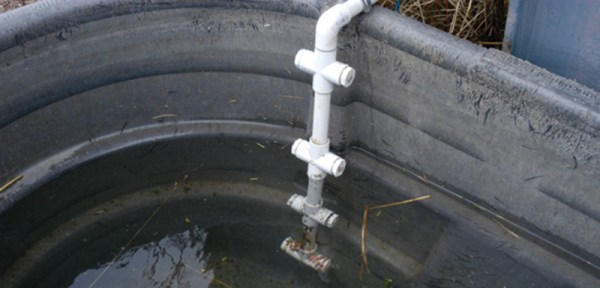
Fail Of The Week: Reverse Engineering A Wireless Energy Monitor

fotw-wireless-energy-monitor-reverse-engineering

[Afonso] picked up a cheap energy use monitor a few years back. He really like the data it displays about his home’s electricity, using a sensor to gather this info and a display that communicates with it wirelessly. But there is no option to log or dump the data. He set out to reverse engineer the wireless protocol in order to extend the use of the system. As the name of this column implies, he failed to get this working.

The hardware above is a 433Mhz transceiver that he rigged up as test hardware. It sounds like he’s assuming the monitor works on this band, which could have been his first misstep (we really don’t know). The speaker is there to give audible confirmation that he’s receiving something from the transmitter. This is where things start to get pretty weird. White noise was coming from the speaker, but when he stepped away from the bench it stopped. He was able to measure a regular pattern to the noise, and proceeded to place the speaker next to his computer MIC so that he could record a sample for further analysis.

Fail of the Week always aims to be a positive experience. In this case we’d like to have a conversation about the process itself. We agree that connecting a speaker (or headphones) should help get your foot in the door because your ear will recognize a rhythmic pattern when it is received. But with this noise, measuring the timing and recording a sample we’re not so sure about. Given the situation, how would you have soldiered on for the best chance at successfully sniffing out the communication scheme used by this hardware? Leave a comment below!


2013-09-05-Hackaday-Fail-tips-tileFail of the Week is a Hackaday column which runs every Wednesday. Help keep the fun rolling by writing about your past failures and sending us a link to the story — or sending in links to fail write ups you find in your Internet travels.

Electric Imp Thermal Printer

imp_printer_01_23

If you’re the type of person that doesn’t mind having a pocket/purse full of crumpled receipts, then maybe you should check out this tutorial from [tombrew] on giving a thermal printer internet-connectivity.

For some of us, there’s something kind of cool about thermal printers, but it’s probably not the kind of project you’d want to burn a lot of calories on. As a developer over at Electric Imp, [tombrew] agrees with this statement, but since the Electric Imp contains both a WiFi module and processor built in, it makes it pretty easy to get your thermal printer printing off the daily weather, stock prices, news headlines, etc… In fact, the claim here is that you could have this project completed before you even finish your morning coffee… knock on wood!

From a hardware standpoint, the project is pretty straight forward; an Electric Imp with breakout board, thermal printer, and a power supply are pretty much all that’s needed. Local communication between the Electric Imp and the thermal printer is accomplished through a simple serial interface. With the roll-out of the new Electric Imp IDE a few months back, we were introduced to ‘Agents’. This is kind of a neat concept, and this tutorial breaks everything down, but basically the agent is server-side code that runs in the ‘ImpCloud’, thus giving your Electric Imp more power and capabilities to deal with complex APIs. Also, handling images (like something you want to print) can take up a ton of memory, so for this project, the agent is used to send down slices of the image you want to print one at a time. This project is just the beginning of what [tombrew] has planned, so we can’t wait to see more insanely detailed tutorials.

HackPhx Winter 2014 Hackathon Winners

HackPhx 2014

The HackPhx Winter 2014 hackathon was held at Heatsync Labs hackerspace in Mesa, Arizona, USA. The advertised theme was “Arduino Wearables”. Participating attendees were randomly placed on teams evenly distributed by their disclosed skills across all teams. There were 10 teams with 4 to 5 members per team competing for two winning spots.

Each team had to build an amazing wearable project utilizing the secret ingredient which was Seedstudio’s Arduino-compatible Xadow wearable platform and add-ons. The Xadow is similar to the Arduino Leonardo and participants used an Arduino cross compatibility and pin mapping chart to assist in development.

Top prize was the Judges’ prizes for the best completed and documented Xadow wearable team project. The second prize was the Jury’s prize given to the team project that the other teams liked the most regardless of event criteria.

Read more about the winning teams and watch their presentations after the break.

Continue reading “HackPhx Winter 2014 Hackathon Winners”

Move Over, Google Nest: Open Source Thermostat Is Heating Up The Internet Of Things

In the wake of Google’s purchase of connected devices interest Nest, the gents at [Spark] set about to making one in roughly a day and for a fraction of the cost it took Nest to build their initial offering. [Spark]’s aim is to put connected devices within reach of the average consumer, and The Next Big Thing within the reach of the average entrepreneur.

The brain is, of course, [Spark]’s own Spark Core wi-fi dev board. The display is made of three adafruit 8×8 LED matrices driven over I²C. Also on the bus is a combination temperature and humidity sensor, the Honeywell HumidIcon. They added some status LEDs for the furnace and the fan, and a Panasonic PIR motion detector to judge whether you are home. The attractive enclosure is made of two CNC-milled wood rings. The face plate, mounting plate, and connection from the twistable wood ring to the potentiometer is laser-cut acrylic.

[Spark]’s intent is for this, like the Nest, to be a learning thermostat for the purpose of increasing energy efficiency over time, so they’ve built a web interface with a very simple UI. The interface also displays historical data, which is always nice. This project is entirely open source and totally awesome.

If you have an old Android phone lying around, you could make this open source Android thermostat.

Continue reading “Move Over, Google Nest: Open Source Thermostat Is Heating Up The Internet Of Things”

Designing, Simulating And Testing A Simple Radio Duty-Cycling Protocol For Contiki

A few days ago we featured [Marcus]’ Contiki port to the TI Launchpad, Contiki being an open source operating system dedicated to the Internet of Things created by [Adam Dunkels] at the SICS in Sweden. Part of [Marcus]’ work involved designing a simple radio duty-cycling protocol that achieves 3% idle listening duty cycle while allowing for an average 65ms latency with no prior contact or synchronization.

As a few readers may already know, it takes quite a lot of power for a wireless device to listen/send data. A platform therefore needs to have an algorithm that minimizes power consumption while allowing a (regular) planned data transfer. After creating his protocol named SimpleRDC, [Marcus] first simulated it using the Cooja simulator in order to check that it could perform as desired. He then implemented a real life test and checked the protocol’s performance by sniffing the SPI lines connecting his MSP430 to the wireless module and by monitoring the platform power consumption with his oscilloscope and a shunt resistor.

Porting Contiki To The TI MSP430 Launchpad

For many years Contiki has been one of the main choices when it came to choosing an IPv6 over Low power Wireless Personal Area Networks stack (aka 6LoWPAN). It is developed by a world-wide team of developers with contributions from Atmel, Cisco, ETH, etc… and is open source. As most platforms to which Contiki has been ported are quite expensive, [Marcus] decided to bring the operating system to the TI Launchpad. For our readers that don’t know, the latter is based on a msp430g2452/2553 microcontroller, which only have 256/512 bytes of RAM and 16kB of ROM. As a side note, Contiki typically requires 10k RAM and 30k ROM.

[Marcus] therefore had to remove several features from Contiki: queue-buffering, energy estimation and regrettably uIP. His test setup (shown above) uses the TI CC2500 radio that can be found for less than $2 on Aliexpress, for which he wrote radio drivers from scratch. He also coded his own radio duty-cicling layer, as the one included in Contiki was too big.

Chameleon Emulates Contactless Smart Cards

chameleon

Researchers at Ruhr University of Bochum in Germany have been busy working with RFID and related devices for quite some time now. They call the fruit of their labors Chameleon, a versatile Contactless Smart Card Emulator. Contactless Smart Cards are RFID style devices that also contain a smart card style memory. These cards are often used for payment, replacing mag strip style credit cards. Philips MIFARE Classic cards are a common example of contactless smart cards. The Chameleon is set up to emulate any number of cards using the common 13.56MHz frequency band. Adding a new card is as simple as loading up a new CODEC  and application to the firmware. Currently Chameleon can emulate MIFARE cards using the ISO14443A.

The Chameleon is completely open source, and can be built for around $25 USD. The heart of the system is an Atmel ATxmega192A3 microcontroller. The 192 is a great microcontroller for this task because it contains hardware accelerators for both DES and AES-128. An FTDI USB interface chip is used to provide an optional communication link between a host computer and the ATxmega. The link can be used for debugging, as well as manipulating data in real-time. A host PC is not necessary for use though – the Chameleon will operate just fine as a stand alone unit. We definitely like this project – though we’re going to be doubling down on the shielding in our RF blocking wallets.