How To Rebuild An 1800s Victorian Leclanché Cell

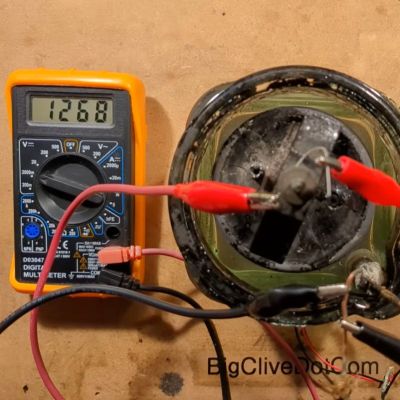
The 19th century was an absolutely electrifying era, including in a literal sense. Although the phenomenon of electricity had been known by that time for centuries, actually making it do useful work was a much taller order. Aside from big, coal-powered generators, there also was a need for a more compact electrochemical solution, such as in the form of a wet or dry cell. One of the first major commercial successes here came in the form of the Leclanché cell, such as the genuine version that [Big Clive] found in an old UK building’s attic and has now revived.
Invented in 1866 by French scientist Georges Leclanché, the Leclanché cell features an ammonium chloride electrolyte solution, carbon cathode and zinc anode. There’s also a manganese dioxide depolarizer for preventing hydrogen build-up. Here water is the solvent for the ammonium chloride (also known as sal ammoniac).

The version that [Clive] got his grubby mitts on features a glass container, an already partially consumed zinc electrode and a slightly cracked porous ceramic tub that contains the carbon electrode and the manganese dioxide. After placing the components inside the specially shaped glass jar and filling it with an electrolyte mixture of one part ammonium chloride and four parts water by weight, the cell starts generating its approximate 1.4 VDC.

This type of wet cell was very popular, being essentially ‘rechargeable’ by topping up the water and replacing the zinc electrode consumable. They did suffer from a voltage drop-off during use due to increasing internal resistance, something that got improved upon with the zinc-carbon dry cell. Itself effectively an evolution of the Leclanché wet cell.

From there zinc-carbon dry cells got replaced with alkalines, which itself got mostly replaced by NiMH and Li-ion cells. Despite more than a hundred years between the electrochemical cell that [Clive] featured in his video and today’s batteries, it’s clear that this wet cell was quite literally just the Victorian-era equivalent of an alkaline AA cell.

Continue reading “How To Rebuild An 1800s Victorian Leclanché Cell”

Hacking A Video Walkie Talkie’s TXW818 MCU And Running DOOM

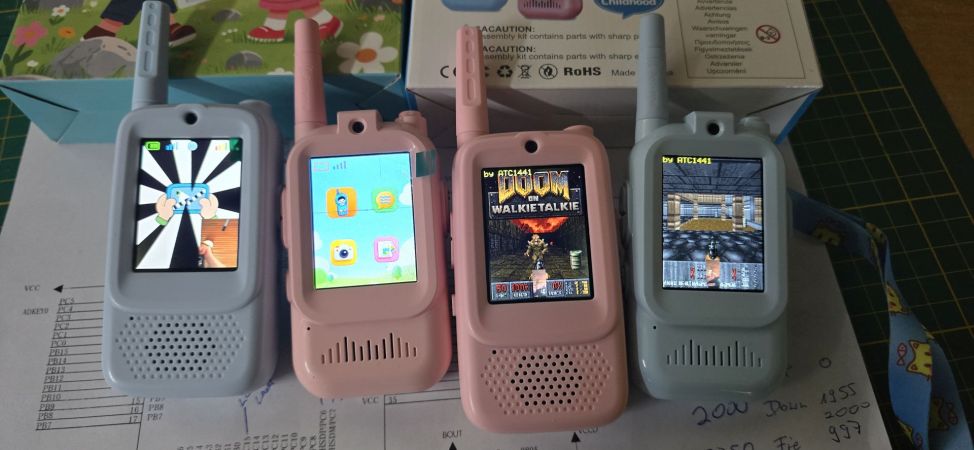
Recently cheapo video walkie-talkies popped up on everyone’s favorite online retailers, which naturally lured in the usual gaggle of reverse-engineering enthusiasts of cheap tat to see what’s inside these devices, as well as what more they can be made to do. Cue [Aaron Christophel] doing just that, with the typical DOOM demo as proof of concept.

Inside these cheerful little devices is a TXW818 MCU, made by TaiXin Semiconductor. It provides its own CK803 CPU core at 240 MHz with 272 kB of SRAM, as well as BLE and 2.4 GHz Wi-Fi support. For these walkie-talkies an additional 4 MB of PSRAM is provided as well as 2-4 MB of SPI Flash.

The display is a glorious 240×320 LCD, which actually fits rather well with a game like DOOM. As also explained on the GitHub project page, to build the project you simply have to fetch the CDK IDE and build the binary. After that it can be flashed with an STM32F103 ‘Blue Pill’ based board.

According to [Aaron] the SDK is rather convoluted and not that nice to work with, so it’s not a sleeper ESP32 alternative, but these cheap walkie-talkies could be nice to tinker with anyway. Other than playing games, of course, as the side buttons aren’t very conducive to gaming, and the limited Flash space required compressing the WAD game file.

Continue reading “Hacking A Video Walkie Talkie’s TXW818 MCU And Running DOOM

Unitree GO-M8018-6 Motor Reverse Engineering

People seem to be rather into the Unitree Go2 quadruped robot, if only for the low price tag. But perhaps more interesting are the motors that propel it — they appear to be similar to the Go1’s GO-M8010-6 motors that Unitree also sells, with [Thomas Flayols] currently working on reverse-engineering its proprietary driver using the publicly available documentation for that motor and some reverse-engineering.

These motors are an assembly that includes a reducer, magnetic encoder, 3-phase inverter, current sensing, an RS-485 bus and a Cortex-M0-based CMS32M57xx MCU, all in a very capable package intended for robotics applications where a compact actuator is needed.

The first step of reverse-engineering involved the physical PCB, made all the more difficult as Unitree was so kind as to remove all markings on the ICs. Fortunately using an X-ray machine and some sleuthing it was possible to deduce the MCU and other components. Following this SWD/OpenOCD access to the MCU could be established and the firmware key extracted from the bootloader SRAM.

Although the firmware was encrypted, a locally recovered key was found to decrypt it. This allowed for an initial custom firmware to be developed, which [Thomas] hopes to develop into a fully featured open source firmware. Doing so would obviously open these motors to a larger audience outside of Unitree’s ecosystem, as they are pretty good value for what they offer mechanically.

It might give the associated Go2 robot a new life too considering the serious malware accusations and security issues pertaining to its firmware.

VGA Output From A PIC18

In the maker world, it’s the Arduino and ESP32 lines that get the lion’s share of attention. However, you can do fantastic things with PIC chips, too, if you put the dev time in—it’s just perhaps less likely another maker has done so before you. A great example is this VGA output project from [grecotron].

A PIC18F47K42 is perhaps not the first part you would reach for to pursue any sort of video-based project. However, with the right techniques, you can get the 8-bit microcontroller pumping out the pixels surprisingly well. [grecotron] was able to get the chip outputting to a VGA monitor at a resolution of 360 x 480 with up to 16 colors. It took some careful coding to ensure the chip could reliably meet the timing requirements for the standard and to get HSYNC, VSYNC, and the color signals all dancing in harmony. Aiding in this regard was that the chip was clocked with a 14.3182 MHz crystal to make it easy to divide down from all the internal timers as needed. Supporting hardware is light, too—primarily consisting of a VGA connector, a couple of multiplexers, and resistor ladder DACs for the color signals. Files are on Github for those interested in deeper detail on the work.

VGA output is possible to implement on all kinds of microcontrollers—and even a bunch of raw logic if you know what you’re doing. If you’re pursuing your own video output wizardry, be sure to let us know on the tipsline.

Modular 18650 Packs, No Spot Welding Required

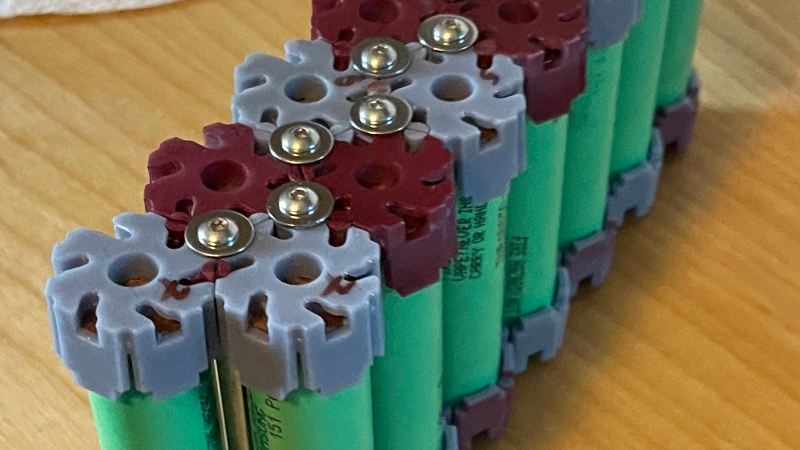
Building a battery pack from 18650 cells traditionally requires patience, a spot welder, and a supply of nickel strip. But what if there was another way? [Ben] is here with Cell-Lock, a modular battery assembly system.

At the system’s heart are a set of interlocking end caps and connection pieces that function as locking cams as well as the electrical connections where needed. They were inspired by the cam systems used for furniture assembly, and are activated by rotation with a screwdriver. The result is a mechanically stable battery system in which different configurations can easily be assembled.

We like that it doesn’t involve any heat near those cells; in part because we’ve seen our share of dodgy connections overheating. But we do have a few concerns. These include how reliable a connection those cams would make, as well as how much current they could safely take without overheating. If both of those could be addressed, we can see that this is an idea with a future.

You can see plenty of examples on the linked project, including an e-bike pack which seems to return no problems. Meanwhile this is by no means the first modular battery pack system we’ve seen.

180 Shots On A Roll With The Little Stupid Camera

If you want to play with the coolest kids on the block when it comes to photography, you have to shoot film. Or so say the people who shoot film, anyway. It is very true though that the chemical medium has its own quirks and needs a bit of effort in a way digital cameras don’t, so it can be a lot of fun to play with.

It’s expensive though — film ain’t cheap, and if you don’t develop yourself there’s an extra load of cash. What if you could get more photos on a roll? It’s something [Japhy Riddle] took to extremes, creating a fifth-frame 35mm camera in which each shot is a fifth the size of the full frame.

The focal plane of a 35mm camera with tape masking most of the frame
We’re slightly worried about that much sticky tape next to the shutter, but hey.

Standard 35mm still film has a 24x36mm frame, in modern terms not far off the size of a full-size SD card. A standard roll of film gives you 36 exposures. There are half-frame cameras that split that frame vertically to give 72 exposures, but what he’s done is make a quarter-frame camera.

It’s a simple enough hack, electrical tape masking the frame except for a vertical strip in the middle, but perhaps the most interesting part is how he winds the film along by a quarter frame. 35mm cameras have a take-up reel, you wind the film out of the cartridge bit by bit into it with each shot, and then rewind the whole lot back into the cartridge at the end. He’s wound the film into the take-up reel and it winding it back a quarter frame at a time using the rewind handle, for which we are guessing he also needs a means to cock the shutter that doesn’t involve the frame advance lever.

We like the hack, though we would be worried about adhesive tape anywhere near the shutter blind on an SLR camera. It delivers glorious widescreen at the cost of a bit of resolution, but as an experimental camera it’s in the best tradition. This is one to hack into an unloved 1970s snapshot camera for the Shitty Camera Challenge!

Continue reading “180 Shots On A Roll With The Little Stupid Camera”

Lumafield battery quality report cover page

Lumafield Peers Into The 18650 Battery

[Alex Hao] and [Andreas Bastian] of Lumafield recently visited with [Adam Savage] to document their findings after performing X-ray computed tomography scans on over 1,000 18650 lithium-ion batteries.

The short version — don’t buy cheap cells! The cheaper brands were found to have higher levels of manufacturing defects which can lead them to being unsafe. All the nitty-gritty details are available in the report, which can be downloaded for free from Lumafield, as well as the Tested video they did with [Adam] below.

Actually we’ve been talking here at Hackaday over at our virtual water-cooler (okay, okay, our Discord server) about how to store lithium-ion batteries and we learned about this cool bit of kit: the BAT-SAFE. Maybe check that out if you’re stickler for safety like us! (Thanks Maya Posch!)

We have of course heard from [Adam Savage] before, check out [Adam Savage] Giving A Speech About The Maker Movement and [Adam Savage]’s First Order Of Retrievability Tool Boxes.

Continue reading “Lumafield Peers Into The 18650 Battery”