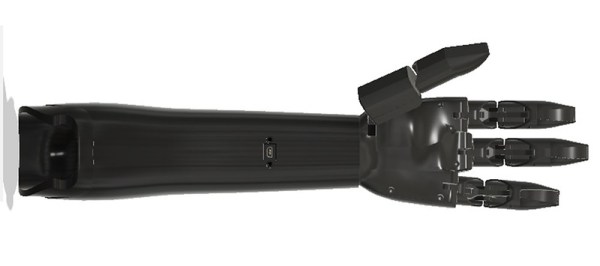
ESP32 Mini Robot Packs Sensors And 4WD

[Stefan]’s Mini WiFi/BLE 4WD robot platform (seen next to a matchbox above) packs an impressive capability into a tiny rover. It’s based on a SparkFun ESP32 Thing, a very compact way to add wireless control to your project. Compare it to some giant old UNO with a WiFi shield, these boards are small but powerful, as well as an easy adoption for Arduino fans.

[Stefan] beefed up the robot with a BNO055 module to determine orientation, an APDS-9930 proximity sensor, as well as four CNY70 IR proximity sensors on the bottom, used for line-following. A pair of 6 V motors move the robot, with a DC-DC step up converter boosting the LiPo’s 3.7 V. It’s impressive how many components [Stefan] crammed inside the shell; they’re all packed in there snugly.

The concept behind the robot is that it’s a generic platform that could be customized as needed, and [Stefan] has versions with a LEGO dart gun as well as a camera. The robot’s code resides on GitHub and the custom 3D-printed chassis is up on Thingiverse.

If you like ESP32 projects you should be sure to check out the Monster Board and the Hamster Tracker we posted recently.

TORLO Is A Beautiful 3D Printed Clock

What if you could build a clock that displays time in the usual analog format, but with the hands moving around the outside of the dial instead of rotating from a central point? This is the idea behind TORLO, a beautiful clock built from 3D printed parts.

The clock is the work of [ekaggrat singh kalsi], who wanted to build a clock using a self-oscillating motor. Initial experiments had some success, however [ekaggrat] encountered problems with the motors holding consistent time, and contacts wearing out. This is common in many electromechanical systems — mechanics who had to work with points ignition will not remember them fondly. After pushing on through several revisions, it was decided instead to switch to an ATtiny-controlled motor which was pulsed once every two seconds. This had the benefit of keeping accurate time as well as making it much easier to set the clock.

The stunning part of the clock, however, is the mechanical design. The smooth, sweeping form is very pleasing to the eye, and it’s combined with a beautiful two-tone colour scheme that makes the exposed gears and indicators pop against the white frame. The minute and hour hands form the most striking part of the design — the indicators are attached to a large ring gear that is turned by the gear train built into the frame. The video below the break shows the development process, but we’d love to see a close-up of how the gear train meshes with the large ring gears which are such an elegant part of the clock.

A great benefit of 3D printing is that it makes designing custom gear trains very accessible. We’ve seen other unconventional 3D printed clock builds before. 

Continue reading “TORLO Is A Beautiful 3D Printed Clock”

Improving Mister Screamer; An 80 Decibel Filament Alarm

I created a prototype 3D printer filament alarm that worked, but the process also brought some new problems and issues to the surface that I hadn’t foreseen when I first started. Today I’m going to dive further into the prototyping process to gain some insight on designing for a well-specified problem. What I came up with is an easy to build pendant that passively hangs from the filament and alerts you if anything about that changes.

I began with a need to know when my 3D printer was out of filament, so that I could drop whatever I was doing and insert a new spool of filament right up against the end of the previous spool. By doing this within four minutes of the filament running out, printing very large jobs could continue uninterrupted. The device I designed was called Mister Screamer.

Continue reading “Improving Mister Screamer; An 80 Decibel Filament Alarm”

New Useless Machine Does The Twist

Useless machines might not do any work or produce anything of value on their own, but they can be a great learning tool, and are often beautifully crafted as an expression of the builder’s artistic talents. By and large, they consist of a switch to turn the machine on, and an arm that switches the machine back off in response to this. Vladimir had a different take, and built this twisting vase useless machine instead.

The build references the twisting vases we saw recently – [Vladimir] loved the way they so elegantly opened and closed, and decided to base the build around that. The useless part of the machine is the lifting mechanism – a servo turns a pulley, which uses a magnet on a rope to lift the vase. Upon reaching a certain point, the vase drops, and the magnet is once again lowered to lift it back up again.

The first prototype used a simple delay-based timing loop to determine when to drop the magnet again, however over time this would fall out of sync with the vase’s position and the magnet would fail to attach to the vase. For the second version, [Vladimir] improved things by using a limit switch to determine the position of the vase instead of running on timing alone. The machine’s frame was also rebuilt using copper pipe, which allowed the wires and servo to be hidden from sight. The second revision of the project shows the difference polish can make – differences like these make the machine more suitable for display as a curio in a stylish home setting, rather then a messy project that lives on the workbench only.

Be sure to check out the video of the project below the break. For a simpler useless machine, check out this build. 
Continue reading “New Useless Machine Does The Twist”

Hackaday Prize Entry: 3D Printed Mini-Lathe

Lathes can be big, powerful, dangerous machines. But sometimes there’s a call for making very small parts out of soft materials, like plastic and wood. For jobs like this, you could use something like this 3D printed mini-lathe.

The benefits of 3D printing a tool like this are plentiful. The design can be customized and refined by the end user; [castvee8] notes that the machine can be made longer simply by increasing the length of the lead screw and guide rails. The machine does rely on some metal parts and a motor; but the real power here is that if you can’t source the exact components, you can always customize the files to suit what you have on hand.

[castvee8] aimed to make the entire build as easy as possible for the novice – even the motor and speed controller are off-the-shelf modules. It’s a testament to the golden age we live in that an entire lathe can be built out of modules and 3D printed parts. The project makes up another member of the family of 3D printed tools [castvee8] is showing off on Hackaday.io.

Practical Enclosure Design, Optimized For 3D Printing

[3D Hubs] have shared a handy guide on designing practical and 3D printing-friendly enclosures. The guide walks through the design of a two shell, two button remote control enclosure. It allows for a PCB mounted inside, exposes a USB port, and is optimized for 3D printing without painting itself into a corner in the process. [3D Hubs] uses Fusion 360 (free to hobbyists and startups) in their examples, but the design principles are easily implemented with any tool.

One of the tips is to design parts with wall thicknesses that are a multiple of the printer’s nozzle diameter. For example, a 2.4 mm wall thickness may sound a bit arbitrary at first, but it divides easily by the typical FDM nozzle diameter of 0.4 mm which makes slicing results more consistent and reliable. Most of us have at some point encountered a model where the slicer can’t quite decide how to handle a thin feature, delivering either a void between perimeters or an awkward attempt at infill, and this practice helps reduce that. Another tip is to minimize the number of sharp edges in the design, because rounded corners print more efficiently and with smoother motions from the print head.

The road to enclosures has many paths, including enclosures made from FR4 (aka PCB material) all the way down to scrap wood with toner transfer labeling, and certainly desktop 3D printing has been a boon to anyone who’s had to joylessly drill and saw away at a featureless plastic box.

DIY USB Power Bank

USB power banks give your phone some extra juice on the go. You can find them in all shapes and sizes from various retailers, but why not build your own?

[Kim] has a walkthrough on how to do just that. This DIY USB Power Bank packs 18650 battery cells and a power management board into a 3D printed case. The four cells provide 16,000 mAh, which should give you a few charges. The end product looks pretty good, and comes in a bit cheaper than buying a power bank of similar capacity.

The power management hardware being used here appears to be a generic part used in many power bank designs. It performs the necessary voltage conversions and manages charge and discharge to avoid damaging the cells. A small display shows the state of the battery pack.

You might prefer to buy a power bank off the shelf, but this design could be perfect solution for adding batteries to other projects. With a few cells and this management board, you have a stable 5 V output with USB charging. The 2.1 A output should be enough to power most boards, including Raspberry Pis. While we’ve seen other DIY Raspberry Pi power banks in the past, this board gets the job done for $3.