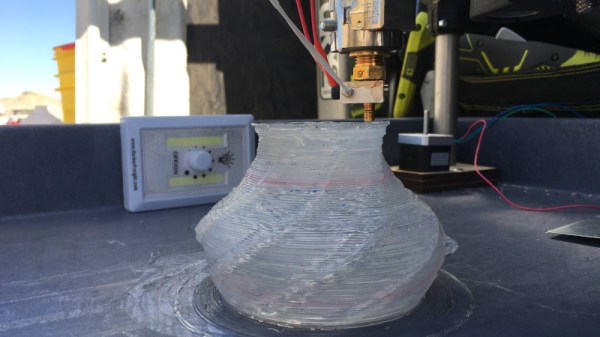
Resuming Failed 3D Prints Automatically

What happens to your 3D printer if the power goes out? What happens if there’s a jam in the nozzle? What happens if your filament breaks, runs out, or turns into a plate of spaghetti? For all these situations, the print fails, wasting plastic and time. For his Hackaday Prize entry, [robert] has come up with a tiny device that saves all those failed prints, and it does it without batteries or a UPS.

The idea behind [robert]’s box is to monitor all the G-code being sent to the printer, and allow a print to be resumed after a failure. The design is simple enough — just a USB mini port on one end, a USB A port on the other, and three buttons in between. This box logs the G-code, and if the printer happens to fail, the box will spring into life allowing you to resume a print from any Z position.

Already [robert] has tested this box on a number of printers including the Prusa i3, the Creality CR-10, and the ever-popular, explodey Anet A8. The project has already gone through a few hardware revisions and there is, of course, a fancy 3D printed enclosure for the board. It’s a great project, and one of the more interesting 3D printing tools we’ve seen in this year’s Hackaday Prize.

3D-Printer Gets Hot-Swappable Hot-Ends

3D printers can be hacked into a multitude of useful machines, simply by replacing the filament extruder with a new attachment such as a laser engraver or plotter.

However, [geggo] was fed up with re-wiring and mounting the printhead/tool every time he wanted to try something new, and set out to design a modular printhead system for next-level convenience. The result? A magnetic base-plate, allowing a 3D printer to become a laser engraver within a matter of seconds. This new base-plate mounts onto the existing ball bearings and provides a sturdy place for attachments to snap to – with room for two at once.

Using neodymium magnets to mount the printhead to the base-plate provides enough force to keep the attachment in place and compress 30 pogo pins, which make the electrical connections. These carry the lines which are common to all attachments (heater, thermistor and fan), as well as custom connections for certain attachments – for example the extruder stepper motors.  A Flexible Flat Cable (FFC) is used to connect the pogo pin PCB to the main controller.

So far, the list of tools available for fitting includes an MK8 extruder, a E3D v6 hotend (for Bowden extrusion), a laser, a micrometer dial indicator, and a pen plotter (used for writing a batch of wedding invitations!). There was even some success milling wood.

For some automated extruder switching action we’ve shown you in the past, check out the 3d-printer tool changer.

Continue reading “3D-Printer Gets Hot-Swappable Hot-Ends”

Can You 3D Print An Axe?

3D printers hit the scene in a big way in the last decade, and thanks to the constant improvements that we’ve seen since then you can now get a decent one, assembled or as a kit, for a reasonable price. The one major drawback is that almost all of these printers are limited to printing in plastic, which has its obvious limitations. Printing in metal seems like the next logical step, and a group from Michigan Tech has created something that is accessible to most of us. Spoiler: they used plastic and metal printing to print a functioning axe.

Untill now, most metal printers have used a process like laser sintering to achieve the desired effect. This group uses a much more common tool: a MIG welder. MIG welders work by passing a wire through the welding handle, which would normally used as the filler material for the weld. If you use the wire for laying down material rather than for welding specifically, you can build up material on a surface in essentially the same way that a printer that prints plastic would.

From there, all that’s needed is to attach the MIG welder to a CNC machine and get to printing. The team has produced some great results so far, including some metal braces and farm implements, so hopefully their work leads to another revolution in 3D printing for the masses. We think it’s high time.

3D Print A Thinner Car Key

Almost all modern cars come with keyless entry, some even come with keyless start. Of course, the price you pay for this technology is a bulky plastic keyfob that is an absolute pain to remove from your pockets, and generally spoils the lines of your carefully chosen outfit. [Jeremy] decided enough was enough.

The project begins with a careful disassembly of the original key. This is important to avoid damaging the PCB inside, particularly if there are any delicate wire links between different sections of the keyfob. With the piece disassembled, it was then time to start designing a replacement encasement to hasten escapement while pacing the pavement.

The 3D printer really is the perfect tool for the job here, and [Jeremy] employs it well. With this being a proximity-based keyfob, the buttons are only necessary if you want to operate the locks at a distance. They simply took up too much vertical space, so they had to go. In the end, with a redesigned housing for the PCB, and while retaining the backup mechanical key, the new fob is just 11mm, down from 18mm – a nearly 40% saving in thickness!

It’s a tidy way to clean up your pockets and make life easier. We’ve seen similar work before, too.

Handheld Propulsion Is Noisy, Awesome

Lithium batteries are ubiquitous, cheap, and incredibly powerful. Combine them with some brushless DC motors and you’ve got serious power in a compact package. [Ivan Miranda] decided to use this to his advantage, building the Handheld Self Propelling System #1. 

Yes, we’ll come right out and say it – it’s a giant fan, and it blows. Or more accurately, it’s four moderately sized fans in one fetching wrist-mounted package. The one thing that seems completely absent from the video is an answer to the obvious question – why? Other than doing damage to the hearing of anyone nearby in an enclosed space, [Ivan] demonstrates its use with the help of a skateboard in the back end of the video.

It’s built with off-the-shelf RC parts and the body is 3D printed. This is the kind of print you want to get right first time – it takes several days to print and uses a significant amount of filament.

Overall, it’s a terrifying device that promises to do something awesome when finished. [Ivan]’s just finished the thrust test and we can’t wait to see what comes next. 

If you’re looking for another way to propel yourself on a skateboard, well – there’s always the more conventional electric path.

https://youtu.be/WmMkUWvBC64

Giant F1 Car Is 3D Printed And Radio Controlled

The OpenRC F1 car is a radio control car you can 3D print and assemble yourself. You make the parts, glue them together, and then add your RC gear. That’s all well and good, but could it be done… bigger? [3D Printing Nerd] decided to tackle this one at 4x scale.

It goes without saying that this took some work. The model has to be carved up into sections that would actually fit on the printers to hand. This can take some planning to ensure the parts still come out nicely, as they may be printed in different orientations or with different slicer settings than originally intended.

That’s just the start, though. Once they’re printed, the parts need to be accurately aligned and glued together, which is a whole extra set of challenges. Urethane, epoxy and superglue adhesives are all pressed into service here to get the job done.

It’s a multipart build, as it’s a huge undertaking to 3D print anything on this scale. It’s a great example of taking a fun project, and turning up the silly factor to 11. And of course, at the end of the day, you’ve got a gigantic RC car to play with. Perhaps the only bigger RC cars we’ve seen have been… actual cars.

A High Speed, Infinite Volume 3D Printer

One of the most interesting developments in 3D printing in recent memory is the infinite build volume printer. Instead of a static bed, this type of printer uses a conveyor belt and a hotend set at an angle to produce parts that can be infinitely long in one axis, provided you have the plastic and electricity. For this year’s Hackaday Prize, [inven2main] is exploring the infinite build volume design, but putting a new spin on it. This is a printer with a conveyor belt and a SCARA arm. The goal of this project is to build a printer with a small footprint, huge build volume, no expensive rails or frames, and a low part count. It is the most capable 3D printer you can imagine using a minimal amount of parts.

Most of the documentation for this build is hanging around on the RepRap forums, but the bulk of the work is already done. The first half of this build — the SCARA arm — is well-traveled territory for the RepRap community, and where there’s some fancy math and kinematics going on, there’s nothing too far out of the ordinary. The real trick here is combining a SCARA arm with a conveyor belt to give the project an infinite build volume. The proof of concept works, using a conveyor belt manufactured out of blue painter’s tape. These conveyor belt printers are new, and the bed technology isn’t quite there, but improvements are sure to come. Improvements will also be found in putting a small crown on the rollers to keep the belt centered.

All the files for this printer are available on the Gits, and there are already a few videos of this printer working. You can check those out here.