Resin Stacking Proves Messy And Difficult

3D printers are typically the tool you use when you want a one-off quick prototype. However, more and more, they’re being used to produce things in quantity. [Uncle Jessy] decided to try out the resin stacking technique in order to quickly produce many figurines on his resin printer. However, not everything went exactly to plan.

The technique is simple. The idea is to produce many copies of an object in a single continuous print on a resin 3D printer. To achieve this, the object is cloned many times, and scaffolding is created to allow the stacking of multiple objects on top of each other. This must be done carefully to avoid ruining the geometry of the object, and similarly to support material, uses more resin in the process.

[Uncle Jessy] experimented several times, but ran into multiple issues with the process when trying to print out some small Magneto figurines. An initial experiment using a raft failed when the print fell off the build plate. With the raft removed, the second print failed as the scaffolding didn’t print quite right. Further tweaks and beefing up the scaffold improved things, and [Jessy] managed to print 93 figurines in a single operation.

It’s a useful technique if you want to print a ton of models on a resin printer in as short a time as possible. However, expect to spend plenty of resin as you refine the technique. You’ll also need a big wash tank to clean the prints during post-processing. Video after the break.

Continue reading “Resin Stacking Proves Messy And Difficult”

Customize These 3D Printed Cases

Building something, of course, requires your electronics skills. But packaging it is often an exercise in mechanics. You can buy off the shelf, of course, but sometimes it is hard to find just the right enclosure. You probably have a 3D printer, too, but sometimes 3D printing an entire case can be time consuming and isn’t always completely attractive. Enter [Johannes-Bosch] and Fusion 360. These 3D printed frames assemble into boxes and are easy to customize. The panels are aluminum, although we imagine you could substitute wood, acrylic, or even a 3D printed sheet of plastic, if you wanted to.

The video below shows some examples. If your German isn’t up to snuff, ask YouTube to automatically translate the subtitles and you’ll get the idea.

Continue reading “Customize These 3D Printed Cases”

A scaled down version of a pedestrian crossing signal

Don’t Walk Past This 3D Printed Pedestrian Crossing Light

There’s just something so pleasing about scaled-down electronic replicas, and this adorable 3D printed pedestrian crossing light by [sjm4306] is no exception.

Although a little smaller than its real-world counterpart, the bright yellow housing and illuminated indicators on this pedestrian lamp are instantly recognizable due to their ubiquitous use throughout the United States. The handful of printed parts are held together using friction alone, which makes assembly a literal snap. The ‘safety grill’ with its many angles ended up being one of the most tedious parts of the build process, but the effort was definitely justified, as it just wouldn’t look right without it.

A suitably minuscule ATtiny85 drives a pair of LED strips that effectively mimic the familiar symbols for ‘Walk’ and ‘Don’t Walk’. [sjm4306] has designed the board and case in such a way to accommodate a variety of options. For example, there’s just enough room to squeeze in a thin battery, should you want to power this contraption on-the-go. If you don’t have an ATtiny85 on hand, the board also supports an ATmega328p or even an ESP8266.

All the build details are available over on Hackaday.io. While it’s billed as a ‘night light’, we think this could be an awesome platform for an office toy, similar to this office status light project. Or if you’ve somehow already got your hands on a full-size pedestrian lamp, why not hook it up to the Internet?

Continue reading “Don’t Walk Past This 3D Printed Pedestrian Crossing Light”

Do You Really Need To Dry Filament?

There’s a lot of opinions and theories around the storing and drying of 3D printing materials. Some people are absolutely convinced you must bake filament if it been stored outside an airtight bag, even for a few days. Some others have ‘never had a problem.’ So it’s about time someone in the know has done some testing to try to pin down the answer to the question we’re all asking; How bad is wet filament really?

[Thomas Sanladerer] setup a simple experiment, using samples of three common types of filament, specifically PLA, PET-G and ASA. He stored the samples in three environments, on his desk, outside in the garden, and finally submerged in water for a full week. What followed was a whole lot of printing, but they all did print.

Different filaments will absorb water at different rates, depending upon their chemical composition and the environment, nylon being apparently particularly fond of a good soaking. It would seem that the most obvious print defect that occurs with increased water absorption is that of stringing, and other than being annoying and reducing surface quality somewhat, it’s not all that serious in the grand scheme of things. It was interesting to note that water absorption doesn’t seem to affect the strength of the final part.
Continue reading “Do You Really Need To Dry Filament?”

DIY Hydroelectric Plant

Impressive Off-Grid Hydroelectric Plant Showcases The Hacker Spirit

We all know the story arc that so many projects take: Build. Fail. Improve. Fail. Repair. Improve. Fail. Rebuild. Success… Tweak! [Kris Harbour] is no stranger to the process, as his impressive YouTube channel testifies.

DIY Hydroelectric Plant
An IOT charge controller makes power management easier.

Among all of [Kris’] off-grid DIY adventures, his 500 W micro hydroelectric turbine has us really pumped up. The impressive feat of engineering features Arduino/IOT based controls, 3D printed components, and large number of custom-machined components, with large amounts of metal fabrication as well.

[Kris] Started the build with a Pelton wheel sourced from everyone’s favorite online auction site paired with an inexpensive MPPT charge controller designed for use with solar panels. Eventually the turbine was replaced with a custom built unit designed to produce more power. An Arduino based turbine valve controller and an IOT enabled charge controller give [Kris] everything he needs to manage the hydroelectric system without having to traipse down to the power house. Self-cleaning 3D printed screens keep intake maintenance to a minimum. Be sure to check out a demonstration of the control system in the video below the break.

As you watch the Hydro electric system playlist, you see the hacker spirit run strong throughout the initial build, the failures, the engineering, the successes, and then finally, the tweaking for more power. Because why stop at working when it can be made better, right? We highly recommend checking it out- but set aside some time. The whole series is oddly addictive, and This Hackaday Writer may have spent inordinate amounts of time watching it instead of writing dailies!

Of course, you don’t need to go full-tilt to get hydroelectric power up and running. Even at a low wattage, its always-on qualities mean that even a re-purposed washing machine can be efficient enough to be quite useful.

Thanks to [Mo] for alerting us to the great series via the Tip Line!

Continue reading “Impressive Off-Grid Hydroelectric Plant Showcases The Hacker Spirit”

Fifty Shades Of Brown: 3D Printing With Sugar

[Norbert Heinz] has been busy for the 2021 Hackaday Prize entry, working on the design of a direct granule extruder for 3D printing with waste materials, or materials that are not provided in the form of a filament. Sugar is pretty common in most households, so since that’s already available in granular form, [Norbert] gave 3D printing with granulated sugar a try. (Video, embedded below.)

[Editor’s note: He earned fifth place for this one! Well, not the sugar in particular, but the overall great work on granular extruders.]

Success was somewhat variable, as the gloopy material is notoriously fickle to work with, but the setup did produce some structures that stayed in one piece, at least for a while. Initially [Norbert] tried it real slow, effectively printing with the liquified sweet stuff, by dragging a molten blob of it around on the end of the extruder nozzle. Whilst this did work, the resulting print resolution did leave something to be desired. The next thing tried was increased print speed. This produced clearer prints, as the sugar did not have time to caramelise, or form a noticeable blob, but as soon as the bed started to cool, it caused it to crack badly.

Going slow seemed to be the way forward, as more time to cool may have reduced the stresses in the structure due to the increased cooling time. But anyway, the way we see it, is it’s fun trying, and if it fails, you can just eat it, so long as you disregard all that food safety stuff anyway.

[Norbert] documents the granule extruder journey on the project Hackaday.io page, so it should be straightforward enough to duplicate this is you were so inclined.

We’ve covered a few sugary hacks before; Need a renewable bed adhesive? out of glue stick? try sugar as a bed adhesive! Printing in gloopy, sloppy materials is nothing new at all, we covered it nearly ten years ago.

Continue reading “Fifty Shades Of Brown: 3D Printing With Sugar”

DIY High Flow 3D Printing Nozzle

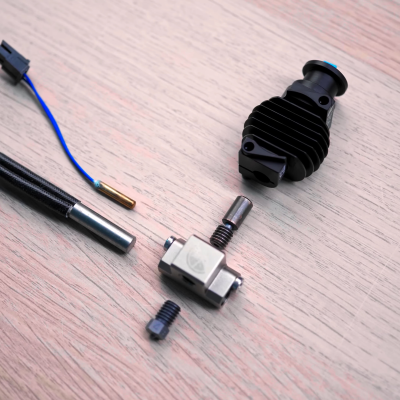
Sometimes advances happen when someone realizes that a common sense approach isn’t the optimal one. Take radio. Success in radio requires bigger antennas and more power, right? But cell phones exist because someone realized you could cram more people on a frequency if you use less power and smaller antennas to limit the range of each base station. With FDM 3D printing, smaller nozzles were all the rage for a while because they offer the possibility of finer detail. However, these days if you want fine detail you should be using resin-based printers and larger nozzles offer faster print times and stronger parts. The Volcano hotend started this trend but there are other options now. [Stefan] over at CNC Kitchen decided to make his own high flow nozzle and he claims it is better than other options.

Don’t get too carried away with the DIY part. As you can see in the video below, he starts with a standard nozzle, so it is really a nozzle conversion or hack. The problem with high flow isn’t the hole in the nozzle. It is melting the plastic fast enough. The faster the plastic moves through the nozzle, the less time there is for it to melt.

Continue reading “DIY High Flow 3D Printing Nozzle”