A fan used to be a simple device – motor rotates blades, air moves, and if you were feeling fancy, maybe the whole thing oscillates. Now fans have thermostats, timers, and IR remotes. So why not increase the complexity by making a smart fan with an IoT interface?
[Casper]’s project looks more like a proof of concept or learning platform than a serious attempt at home automation. His build log mentions an early iteration based on a Raspberry Pi. But an ESP8266 was a better choice and made it into the final build, which uses an IR LED to mimic the signals from the remote so that all the stock modes of the fan are supported. The whole thing is battery powered and sits on a breadboard on top of the fan, but we’ll bet that a little surgery could implant the interface and steal power internally. As for interfaces, take your pick – an iOS app via the SmartThings home automation platform, through their SmartTiles web client, or using an Amazon Echo. [Casper] mentions looking into MQTT as well but having some confusion; we’d suggest he check out [Elliot Williams]’ new tutorial on MQTT to get up to speed.


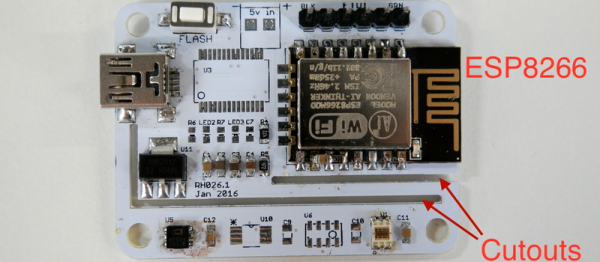
 Next came the clever bit. [Richard] put cutouts into the board to hopefully stop the flow of heat from the ESP8266 module to the temperature sensor. Again, he found that the board heats up by around four degrees Celcius or nine degrees Farenheit. That’s a horrible result in any units.
 Fail of the Week is a Hackaday column which celebrates failure as a learning tool. Help keep the fun rolling by writing about your own failures and