Drink Water On Schedule Or Else Flood Your Desk

How much water have you had to drink today? We would venture to guess that the answer is somewhere between ‘absolutely none’ and ‘not not nearly enough’. You can go ahead and blame poor work/life balance — that’s our plan, anyway — and just try to do better. All this working from home means the bathroom situation is now ideal, so why not drink as much water as you can?

But how? Well, you’re human, so you’ll need to make it as easy as possible to drink the water throughout the day. You could fill up one big jug and hoist it to your mouth all day long (or use a straw), but facing that amount of water all at once can be intimidating. The problem with using a regular-sized vessel is that you have to get up to refill it several times per day. When hyper-focus is winning the work/life tug-of-war, you can’t always just stop and go to the kitchen. What you need is an automatic water dispenser, and you need it right there on the desk.

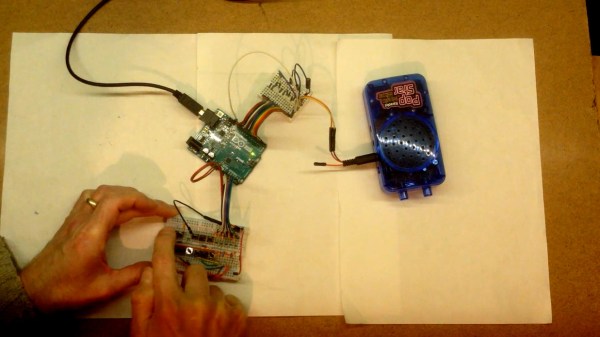
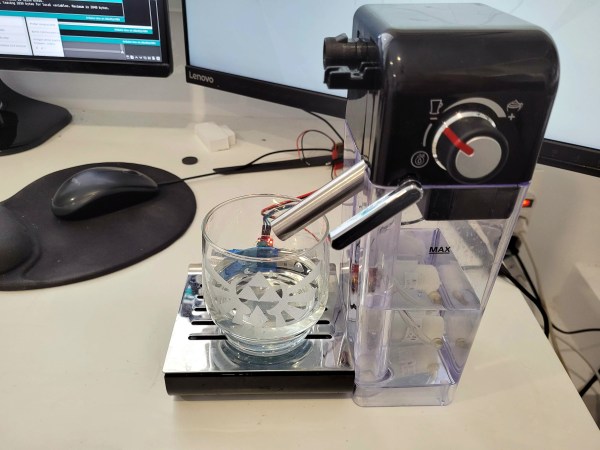
[Javier Rengel]’s water pomodoro makes it as easy as setting your cup down in front of this machine and leaving it there between sips. As long as the IR sensor detects your cup, it will dispense water every hour. This means that if you don’t drink enough water throughout the day, you’re going to have it all over the desk at some point. [Javier] simply connected an Arduino UNO to a water pump and IR sensor pair and repurposed the milk dispenser from a coffee machine. Check it out in action after the break.

Of course, if you aren’t intimidated by the big jug approach, you could keep tabs on your intake with the right kind of straw.

Continue reading “Drink Water On Schedule Or Else Flood Your Desk”

Realistic Mission Control Box Is A Blast For All Ages

A lot of electronic busy boxes that are built for children are simply that — a mess of meaningless knobs and switches that don’t do much beyond actuating back and forth (which, let’s be honest, is still pretty fun to do). But this Mission Control Center by [gcall1979] knocks them all out of orbit. The simulation runs through a complete mission, including a 10-minute countdown with pre-flight system checks, 8.5 minutes of powered flight to get out of the atmosphere that includes another four tasks, and 90 minutes to orbit the Earth while passing through nine tracking stations across the world map.

That’s a lot time to keep anyone’s attention, but fortunately [gcall1979] included a simulation speed knob that can make everything go up to 15 times faster than real-time. This knob can be twiddled at any time, in case you want to savor the countdown but get into space faster, or you don’t have 90 minutes to watch the world map light up.

The main brain of this well-built box is an Arduino Mega, which controls everything but the launch systems’ mainframe computer — this is represented by bank of active LEDs that blink along with the voice in the sound clips and runs on an Arduino Uno and a couple of shift registers. To keep things relatively simple, [gcall1979] used an Adafruit sound board for the clips.

We love everything about this build, especially the attention to detail — the more important pre-flight tasks are given covered toggle switches, and there’s a Shuttle diagram that lights up as each of these are completed. And what Shuttle launch simulator would be complete without mushroom buttons for launch and abort? Grab your victory cigar and check out the demo video after the break.

Is your child too young to be launching the Shuttle? Here’s an equally cool busy box with toddler brains in mind.

Continue reading “Realistic Mission Control Box Is A Blast For All Ages”

Arduino Serial Vs SerialUSB

[Andrew] wonders why the SerialUSB() function on the Cortex M3-based Arduino Due is so much faster than Serial() on the Uno or Nano, and shares his observations in this short video. He sets up an experiment with a simple sketch on both boards and uses Wireshark to evaluate the results.

Data is sent in the USB packets in groups of four characters on the ATmega-based boards, but the entire string is put in a packet on the Due board. If you look under the hood, the answer is hiding in plain sight. While the Arduino family of boards connect to your computer using a USB virtual serial port, the ATmega ones have an actual serial connection on-board. For instance, on the Nano there is an FT232RL between the USB connector and the microprocessor (on an Arduino Uno board, a small ATMEGA8U2 is used instead of an FTDI chip, but the concept is the same). On the Arduino Due, the USB connects directly to the SAM3X8E processor.

This concept doesn’t apply only to Arduino boards, of course. On any serial connection between two computers, when a virtual USB device is used on both sides of the link (no actual serial signals involved), the serial baud rate is a fictional thing — data transfer speeds depends on USB alone. We are curious why the packets contain four characters in [Andrew]’s ATmega Wireshark captures — why not 1, 2, or 10? Is this something that can be controlled by the programmer, or is it fixed by the protocol and/or the FTDI chip? If you have the answer, let us know in the comments below. Continue reading “Arduino Serial Vs SerialUSB”

Running 57 Threads At Once On The Arduino Uno

When one thinks of the Arduino Uno, one thinks of a capable 8-bit microcontroller platform that nonetheless doesn’t set the world alight with its performance. Unlike more modern parts like the ESP32, it has just a single core and no real multitasking abilities. But what if one wanted to run many threads on an Uno all at once? [Adam] whipped up some code to do just that.

Threads are useful for when you have multiple jobs that need to be done at the same time without interfering with each other. The magic of [Adam]’s ThreadHandler library is that it’s designed to run many threads and do so in real time, with priority management as well. On the Arduino Uno, certainly no speed demon, it can run up to 57 threads concurrently at 6ms intervals with a minumum timing error of 556 µs and a maximum of 952 µs. With a more reasonable number of 7 threads, the minimum error drops to just 120 µs.  Each thread comes with an estimated overhead of 1.3% CPU load and 26 bytes of RAM usage.

While we struggle to think of what we could do with more than a handful of threads on an Arduino Uno, we’re sure you might have some ideas – sound off in the comments. ThreadHandler is available for your perusal here, and runs on SAMD21 boards as well as any AVR-based boards that are compatible with TimerOne. We’ve seen other work in the same space before, such as ChibiOS for the Arduino platform. Video after the break.

Continue reading “Running 57 Threads At Once On The Arduino Uno”

12-Note Polyphony On An Arduino Synth

When synthesizers first hit the scene back in the mid-20th century, many were monophonic instruments, capable of producing just one pitch at a time. This was a major limitation, and over time polyphonic synthesizers began to flood into the scene, greatly expanding performance possibilities. [Kevin] decided to build his own polyphonic synthesizer, but far from taking the easy route, he built it around the Arduino Uno – not a platform particularly well known for its musical abilities! 

[Kevin]’s build manages 12-note polyphony, an impressive feat for the ATmega328 at the heart of the Arduino Uno. It’s done by running an interrupt on a timer at a steady rate, and implementing 12 counters, one per note. When a counter overflows, a digital IO pin is flipped. This outputs a square wave at a certain pitch on the IO pin, producing the given note. The outputs of 12 digital IO pins are mixed together with a simple resistor arrangement, producing a basic square wave synth. Tuning isn’t perfect, but [Kevin] notes a few ways it could be improved down the line.

[Kevin] has added features along the way, expanding the simple synth to work over several octaves via MIDI, while also building a small tactile button keyboard, too. It’s a project that serves as a great gateway into basic synthesis and music electronics, and we’re sure [Kevin] learned a lot along the way. We’ve seen other microcontroller synths before too, like this tiny device that fits inside a MIDI plug. Video after the break.

Continue reading “12-Note Polyphony On An Arduino Synth”

Remote Control Robot Deals Dominoes

Oh, dominoes — the fun of knocking them down is inversely proportional to the pain of setting them all up again. [DIY Machines] is saving loads of time by automating the boring part with a remote control domino-laying machine. If only it could pick them back up.

This machine can be driven directly over Bluetooth like an R/C car, or programmed to follow a predetermined path via Arduino code. Here’s how it works: an Arduino Uno drives two servos and one motor. The 1:90 geared motor drives the robot around using a 180° servo to steer. A continuous servo turns the carousel, which holds nearly 140 dominoes. We love that the carousel is designed to be hot-swappable, so you can keep a spare ready to go.

[DIY Machines] really thought of everything. Every dozen or so dominoes, the machine leaves a gap in case one of the dominoes is tipped prematurely. There are also a couple of accessories for it, like a speedy domino loading stick and a fun little staircase bridge to add to your domino creations. Though all the machine files are freely available, [DIY Machines] requests a small donation for the accessories files. Check out the complete build video after the break, followed by a bonus video that focuses on upgrading the machine with an HM10 Bluetooth module for controlling it directly with a phone.

This certainly isn’t the first domino-laying device we’ve seen, though it might be the most accessorized. [Matthias Wandel]’s version uses only one motor to move and deal the dominoes.

Continue reading “Remote Control Robot Deals Dominoes”

Ambience Lamp Ripples Like Water

After the year humanity has endured, we could all use a little more relaxation in our lives. This atmosphere lamp is just the thing to set a relaxing ambience for work, studying, or hanging out. Just touch the surface and the light ripples to life, resembling the concentric circles that form on the surface of still water when it is touched. When the light settles, it looks like an inviting pool that’s ready for a nighttime swim.

There aren’t really any surprises inside — the lamp is operated via capsense by touching the center of the top. Three NeoPixel rings and an RGB LED strip provide the lighting, and an Arduino UNO runs the show. [Qttting_F] used an inexpensive ceramic bowl with a piece of acrylic for a lid, but this could just as easily be printed in white PLA or something. Check it out in action after the break.

Ambience is nice, but sometimes you need something more functional. Those types of lamps can be printed, too.

Continue reading “Ambience Lamp Ripples Like Water”