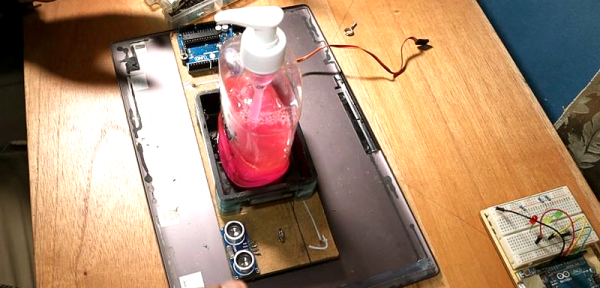
A Tetris To Be Proud Of, With Only A Nano

Tetris may have first arrived in the West on machines such as the PC and Amiga, but its genesis at the hands of [Alexey Pajitnov] was on an Electronika 60, a Soviet clone of an early-1970s DEC PDP-11. Thus those tumbling blocks are hardly demanding in terms of processor power, and a game can be implemented on the humblest of hardware. Relatively modern silicon such as the Atmega328 in [c0pperdragon]’s Arduino Nano Tetris console should then have no problems, but to make that assumption is to miss the quality of the achievement.

In a typical home or desktop computer of the 1980s the processor would have been assisted by plenty of dedicated hardware, but since the Arduino has none of that the feat of creating the game with a 288p video signal having four gray scales and with four-channel music is an extremely impressive one. Beside the Nano there are only a few passive components, there are no CRT controllers or sound chips to be seen.

The entire device is packaged within a clone of a NES controller, with the passives on a piece of stripboard beside the Nano. There is a rudimentary resistor DAC to produce the grey scales, and the audio is not the direct PWM you might expect but a very simple DAC created by charging and discharging a capacitor at the video line frequency. The results can be seen and heard in the video below the break, and though we’re sure we’ve heard something like that tune before, it looks to be a very playable little game.

Continue reading “A Tetris To Be Proud Of, With Only A Nano”

Writing Arduino Libraries, An Expert View

The Arduino IDE has a bit of a split personality. On the one hand, it is a simple environment where you can just pick and choose a few libraries, write a few lines of code, and make lots of interesting things. On the other hand, it is also an ecosystem in which many different boards and libraries can be supported. Writing a great library that everyone can easily use takes a little forethought. There is an official style guide, but a recent post by [Nate] from Sparkfun points out lessons learned from writing more libraries than most people.

Of course, as you might expect, some of this is a matter of opinion, and [Nate] admits that. For example, they always use the serial port at 115,200 baud, but they do note that 9,600 baud is also popular. They also suggest making code as readable as possible, which is usually good advice. In the old days, writing terse code might lead to higher efficiency, but with modern compilers, you ought to get a tight final result even when doing things in a pretty verbose fashion.

Continue reading “Writing Arduino Libraries, An Expert View”

MIL-SPEC Keyboard Now Salutes USB

When [easyjo] picked up this late ’80s Marconi mil-spec keyboard for cheap, he knew it wouldn’t be easy to convert it to USB — just that it would be worth it. Spoiler alert: those LEDs aren’t a mod, they’re native. They get their interesting shape from the key traces, which are in the four corners.

Despite having way-cool buttons such as WPNS HOLD, and the fact that Control is on the home row where it belongs, this keyboard does not look fun to type on at all for any length of time. Of course, the point of this keyboard is not comfort, but a reliable input device that keeps out dust, sweat, liquids, and the enemy.

This is probably why the controller is embedded into the underside of the key switch PCB instead of living on its own board.  [easyjo] tried to analyze the signals from the existing 26-pin connector, but it didn’t work out.

So once he was able to decode the matrix, he removed the controller chip and wired the rows and columns directly to an Arduino Leonardo. Fortunately, the LEDs were just a matter of powering their columns from the front side of the board.

The availability of certain kinds of military surplus can make for really interesting modernization projects, like adding POTS to a field telephone.

Via r/duino

Gravity-Defying Water Droplet Fountain Gets An Upgrade

When we last saw [isaac879]’s levitating RGB time fountain, it was made of wood which meant that it would absorb water and didn’t really show off the effect very well. His new version solves this problem with an acrylic case, new PCB and an updated circuit.

Like the original, this project drops water past strobing RGB LEDs creating an illusion of levitating, undulating colored water droplets. The pump at the top creates the droplets, but the timing has a tendency to drift over time. He thus implemented a PID controller to manage the pump’s drip rate, which was done by having the droplets pass by an infrared diode connected to an ATTiny85. The ’85 used the diode and PWM to control the pump motor speed and communicated to the Arduino over I2C.

The video shown below shows the whole process of designing and building the new time fountain. Everything from circuit and PCB design to 3D printing to assembly is shown along with narration describing what’s going on in case you want to build one yourself. If you do, all the files and components required are listed in the info section of the video.

There’s more that [isaac879] wants to do to improve the time fountain, but V2 looks great. It’s sleeker and smaller than the original and solves some of the design issues of the first. For more inspiration, check out some of the other levitating water fountain projects that have been posted over the years.

Continue reading “Gravity-Defying Water Droplet Fountain Gets An Upgrade”

Self-Playing Kalimba V2 Thanks To Readers Like You

Would you like to know the great thing about this community we have here? All the spitballing that goes on every day in the comments, the IO chat rooms, and in the discussion threads of thousands of projects. One of our favorite things about the Hackaday universe is that we help each other out, and because of that, our collective curiosity pushes so many designs forward.

[Gurpreet] knows what we’re talking about. He’s back with version two of his self-playing kalimba, driven as strongly as ever by the dulcet tones of the Avatar theme. Now the robo-kalimba is rocking two full octaves, and thanks to your comments and suggestions, has relocated the servos where they can’t be picked up by the soundboard.

We gasped when we saw the new mechanism — a total of 15 rack and pinion linear actuators that make the kalimba look like a tiny mechanical pipe organ. Now the servos float, fixed into a three-part frame that straddles the sound box. [Gurpreet] melted servo horns to down to their hubs rather than trying to print something that fits the servos’ sockets.

Thumb your way past the break to check out the build video. [Gurpreet] doesn’t shy away from showing what went wrong and how he fixed it, or from sharing the 3D printering sanity checks along the way that kept him going.

Plucking kalimba tines is a difficult problem to solve because they’re stiff, but with timbre sensitive to many degrees of pressure. A slightly easier alternative? Make a toy player piano.

Continue reading “Self-Playing Kalimba V2 Thanks To Readers Like You”

Levitating Starship Model Comes In For A Landing

If everything goes according to plan, Elon Musk says the first generation of SpaceX’s massive Starship will make an orbital flight before the end of 2020. That’s a pretty bold claim, but when you’ve made landing rockets on their tails as in the old science fiction pulp magazines seem routine, we suppose you’ve earned the right to a bit of bravado. We’re excited to see the vehicle evolve over the next several months, but even if the real one stays grounded, we’ll gladly take this “flying” Starship model from [Chris Chimienti] as a consolation prize.

A magnetic levitation module, we’re officially in the future.

Feeling a bit let down by the 3D printable models of the Starship he found online, [Chris] set out to build his own. But it wasn’t enough to just make his bigger, stronger, and more accurate to Starship’s current design; he also wanted to make it a bit more exciting. Some RGB LEDs an Arduino embedded in the “cloud” stand the rocket sits on was a good start, and the landing pad inspired by SpaceX’s real autonomous spaceport drone ship Just Read the Instructions looks great all lit up.

But this is Starship we’re talking about, a vehicle that could literally push humanity towards being a multi-planet species. To do it justice, you’ve really got to knock it out of the park. So [Chris] found a magnetic levitation module online that could support a few hundred grams, and set to work on making his plastic Starship actually hover over the landing pad.

As you might imagine, it was a bit tricky. The first versions of the rocket looked great but came out too heavy, so he switched over to printing the model in so-called “spiral vase mode” which made it entirely hollow. Now far lighter and with a magnetic plate fit into the bottom, it was stable enough to float on its own. For the final touch, [Chris] added some red LEDs and a coin cell battery to the base of the Starship so it looks like the sleek craft is performing a last-second landing burn with its “impossible” full-flow staged combustion engines.

This isn’t the first time we’ve seen a model rocket with an electronic glowing cloud under it, but it’s certainly the first one we’ve seen that could levitate in mid-air. While this little rocket might not make it all the way to Mars, we wouldn’t be surprised to see it touching down on the desks of other hackers and makers in the near future.

Continue reading “Levitating Starship Model Comes In For A Landing”

LoRa Tutorials For The DIY Masses

LoRa is the go-to tech for low power, long range wireless sensor networks. Designing with off-the-shelf modules can be a boon or a bane depending on the documentation and support. Luckily, [Renzo] has prepared a set of tutorials to get you started.
In his seven part series of write-ups, [Renzo] starts by connecting the E32 module from AliExpress to an Arduino as well as an ESP8266 to demonstrate essential communications. Then he discusses the configuration options and the library he created to make like a bit easier. Following that is a series of posts discussing transmission types as well as power saving methods including sleep modes and wake-on-radio.
The information will be extremely handy for someone starting off with the SX1276/SX1278 Wireless Modules which are relatively inexpensive as opposed to more standardized development kits. We love the abundance of fritzing diagrams, arduino code and helper library and hope someone will build on it. You can get the library from Github for your tinkering pleasure.
If you are looking for ideas for this newly discovered skill, have a look at LoRa Enabled Mailbox as well as Electric Fence Monitoring with The Things Network for a bit of IoT action.