Ultrasonic Array Gets Range Data Fast And Cheap

How’s your parallel parking? It’s a scenario that many drivers dread to the point of avoidance. But this 360° ultrasonic sensor will put even the most skilled driver to shame, at least those who pilot tiny remote-controlled cars.

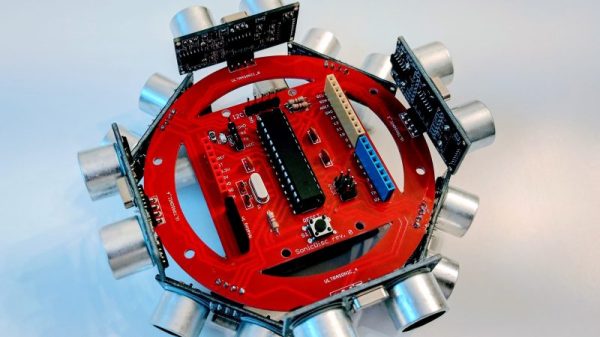
Watch the video below a few times and you’ll see that within the limits of the test system, [Dimitris Platis]’ “SonicDisc” sensor does a pretty good job of nailing the parallel parking problem, a driving skill so rare that car companies have spent millions developing vehicles that do it for you. The essential task is good spatial relations, and that’s where SonicDisc comes in. A circular array of eight HC-SR04 ultrasonic sensors hitched to an ATmega328P, the SonicDisc takes advantage of interrupts to make reading the eight sensors as fast as possible. The array can take a complete set of readings every 10 milliseconds, which is fast enough to allow for averaging successive readings to filter out some of the noise that gets returned. Talking to the car’s microcontroller over I2C, the sensor provides a wealth of ranging data that lets the car quickly complete a parallel parking maneuver. And as a bonus, SonicDisc is both open source and cheap to build — about $10 a copy.

Rather use light to get your range data? There are some pretty cheap LIDAR units on the market these days.

Continue reading “Ultrasonic Array Gets Range Data Fast And Cheap”

1btn – An Open Source Dash

The availability of cheap radios, omni-present WiFi and powerful web services means the IoT wave is here to stay. Amazon got into the act with its “do only one thing” Dash button. But a more interesting solution would be an IoT “do it all” button.

[Anand] has been working on his 1btn Open Source WiFi connected IoT button for a while. It connects to the Internet over WiFi to trigger whatever action you have assigned to it using a simple, online interface. It’s reconfigurable and open source. Which means it can be used in pretty imaginative ways, and if needed, can be re-flashed with your own custom firmware should you decide to really get under its hood.

The 1btn’s ESP8266 module is usually in sleep mode, waking up when the button is pressed, making the connection, performing the task and then going back to sleep once confirmation is received. A Red/Green LED indicates if the action was successful or not. You can set it up to send e-mails, messages, tweets or perform actions via a custom script, API or the IFTTT – maker channel. To make it hacker friendly, all of the ESP8266 GPIO pins are accessible via headers. This makes it convenient to add external sensors, for example. There’s also a (unpopulated) QFN footprint to allow adding an ATmega device (168P/328P) whose GPIO pins are also accessible via headers. This opens up a large number of additional applications for the device such as home automation.

On the software side, the 1btn connects to a web console, where you can set up an account, configure the device, register its MAC ID, assign it an alias and set up its actions. All of the source files for the 1btn – firmware, enclosure, schematic, BOM, PCB layout and example use cases – are posted on his Github repository.

The HackadayPrize2016 is Sponsored by:

Tiny Radio Tracks Your Balloons

The name of the game in rocketry or ballooning is weight. The amount of mass that can be removed from one of these high-altitude devices directly impacts how high and how far it can go. Even NASA, which estimates about $10,000 per pound for low-earth orbit, has huge incentives to make lightweight components. And, while the Santa Barbara Hackerspace won’t be getting quite that much altitude, their APRS-enabled balloon/rocket tracker certainly helps cut down on weight.

Tracksoar is a 2″ x .75″ x .5″ board which weighs in at 45 grams with a pair of AA batteries and boasts an ATmega 328P microcontroller with plenty of processing power for its array of on-board sensors. Not to mention everything else you would need like digital I/O, a GPS module, and, of course, the APRS radio which allows it to send data over amateur radio frequencies. The key to all of this is that the APRS module is integrated with the board itself, which saves weight over the conventional method of having a separate APRS module in addition to the microcontroller and sensors.

As far as we can see, this is one of the smallest APRS modules we’ve ever seen. It could certainly be useful for anyone trying to save weight in any high-altitude project. There are a few other APRS projects out there as well but remember: an amateur radio license will almost certainly be required to use any of these.

Unusual Nixie Tubes Lead To Unique Clock

There’s no doubting the appeal of Nixie tubes. The play of the orange plasma around the cathodes through the mesh anode and onto the glass envelope can be enchanting, and the stacking of the symbols in the tube gives a depth to the display that is unlike any other technology. So when [Ian] found a set of six tubes on eBay at a fire sale price, he couldn’t resist picking them up and incorporating them into a unique but difficult to read Nixie clock.

It turns out the set of tubes [Ian] ordered were more likely destined for a test instrument than a clock, displaying symbols such a “Hz”, “V” and “Ω”. Initially disappointed with his seemingly useless purchase, [Ian] put his buyer’s remorse aside and built his clock anyway. Laser-cut acrylic, blue LEDs under the tube for a glow effect, a battery-backed RTC talking to an ATmega328, and the appropriate high-voltage section lead to a good-looking and functional clock, even if [Ian] himself needs a cross-reference chart to read the time. You’ll be able to figure out at the whole character set after watching the video after the break; spoiler alert: sensibly enough, Ω maps to 0.

We’ve seen lots of Nixie projects before, but few as unique as [Ian]’s clock.

Continue reading “Unusual Nixie Tubes Lead To Unique Clock”

Camera Controller

A Remote For CHDK Cameras Made Possible With Arduino

[AlxDroidDev] built himself a nice remote control box for CHDK-enabled cameras. If you haven’t heard of CHDK, it’s a pretty cool software modification for some Canon cameras. CHDK adds many new features to inexpensive cameras. In this case, [AlxDroidDev] is using a feature that allows the camera shutter to be activated via USB. CHDK can be run from the SD card, so no permanent modifications need to be made to the camera.

[AlxDroidDev’s] device runs off of an ATMega328p with Arduino. It operates from a 9V battery. The circuit contains an infrared receiver and also a Bluetooth module. This allows [AlxDroidDev] to control his camera using either method. The device interfaces to the camera using a standard USB connector and cable. It contains three LEDs, red, green, and blue. Each one indicates the status of a different function.

The Arduino uses Ken Shirrif’s IR Remote library to handle the infrared remote control functions. SoftwareSerial is used to connect to the Bluetooth module. The Arduino code has built-in functionality for both Canon and Nikon infrared remote controls. To control the camera via Bluetooth, [AlxDroidDev] built a custom Android application. The app can not only control the camera’s shutter, but it can also control the level of zoom.