Hacklet 26 – Arduino Projects

Arduino is one of those boards that has become synonymous with hacking and making. Since its introduction in 2005, over 700,000 official Arduino boards have been sold, along with untold millions of compatible and clone boards. Hackers and makers around the world have found the Arduino platform a cheap and simple way to get their projects off the ground. This weeks Hacket focuses on some of the best Arduino based projects we’ve found on Hackday.io!

drawingbot
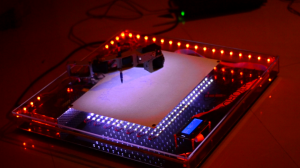
[Niazangels] gets the ball – or ballpoint pen – rolling with Roboartist, a robot which creates line drawings. Roboartist is more than just a plotter though. [Niazangels] created a custom PC program which creates line drawings from images captured by a webcam. The line drawings are converted to coordinates, and sent to an Arduino, which controls all the motors that move the pen. [Niazangels] went with Dynamixel closed loop servo motors rather than the stepper motors we often see in 3D printers.

tape
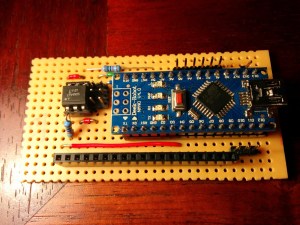
[Peter Edwards] is preserving the past with Tapuino, the $20 C64 Tape Emulator. Plenty of programs for the Commodore 64, 128, and compatibles were only distributed on tape. Those tapes are slowly degrading, though the classic Commodore herdware is still going strong. Tapuino preserves those tapes by using an Arduino nano to play the files from an SD card into the original Datasette interface. [Peter] also plans to add recording functionality to the Tapuino, which will make it the total package for preserving  your data. All that’s missing is that satisfying clunk when pressing the mechanical Play button!

infinity

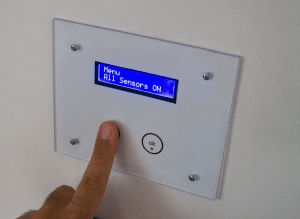
[Dushyant Ahuja] knows what time it is, thanks to his Infinity Mirror Clock. This clock tells time with the help of some WS2812B RGB LED. [Dushyant] debugged the clock with a regular Arduino, but when it came time to finish the project, he used an ATmega328 to create an Arduino compatible board from scratch. Programming is easy with an on-board Bluetooth module. [Dushyant] plans to add a TFT lcd which will show weather and other information when those power-hungry LEDs are switched off.

alarm2
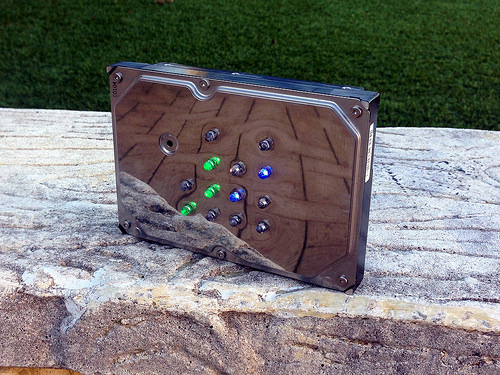
[IngGaro] built an entire home alarm system with his project Arduino anti-theft alarm shield. [IngGaro] needed an alarm system for his home. That’s a lot to ask of a standard ATmega328p powered Arduino Uno. However, the extra I/O lines available on an Arduino Mega2560 were just what the doctor ordered. [IngGaro] performed some amazing point-to-point perfboard wiring to produce a custom shield that looks and works great! The alarm can interface with just about any sensor, and can be controlled via the internet. You can even disarm the system through an RFID keycard.

Want MORE Arduino in your life? Check out our curated Arduino List!

That’s about all the millis()  we have for this weeks Hacklet. As always, see you next week. Same hack time, same hack channel, bringing you the best of Hackaday.io!

Using The Second Microcontroller On An Arduino

While newer Arduinos and Arduino compatibles (including the Hackaday.io Trinket Pro. Superliminal Advertising!) either have a chip capable of USB or rely on a V-USB implementation, the old fogies of the Arduino world, the Uno and Mega, actually have two chips. An ATMega16u2 takes care of the USB connection, while the standard ‘328 or ‘2560 takes care of all ~duino tasks. Wouldn’t it be great is you could also use the ’16u2 on the Uno or Mega for some additional functionality to your Arduino sketch? That’s now a reality. [Nico] has been working on the HoodLoader2 for a while now, and the current version give you the option of reprogramming the ’16u2 with custom sketches, and use seven I/O pins on this previously overlooked chip.

Unlike the previous HoodLoader, this version is a real bootloader for the ’16u2 that replaces the DFU bootloader with a CDC bootloader and USB serial function. This allows for new USB functions like HID keyboard, mouse, media keys, and a gamepad, the addition of extra sensors or LEDs, and anything else you can do with a normal ‘duino.

Setup is simple enough, only requiring a connection between the ‘328 ISP header and the pins on the ’16u2 header. There are already a few samples of what this new firmware for the ’16u2 can do over on [Nico]’s blog, but we’ll expect the number of example projects using this new bootloader to explode over the coming months. If you’re ever in an Arduino Demoscene contest with an Arduino and you’re looking for more pins and code space, now you know where to look.

10th Anniversary Trinket Pro Now In The Hackaday Store

Black solder mask and proudly sporting the Jolly Wrencher? The 10th Anniversary Trinket Pro boards just hit the Hackaday Store.

These were actually the suggestion of [Phil Torrone]. He founded Hackaday way back in 2004 and is now CEO of Adafruit Industries. Shortly after I asked him to record a remembrance of his time at Hackaday for the anniversary party he suggested these boards (normally blue and missing our logo) as a limited-edition for the event. It took just two weeks for them to crank out 585 of them.

I’m most likely biased for many reasons. Obviously I like putting the skull and wrenches on everything, and black solder mask is just cool. I also adore the ATmega328 (my 8-bit go-to chip for prototyping) and am especially fond of this form factor as it makes for super simple on-the-go firmware coding.

Once we sell 560 of them they will never return. We’re betting that Adafruit will have an even better minuscule breakout board for our 25th Anniversary. Do you think quantum computing will have trickled down to the single-chip prototyping stage by then?

Update: We’ve updated shipping rates on the store. Orders over $25 in the USA now have free shipping. International shipping is free for orders over $50. We will continue to try and reduce shipping rates as much as possible. We’re new to this so stay tuned!

Low-Level Computing With Entry-Level Difficulty: DUO Light

The hardware can’t get much simpler. The DUO Light uses an ATmega328 (commonly found on Arduino boards) along with an external SRAM chip to provide a low-level computer programming experience that will suit those new to programming and some more experienced tinkerers.

At the time of writing the modest Kickstarter goal of $1100 was just $18 shy of success. We’d wager that this is partly due to the availability of so much support material on [Jack’s] website. (fyi- a lot of the links on that page are zip files)

The SD card slot accepts a FAT16 card with byte code for the programs. The available Psuedo C compiler, and assembler let you pick your poison, or you can simply dig into the byte code directly. We didn’t see a schematic, but the firmware and BOM are both available. You should be able to easily figure out connections from those.

We’ve been a fan of [Jack’s] work for quite some time. His TTL computer and 16-core ATmega-based offerings are sure to delight, even if you remember seeing them go by the first time. This isn’t his first stab at educational models either. Though we still found his logic chip computer a bit daunting.


Hard Drive Clock Is Simple And Elegant

Binary hard drive clock

[Aaron] has been wanting to build his own binary desk clock for a while now. This was his first clock project, so he decided to keep it simple and have it simply display the time. No alarms, bells, or whistles.

The electronics are relatively simple. [Aaron] decided to use on of the ATMega328 chips he had lying around that already had the Arduino boot loader burned into them. He first built his own Arduino board on a breadboard and then re-built it on a piece of protoboard as a more permanent solution. The Arduino gets the time from a real-time clock (RTC) module and then displays it using an array of blue and green LED’s. The whole thing is powered using a spare 9V wall wort power supply.

[Aaron] chose to use the DS1307 RTC module to keep time. This will ensure that the time is kept accurately over along period of time. The RTC module has its own built-in battery, which means that if [Aaron’s] clock should ever lose power the clock will still remember the time. The RTC battery can theoretically last for up to ten years.

[Aaron] got creative for his clock enclosure, upcycling an old hard drive. All of the hard drive guts were removed and replaced with his own electronics. The front cover had 13 holes drilled out for the LED’s. There are six green LED’s to display the hour, and seven blue LED’s for the minute. The LED’s were wired up as common cathode. Since the hard drive cover is conductive, [Aaron] covered both sides of his circuit board with electrical tape and hot glue to prevent any short circuits. The end result is an elegant binary clock that any geek would be proud of.

Update From Wayback: AVGA Reborn As RetroWiz

retrowiz-vga-avr-gaming-system

This one has been a long time coming. We’re finally seeing an update to [Jaromir’s] retro gaming platform based around and ATmega chip. The thing that was novel about it back in 2009, and continues to be to this day, is the use of VGA output (PAL) from an AVR chip rather than composite video like most offerings.

Good projects never die and recently he picked the hardware up again, spinning a mostly surface mount board and putting together a new website to feature his work. Above you can see a demo of Commander Keen 4 running on the hardware (video below). He’s also has a rather trippy Super Mario port and adapted [Albert Seward’s] PacMan source for the hardware.

The chip is being clocked at 32MHz with VGA clock running at 19.6608 MHz. This gives him sixteen colors with a resolution of 192×144. He concedes that you get better resolution out of composite video, but who needs resolution for retro gaming?

Continue reading “Update From Wayback: AVGA Reborn As RetroWiz”

8-Bit Video Game Is Best Of Retro Gaming On A Shoestring Budget

[Petri] wrote in to show off the 8-bit gaming system and original platformer which he and [Antti] developed. Don’t get us wrong now, it’s impressive that the duo were able to put together what looks like a very interesting game. But we’ve seen many industry-leading video games developed with just one or two people (we’re thinking all the way back to the days of Atari). Nope, what’s most interesting to us is that the console is also their creation. We should note that the title screen was the work of their friend [Juho].

Take this with a grain of salt, as the bottom right image in the vignette obviously includes an Arduino. But isn’t it a testament to the state of open hardware and the sharing of knowledge through the Internet that this is even possible on the hobby level? And just because we call it “hobby” doesn’t mean you have to lower your expectations. This thing is full featured. Watch the clip after the break to see the ATmega328 driving a 104×80 resolution screen with a 256 color palette, while using four audio channels for the chiptunes. The thing even utilizes an original NES controller port for user input.

And for those of you who are thinking we’ve seen the same thing before, we never get tired of seeing projects where a lot of hard work has obviously paid off!

Continue reading “8-Bit Video Game Is Best Of Retro Gaming On A Shoestring Budget”