Mac SE Reborn As A Server And Mac Emulator

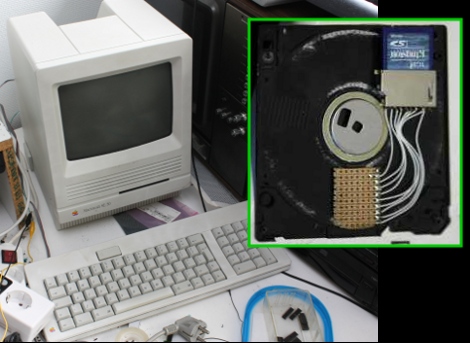
[Sprite_TM] cooked up an amazing hack by resurrecting a Mac SE using a Dockstar and ARM processor. The retro hardware had a bad mainboard thanks to the corrosive properties of a failed backup-battery. He had been wanting to do something with the Seagate Dockstar and decided it would find a nice home in the Mac. But what fun is a dead machine housing a headless server? To add to the fun he included an ARM processor running a Mac emulator, along with all the bits to make the screen, keyboard, and peripherals work. When the Mac is off the Dockstar still runs as a server.

But one of the best parts is the floppy drive. It still takes floppies, but there’s no magnetic media inside of them anymore. Instead, he’s added an SD card slot and some protoboard in the space for the read head. The drive itself has had the read head transplanted for some pogo pins (hey, we saw those earlier today). When you insert the floppy, the pogo-pins raise up and contact the protoboard, connecting the SD card to a Teensy microcontroller.

There’s so much going on with this project we just can’t cover it all here. Things like a chemical cleaning to return the original color of the classic case, and building a converter so that the peripherals are USB compatible are just some of the pleasures awaiting you in [Sprite_TM’s] post. He’s also filmed a demo video that we’ve embedded after the break.

Continue reading “Mac SE Reborn As A Server And Mac Emulator”

Tiny USB Business Card

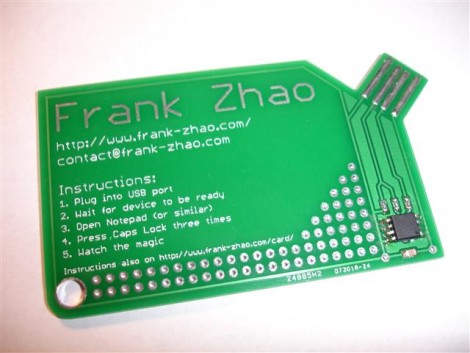
[Frank Zhao] put together a USB business card. It’s even got the instructions printed right on the silk screen of the PCB explaining how it should be used. He based the design around an AVR ATtiny85 microcontroller. It runs the V-USB package that handles USB identification and communication protocols. The rest of the hardware is pretty standard, the uC draws power from the 5V USB rail, with a couple of 3.6V Zener diodes to drop the two data lines down to the proper level.

Once plugged in it waits until it detects three caps lock keypresses in a row, then spews a string of its own keypresses that type out [Frank’s] contact information in a text editor window (video after the break). It’s not as reusable as the mass storage business card because [Frank] didn’t breakout the pins on controller. But we still enjoy seeing business cards that make you stand out.

This is a great project to tackle with your newly acquired AVR programming skills.

Continue reading “Tiny USB Business Card”

70 LED Matrix In A Jack-o-lantern

What takes eight hours to solder and uses more shrink tubing that you thought imaginable? An LED matrix installed in a real pumpkin. When I mentioned that we’d like the LED pumpkin in last Friday’s post scaled up to a full LED matrix I had no idea it would be me doing the work. But [Caleb] and I thought it might be just the thing to present for the hacker’s favorite holiday.

Installed in the autumn vegetable is a marquee made from a 5×14 matrix of light emitting diodes. I spaced them by printing out a grid on the computer, taping it to the pumpkin, and drilling 70 holes in the front of the thing. The real trouble came when inserting all of the LEDs from the inside; each of them has four wires soldered to it, creating a net of black wiring. Above you can see it turned out great. This is a shot of it scrolling the message HAPPY HALLOWEEN.

Join us after the break for video of this prop. But we’re not just sharing the finished product. I’ll take you through the build process. Along the way you’ll learn the design considerations that go into an LED matrix and how you can use these techniques to build your own in any size and configuration you desire.

Continue reading “70 LED Matrix In A Jack-o-lantern”

RC Controlled Camera Takes Intimate Video Of Rodents

[Leor] wanted to take some video of the wildlife in his yard, like this chipmunk or some hummingbirds, but every time he tried to get close it scared them away. His solution was to rig up a cheap video recorder to be radio controlled (PDF). The donor camera was a cheap SD card based eBay purchase that takes 720×480 video. [Leor] removed the SMD switches from the recorder’s PCB and wired up a 4066 quad bi-lateral switch IC in its place. An RC toy car donated the receiver transmitter pair. The receiver signals are monitored by an AVR microcontroller which translates the commands in a proper set of button presses for the video. What you get is a controller that and turn the camera on and set to the proper mode, and the ability to start and stop the recording.

We’ve got some pics of the hardware after the break, and [Leor] posted a bit of the chipmunk video for your enjoyment.

Continue reading “RC Controlled Camera Takes Intimate Video Of Rodents”

AVR Programming 02: The Hardware

You may be able to write the most eloquent code in the history of embedded systems but without a way to run it on the hardware it will be worthless. In this installment of the tutorial series we will:

  • Look at some of the available AVR programmer options
  • Place the microcontroller on a breadboard and connect it to a power supply and a programmer.
  • Use programming software to send some example code to the microcontroller

If you missed Part 1 take a few minutes to review that portion of the tutorial and then join us after the break.

Series roadmap:

Continue reading “AVR Programming 02: The Hardware”

AVR Programming 01: Introduction

We love looking at hardcore electronics projects with a beefy microcontroller and hundreds, if not thousands, of lines of code at its center. But everyone needs to get there somehow.

This tutorial series aims to make you comfortable programming the Atmel AVR line of microcontrollers. Whether you’ve never touched a microcontroller before, or you’ve cut your teeth with dozens of Arduino projects, this will help you get right down to the hardware and give you the confidence to build anything.

Series roadmap:

Continue reading “AVR Programming 01: Introduction”

AVR DDS Signal Generator Improvements

[Vassilis Papanikolaou] took a good thing and made it better with some design upgrades to this AVR based signal generator. We looked at version 1.0 of this tool back in 2006 and since then it saw an upgrade to 2.0. But [Vassilis] wanted to take things one step further, with a compact single-sided PCB. What you see above is the beautiful result of his work; a professionally made board that is compact, uses through-hole components, and has zero wire jumpers.

If you want to build one for yourself there’s a great parts list as well as board artwork and schematic. The system uses an ATmega16 so you’ll need a way to program one. There’s also just a bit of firmware tweaking to remap the control buttons to match the updated hardware layout.