IP camera hack

How To Backup And Restore Your IP Camera Firmware

[Filipe] has been playing around with custom firmware for inexpensive IP cameras. Specifically, he has been using cameras based on a common HI3815 chip. When you are playing around with firmware like this, a major concern is that you may end up bricking the device and rendering it useless. [Filipe] has documented a relatively simple way to backup and restore the firmware on these cameras so you can hack to your heart’s content.

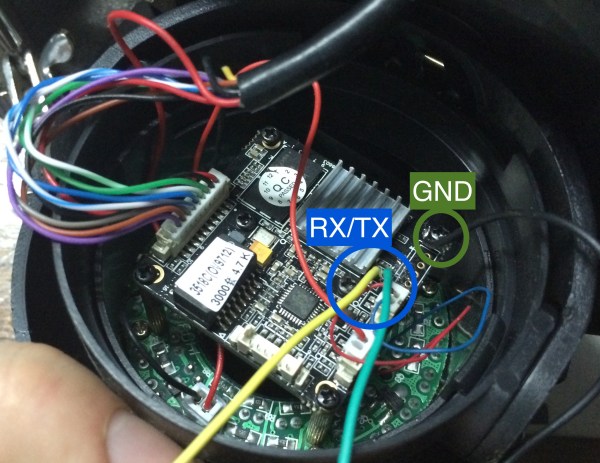
The first part of this hack is hardware oriented. [Filipe] cracked open the camera to reveal the PCB. The board has labeled serial TX and RX pads. After soldering a couple of wires to these pads, [Filipe] used a USB to serial dongle to hook his computer up to the camera’s serial port.

Any terminal program should now be able to connect to the camera at 115200 baud while the camera is booting up. The trick is to press “enter” during the boot phase. This allows you to log in as root with no password. Next you can reset the root password and reboot the camera. From now on you can simply connect to the phone via telnet and log in as root.

From here, [Filipe] copies all of the camera’s partitions over to an NFS share using the dd command. He mentions that you can also use FTP for this if you prefer. At this point, the firmware backup is completed.

Knowing how to restore the backup is just as important as knowing how to create it. [Filipe] built a simple TFTP server and copied the firmware image to it in two chunks, each less than 5MB. The final step is to tell the camera how to find the image. First you need to use the serial port to get the camera back to the U-Boot prompt. Then you configure the camera’s IP address and the TFTP server’s IP address. Finally, you copy each partition into RAM via TFTP and then copy that into flash memory. Once all five partitions are copied, your backup is safely restored and your camera can live to be hacked another day.

Raspberry Pi Backup Scripts

Raspberry Pi

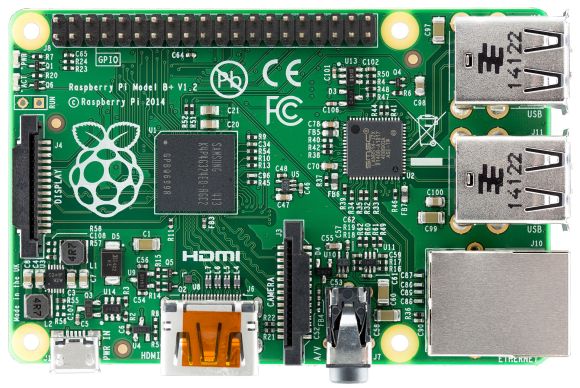
[Matthew’s] recent blog post does a good job explaining the basics of the Raspberry Pi’s file system. The Linux operating system installed on a Pi is generally installed on two different partitions on an SD card. The first partition is a small FAT partition. All of the files on this partition are used for the initial booting of the Pi. This partition also includes the kernel images. The second partition is the root file system and is generally formatted as ext4. This partition contains the rest of the operating system, user files, installed programs, etc.

With that in mind you can deduce that in order to backup your Pi, all you really need to do is backup all of these files. [Matt] has written some scripts to make this a piece of cake (or pie). The first script will simply copy all of the files into a gzipped archive. You can save this to an external SD card, USB drive, or network share.

The second script is perhaps more interesting. This script requires that you have one free USB port and a USB SD card reader. The script will automatically format the extra SD card to contain the two critical partitions. It will then copy the “boot” files to the new boot partition and the root file system files to the new SD card’s root partition. When all is said and done, you will end up with an SD card that is an exact copy of your current running file system.

This can be very handy if you have multiple Pi’s that you want to run the same software, such as in a Pi cluster. Another good example is if you have spent a lot of time tweaking your Pi installation and you want to make a copy for a friend. Of course there are many ways to skin this cat, but it’s always fun to see something custom-built by a creative hacker.

Rackmount RasPi Leaves No Excuse To Lose Data

RasPi backup server

[Frank] knows how important backups are for data security, but his old method of plugging a hard drive in to take manual backups every so often is not the most reliable or secure way of backing up data. He realized he was going to need a secure, automated solution. He didn’t need a full-sized computer with a ton of power; why waste electricity for something so simple? His solution was to use a Raspberry Pi as the backup computer.

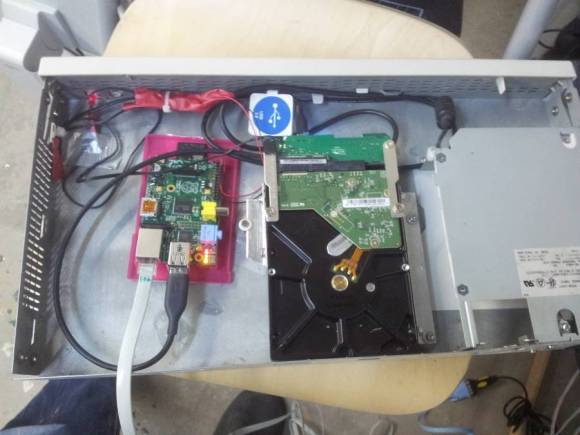
The main problem he faced with the Pi was finding a way to make it rack mountable. [Frank] started with an empty 1U server case. He then had to bend a few metal plates in order to securely mount the backup drive into the case. A couple of small rubber pads help dampen any vibrations caused by the hard drive.

The computer power supply was able to put out the 12V needed for the hard disk, but not the 5V required to run the Pi. [Frank’s] solution was to use an LM2596 based switching supply to turn the 12V into 5V. He soldered the power supply wires directly to the Pi, thinking that a USB plug might vibrate loose over time. Mounting the Pi to the computer case should have been the trickiest part but [Frank] made it easy by simply gluing the Pi’s plastic case to the inside of the computer case. When all was said in done, the backup server pulls 29W under full load, 9W with the disk spinning, and only about 2W in an idle state.

On the software side of things, [Frank’s] backup box uses bash shell scripts to get the job done. The Pi connects to his main server via VPN and then the bash scripts use rsync to actually collect the files. The system not only saves backups every night, but also keeps week old backups just in case. If you are really paranoid about your backups, try hooking up a custom battery backup solution to your Pi. If a Pi just isn’t doing it for you, you can always try one of many other methods.

Battery Backup For RasPi Keeps Your Data Safe

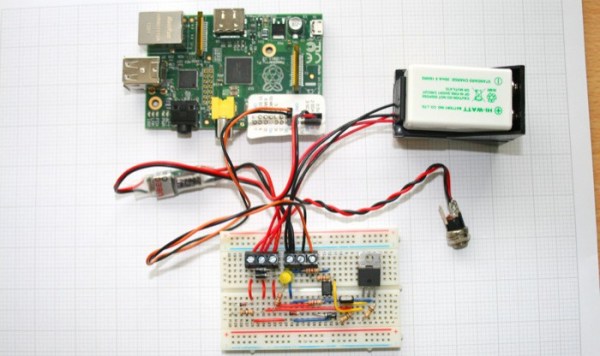
We’ve all raised a clench fist in anger over lost data, and it’s usually the result of unjustified optimism and lack of planning. [George] shared his solution that prepares for the worst: a circuit that provides backup power to a RasPi and its hard drives. [George’s] Pi setup runs as both an Apple Time Machine server and a website backup server, and a power outage could corrupt the data stored on the Pi’s attached hard drives.

Rather than turn to commercial solutions, however, [George] wanted to take advantage of the Pi’s low power consumption and create an inexpensive custom circuit that would safely and automatically power down the devices upon loss of power. To detect a power failure, the build connects one of the Pi’s GPIOs to an opto-isolator, which—through a zener diode—connects to the 12V wall adapter: though [George] welcomes suggestions for alternative methods of safely identifying a mains power loss. The rest of the circuit serves as a trickle charger for the two attached 9V batteries and as a regulator to supply the correct voltage to the RasPi. Power MOSFETs connected to a GPIO handle the delayed power off.

You can view (and edit!) the circuit online here and find the relevant source code on [George’s] website. If you want to build your own RasPi file server, try cramming all the parts into an old optical drive enclosure.

Ask Hackaday: What’s Your Backup Solution?

Here’s some very, very sad news from [Charles] over at The Maker’s Workbench: on July 16th, his house was hit by lightning causing his workshop to catch fire. His family is safe, but unfortunately thousands of dollars in gear has gone up in smoke. [Charles] lost a Reprap, a ton of dev boards, a huge amount of tools including an awesome soldering setup, and his laptop and file server.

Short of taking up residence inside Yucca Mountain, there’s little that can be done to prevent random, disastrous acts of Thor. The only bright side to [Charles]’ ordeal (if there is one) is that most of his file server – including all the code he’s written over the years – was backed up on the cloud.

Hackaday readers aren’t much for marketing buzzwords like ‘the cloud,’ so we’re wondering what your backup solutions are. If the cloud isn’t for you, is a NAS at home a good idea? rsync will do wonders, but even hard drives at an off-site location fail; maybe tape is the best choice. Of course if you have a laser cutter, there’s always the option of cutting patterns of holes in stainless steel plates and preserving your data for thousands of years.

If [Charles]’ story doesn’t inspire you to backup often and preserve your data, consider this: the greek poet [Sophocles] wrote 123 plays, seven of which still survive. Put in perspective, that’s like the only songs in The Beatles’ catalog surviving 2,500 years coming from the Yellow Submarine soundtrack.

Automotive Backup Alarm

[Dino’s] project of the week is a backup alarm for your car. This is a feature that has become popular on many large vehicles like SUVs where visibility is an issue when moving in reverse. But it doesn’t sound like he was motivated by the need to have this in his own car. Instead, he was looking for something to build using a laser range finder.

[Joe Grand] (the brains behind DEFCON badges) has been working on an inexpensive laser range finder for Parallax. He sent one of the first-run prototype boards to [Dino] for beta testing and we’re glad that [Dino] decided to show it off. It uses a small red laser diode and a camera module to measure distance in millimeters. The board communicates serially and this particular project uses an Arduino along with a character LCD and speaker to display distance and sound an alarm when the car is within a meter of an object.

Check out the video after the break to see the build in its entirety. The system works reasonably well, if the object you’re about to hit is perfectly lined up with the laser dot.

Continue reading “Automotive Backup Alarm”

Beefy Battery Backup Still Running After A Decade

In 1997 [Michael Butkus Jr.] found an uninterruptible power supply in the dumpster. The batteries were shot, but he needed a backup to keep his pellet stove running for heat, drive the exhaust fan to keep the smoke out of the house, and power his computer and other electronics. After a bit of head scratching he decided to beef up the UPS using deep-cycle batteries.

He actually built two of these. One is smaller, and similar to what we’ve seen before. The other is larger and uses four batteries, two pairs in parallel which are then connected in series. He’s careful to use heavy gauge wiring and 50 amp fuses for each battery, both of which will protect against the risk of fire. One thing we found interesting is that the batteries are stored in the basement, directly below the UPS which is connected via a short run of 12 gauge home electrical wire.

We were happy to see that he’s done updates at the top of his post over the years. He lost a few batteries due to neglectfully letting the water levels drop too much. He did switch over to sealed automotive batteries sometime in 2004 or 2005. Looks like things have been going strong ever since.

[Thanks Spencer]