Uncovering The Echo Dot’s Hidden USB Port

If you upgraded to Amazon’s latest Echo Dot, you might have been surprised to find that the diminutive voice assistant had shed its USB port. Earlier models of the Dot used a garden variety micro USB port for power, which hackers eventually figured out also provided a helpful way to snoop around inside the device’s firmware. The fact that the USB port was deleted on the latest Echo Dot in favor of a simple barrel connector for power was seen by some as a sign that Amazon was trying to keep curious owners out of their hardware.
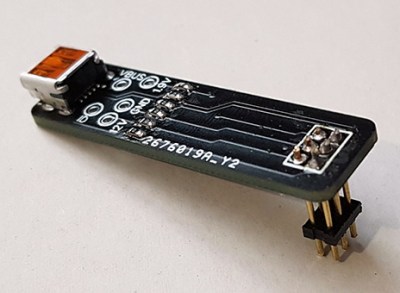
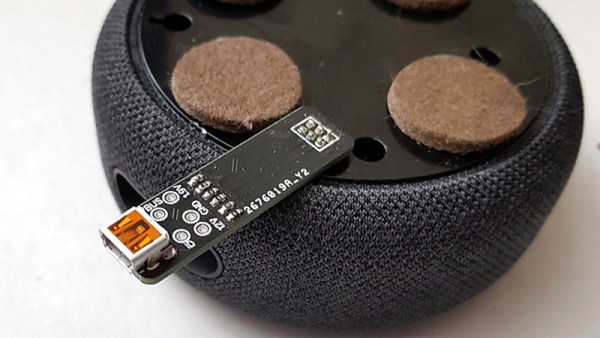
But as [Brian Dorey] shows, all they did was put a bump in the road. While they removed the external USB connector, the traces for it are still on the board waiting to be accessed. Even better, it turns out the USB data lines are connected to the test points located on the bottom of the Dot. All you need is a simple breakout that will connect through the existing opening in the device’s case, and you’ve got your USB port back.

So what can you do with USB on the Echo Dot? Well, not much right now. [Brian] found that the Dot shows up as a Mediatek device under Linux using lsusb, and fastboot can see it and even confirms the presence of a locked bootloader. It’s going to take some work from the community to see how deep this particular rabbit hole goes.

Even if you’re not interested in restoring its USB port, [Brian] has uncovered a wealth of fascinating hardware information about the Echo Dot during his deep-dive. He’s mapped out many of the test points located throughout the device’s PCBs, and found a few interesting points that might be worth further investigation. For example, he found that driving one of the pins high would trigger the Dot to mute its microphones; which could be useful for anyone looking to cover Alexa’s ears.

[Brian] first cracked open the Echo Dot last month, after scoring one for cheap during Amazon’s Prime Day sale. It looks like he’s making fairly rapid progress on unraveling the mysteries of this popular gadget, and we’re very interested in seeing where this research takes us.

A Retro Handheld Console As They Used To Be Made

Before there were Nintendo Switches, there were Game Boys. And before that there were all the successive generations of Game Boys and other consoles right back to the Game and Watch, and then those handheld Simon and Space Invaders games of the late 1970s. These devices typically packed a 4-bit microcontroller and an array of discrete LEDs, and movements in-game were simply created by alternate LEDs on the game field being flashed.

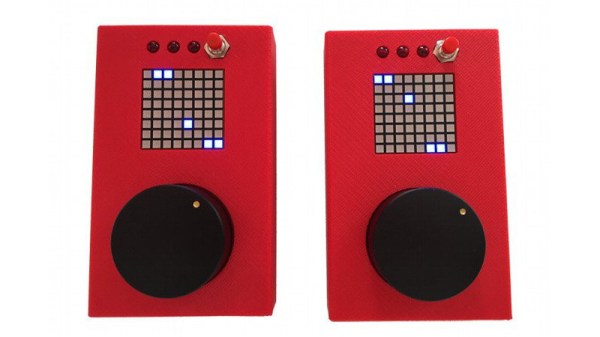
The TeleBall from [sv2002] is a handheld game in the vein of those early handheld games, in that it features a matrix of LEDs as a screen on which it can display simple games. So far it plays Breakout, and Tennis for Two, which might seem odd were it not for its built-in radio for two-person play with two consoles.

Inside the TeleBall is an Arduino Nano, a Maxim display driver for the LED matrix, and the familiar Nordic Semiconductor RF module. Control is via a potentiometer, and everything sits in a smart 3D-printed case. Everything is open-source, so should you wish to have your own you can head over to the project’s web site and grab all the files. You can watch it in action playing tennis with two consoles in the video below the break.

The original Tennis for Two created in 1958 was an oscilloscope game using an analogue computer, and is credited as the first video game created purely for entertainment purposes. If you’d like to see a recreation of it, we covered one over a decade ago.

Continue reading “A Retro Handheld Console As They Used To Be Made”

A Hacked Solution For Non-Standard Audio Modules

When life hands you lemons, lemonade ends up being your drink of choice. When life hands you non-standard components, however, you’ve got little choice but to create your own standard to use them. Drinking lemonade in such a situation is left to your discretion.

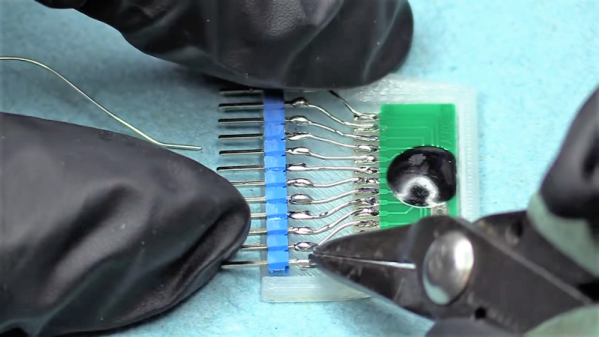
The little audio record and playback modules [Fran Blanche] scored from eBay for a buck a piece are a good example. These widgets are chip-on-board devices that probably came from some toy manufacturer and can record and playback 20 seconds of audio with just a little external circuitry. [Fran] wants to record different clips on a bunch of these, and pictured using the card-edge connector provided to plug them the recording circuit. But the pad spacing didn’t fit any connector she could find, so she came up with her own. The module and a standard 0.1″ (2.54 mm) pitch header are both glued into a 3D-printed case, and the board is connected to the header by bonding wires. It makes a nice module that’s easily plugged in for recording, and as [Fran] points out, it’s pretty adorable to boot. Check it out in the video below.

Sure, the same thing could have been accomplished with a custom PCB breaking out the module’s pins to a standard card-edge connector. But [Fran] knows a thing or two about ordering PCBs, and our guess is she wanted to get this done with what was on hand rather than wait for weeks. There’s something to be said for semi-instant gratification, after all. And lemonade.

Continue reading “A Hacked Solution For Non-Standard Audio Modules”

Save Some Steps With This Arduino Rapid Design Board

We’re all familiar with the wide variety of Arduino development boards available these days, and we see project after project wired up on a Nano or an Uno. Not that there’s anything wrong with that, of course, but there comes a point where some hobbyists want to move beyond plugging wires into header sockets and build the microcontroller right into their project. That’s when one generally learns that development boards do a lot more than break the microcontroller lines out to headers, and that rolling your own design means including all that supporting circuitry.

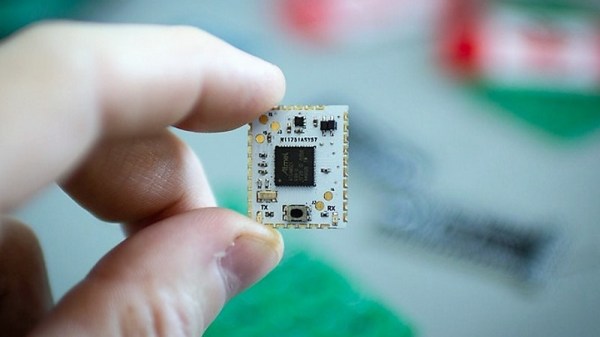
To make that transition easier, [Sean Hodgins] has come up with a simple Arduino-compatible module that can be soldered right to a PCB. Dubbed the “HCC Mod” for the plated half-circle castellations that allows for easy soldering, the module is based on the Atmel SAMD21 microcontroller. With 16 GPIO lines, six ADCs, an onboard 3.3 V regulator, and a reset button, the module has everything needed to get started — just design a PCB with the right pad layout, solder it on, and surround it with your circuitry. Programming is done in the familiar Arduino IDE so you can get up and running quickly. [Sean] has a Kickstarter going for the modules, but he’s also releasing it as open source so you’re free to solder up your own like he does in the video below.

It’s certainly not the first dev module that can be directly soldered to a PCB, but we like the design and can see how it would simplify designs. [Sean] as shown us a lot of builds before, like this army of neural net robots, so he’ll no doubt put these modules to good use.

Continue reading “Save Some Steps With This Arduino Rapid Design Board”

Programming An Oscilloscope Breakout Game In Pure Data

[S-ol] wrote in to share his sweet breakout game played on an oscilloscope. Built in a weekend as part of a game development jam, Plonat Atek is a polar breakout game where the player attacks the center and the ball bounces around the perimeter. You can play it either on an oscilloscope or using an online emulator. [S-ol] wrote the game in Pure Data, a visual programming language for audio. The software controls the audio out channels and uses sound to control the game graphics. He also made use of the Zexy extension for Pure Data.

One of the cool things about this setup is that since the game is programmed with sound, all the sound effects also double as visual effects

We love oscilloscopes, and not just because they’re useful as hell. They also make sweet vector displays, like this analog pong game that uses a scope for a display. Even when they’re not being used for retrogaming they can be capable of some pretty amazing graphics.

Hackaday Links: September 18, 2016

No Star Trek until May, 2017, at which time you’ll have to pay $5/month to watch it with ads. In the meantime, this is phenomenal and was shut down by Paramount and CBS last year ostensibly because Star Trek: Discovery will be based around the same events.

Tempest in a teacup. That’s how you cleverly introduce the world’s smallest MAME cabinet. This project on Adafruit features a Pi Zero, a 96×64 pixel color OLED display, a few buttons, a tiny joystick, and a frame made out of protoboard. It’s tiny — the height of this cabinet just under two wavelengths of the radiation corresponding to the transition between the two hyperfine levels of the ground state of the cesium 133 atom. Being based on the Pi Zero, it’s a capable arcade cabinet, although we would struggle to find a continuous rotation pot small enough to play Tempest the way it should be played. Check out the video.

[Graham] sent an interesting observation in on the tip line. It’s an election year in the US, and that can mean only one thing. It’s coroplast season. Coroplast is that strange material used for political signage, famous for its light weight, being waterproof, and reasonably strong, depending on how you bend it. There is a severe lack of coroplast builds, but if you have some be sure to send them in.

The ESP32, the followup to the hugely popular ESP8266 , is shipping. [Elliot] got his hands on one and found it to be a very promising chip, but the ESP3212 modules I bought from Seeed haven’t arrived yet. That hasn’t stopped [Ptwdd] from making a breakout board for the ESP3212, though. We don’t know if it works, but it’s just a breakout board, anyway.

The usual arguments for drones involve remote sensing, inspection, and generally flying around for a very long time. Quadcopters don’t do this, but fixed wings can. Over on DIYDrones, [moglos] just flew 425km on a single charge. The airframe is a 3 meter Vigilant C1 V tail, using the stock 300kV motor. The battery is a bunch of Panasonic 18650 cells arranged in 6S 9P configuration for 30600mAh. The all-up weight is 5.7kg. This is significant, and we’re seeing the first glimmer of useful tasks like pipeline monitoring, search and rescue, and mapping being done with drones. It is, however, less than half the range a C172 can fly, but batteries are always getting better. Gas goes further because it gets lighter as you fly.

Hacklet 52 – Breakout Board Projects

Starting a design with a new part can be hard. What power supply voltage(s) does it need? Are there any support component requirements? What is the footprint? What about the I/O voltage levels? Breakout boards are designed to answer all those questions for you. Breakouts help when you’re designing with a new part – be it a microcontroller, a sensor, a motor driver, or anything else. They also are a huge help when you’re trying to knock out a quick hack, and just need to get something working quick. Fast to integrate, often breadboard friendly, breakouts just make things easier! This week’s Hacklet is about some of the best breakout board projects on Hackaday.io!

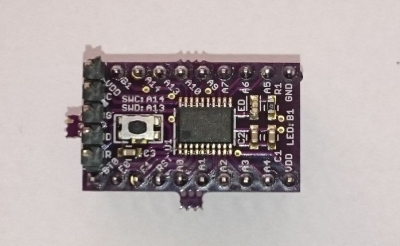
32f4We start with [Christoph] and STM32F030F4P6 breakout board. Inspired by the Teensy 3.0, [Christoph] set out to build a simple, easy to use, and small breakout board for an ARM processor. The STM32F030F4P6 is a great starting point. At only 20 pins, it’s one of the smallest ARM based chips around. He added the basic things needed to bring this chip up: decoupling caps, a reset button, headers for ST’s software debugger, and of course an LED for a blinky hello world program. The resulting board is physically tiny, but this lilliputian ARM board packs Coretex M0 powered punch!

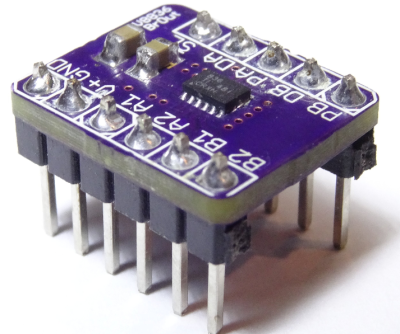
drvNext up is [al1] and DRV8836 Breakout. Sooner or later, everyone wants to drive a motor in one of their projects. It’s a rite of passage, just like blinking an LED. Motors pull a lot of current though, so external transistors or driver chips are almost always necessary. TI’s DRV8836 chip packs two full H-bridges into one package. That’s enough to drive two DC motors or one stepper. Handling 1.5 amps of current per driver in a tiny package means that thermal coupling is important. The DRV8836 has a large thermal pad which has to be soldered to keep the magic smoke in. [al1] dropped the chip, along with the correct thermal footprint and decoupling capacitors onto a simple breakout. The result is easy to use motor drivers for the masses.

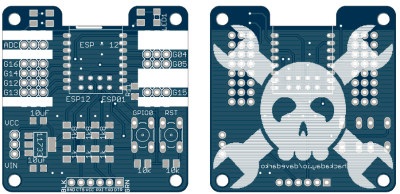
espHackaday.io power user [davedarko] took cues from his favorite designs to create Ignore this ESP8266 board. In [Dave’s] own words, “I stole from every one. The huzza from Adafruit, [Matt’s] breakout board, [Al1s] board, NodeMCUs DevKit.” Hey [Dave] there’s no stealing in open source hardware! There is  only design reuse with attribution, which is exactly what you’re doing. [Dave’s] breakout can use both popular ESP8266 footprints: the ESP-01 and ESP-12. He’s added power, reset/programming buttons, and the all important serial header to talk to the module. Going serial allows dave to keep costs down by not including an expensive serial to USB chip in the BOM. Most of us have FTDI cables (or clones) bouncing hanging around anyway. We definitely like the logo on this one!

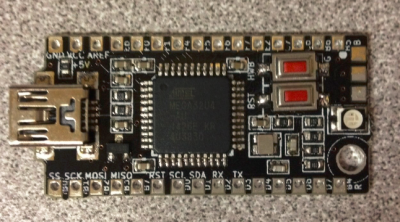
bbbFinally we have [The Big One] with uBBB 32u4. uBBB 32u4 is a bigger brother of µbbb, a Hackaday.io project [Warren] and [The Big One] worked on. µbbb uses an Atmel ATmega32u2 processor. [The Big One] has expanded the faimly to include an ATmega32u4. If you’re wondering, uBBB stands for “Micro Bare Bones Board” At 1.65″ x 0.8″, this is a micro board. It still manages to  include everything you need to get the processor up and running fast. Crystal, buttons, decoupling caps, and LEDs – everything is here. A mini USB connector makes communicating with the ATmega a snap!

If you want to see more breakout boards, check out our new breakout board list! If I’ve forgotten to add you to the list, just drop me a message on Hackaday.io. That’s it for this week’s Hacklet, As always, see you next week. Same hack time, same hack channel, bringing you the best of Hackaday.io!