If you’re willing to spend $200 USD on nothing more than 100 grams of plastic, there are a few trendy sunglasses brands that are ready to take your money before you have time to think twice. Sure, you can get a pair of sunglasses for an order of magnitude less money that do the exact same job, but the real value is in the brand stamped into the plastic and not necessarily the sunglasses themselves. Not so with this pair of Ray-Bans, though. Unlike most of their offerings, these contain a little bit more than a few bits of stylish plastic and [Becky Stern] is here to show us what’s hidden inside.
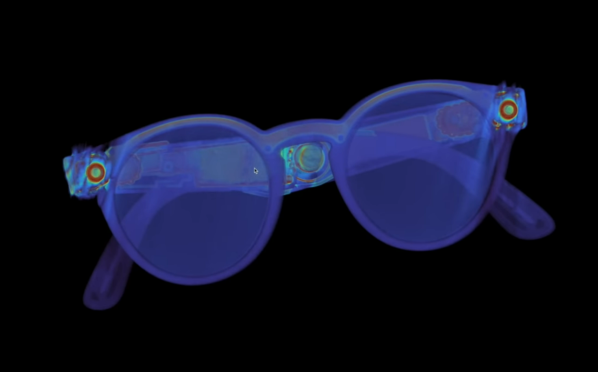
At first glance, the glasses don’t seem to be anything other than a normal pair of sunglasses, if a bit bulky But on closer inspection they hide a pair of cameras and a few other bits of electronics similar to the Google Glass, but much more subtle. The teardown demonstrates that these are not intended to be user-repairable devices, and might not be repairable at all, as even removing the hinges broke the flexible PCBs behind them. A rotary tool was needed to remove the circuit boards from the ear pieces, and a bench vice to remove the camera modules from the front frame. We can presume these glasses will not be put back together after this process.
Hidden away inside is a pair of cameras, a Snapdragon quad-core processor, capacitive touch sensors, an amplifier for a set of speakers. Mostly this is to support the recording of video and playback of audio, and not any sort of augmented reality system like Google Glass attempted to create. There are some concerning ties with Facebook associated with this product as well which will be a red flag for plenty of us around here, but besides the privacy issues, lack of repairability, and lack of features, we’d describe it as marginally less useful as an entry-level smartwatch. Of course, Google Glass had its own set of privacy-related issues too, which we saw some clever projects solve in unique ways.