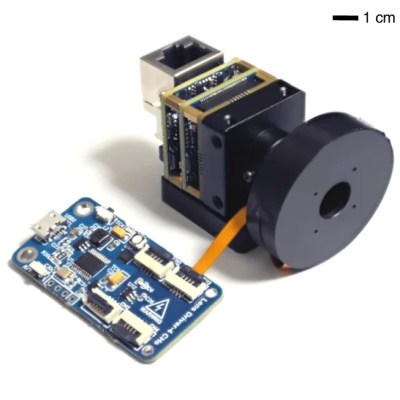
DIY Pan And Tilt Camera Mount

Pan and tilt mounts have a number of uses that can increase the functionality of various types of cameras. Security cameras can use them to adjust the field of view remotely, astronomers can use them as telescope mounts to accurately track celestial objects, and of course photographers and videographers can use them to add dynamic elements to shots. But getting the slow, smooth, and reliable movement isn’t as simple as slapping some servos on a tripod. So unless you want to break the bank for a commercial mount, this DIY pan and tilt mount might be the way to go.

The mount is built largely out of 3D printed parts and a few fairly common motors, belts, pulleys, and bearings. The movements are controlled using stepper motors, and there are two additional systems built in so that focus and zoom can be controlled through the system as well. The software controlling it all is open-source and  available on GitHub, and controls the mount remotely through a network connection. It’s also designed to use the readily-available ESP32 chip, making it overall fairly adaptable.

The system doesn’t slouch on features, either. It can move from one point to another with various programmable speeds, has a key sequencer for more complex movements, and can accommodate the needs of stop motion animators as well. It’s an impressive build that should be accessible to plenty of photographers with a 3D printer and the right parts, but photography and astronomy aren’t the only reasons to use a pan and tilt mount. Check out this one that brings some sunlight to a shaded room.

Old Film Camera Modified For Different Chemistry

While most photographers have moved on to digital cameras with their numerous benefits, there are a few artists out there still taking pictures with film. While film is among the more well-known analog photographic methods available, there are chemically simpler ways of taking pictures available for those willing to experiment a little bit. Cyanotype photography is one of these methods, and as [JGJMatt] shows, it only takes a few commonly available chemicals, some paper, and a slightly modified box camera to get started.

Cyanotype photography works by adding UV-reactive chemicals to paper and exposing the paper similarly to how film would be exposed. The photographs come out blue wherever the paper wasn’t exposed and white where it was. Before mixing up chemicals and taking photos, though, [JGJMatt] needed to restore an old Kodak Brownie camera, designed to use a now expensive type of film. Once the camera is cleaned up, only a few modifications are needed to adapt it to the cyanotype method, one of which involves placing a magnet on the shutter to keep it open for the longer exposure times needed for this type of photography. There is some development to do on these pictures, but it’s relatively simple to do in comparison to more traditional chemical film development.

For anyone looking for a different way of taking photographs, or even those looking for a method of taking analog pictures without the hassle of developing film or creating a darkroom, cyanotype offers a much easier entry point and plenty of artists creating images with this method don’t use a camera at all. There are plenty of other photographic chemistries to explore as well; one of our favorites uses platinum to create striking black-and-white photos.

Game Boy-Style Camera For Playdate

The Game Boy Camera, while perhaps not the most technologically advanced piece of equipment, left a huge mark on video game and electronics culture. The grayscale photographs are still highly prized, and there are an untold number of projects which interface with original hardware to download authentic Game Boy Camera pictures to modern computers. There are others that look to recreate the feel and style of these images, and the latest comes to us on a Game Boy-like platform as well, the Playdate.

[t0mg] is the creator of this project, utilizing a OV7670 camera module sending data to a Teensy 4.1 which interfaces with the Playdate via USB. The images recorded on the Playdate are 1-bit, slightly different than the 2-bit images the Game Boy Camera was capable of. The case of the camera also physically matches up well with the small console, using magnets to secure it to the device either in normal camera mode, in reverse for selfie mode, and can also support the console in “cover” mode as a way of storing the console to protect the screen. A companion application needs to run on the Playdate to get this all up and running, but with that and a battery plenty of retro-style images are ready to be captured.

All of the source for this project is available on the project’s GitHub page for anyone ready to experience some nostalgia or just experiment with a small camera like this. It’s a clean build that takes advantage of the Playdate’s open-source nature, through which we’ve seen the console turned into a typewriter and inspire other builds like this one-off handheld with a crank-style controller.

Continue reading “Game Boy-Style Camera For Playdate”

Reverse Engineering Reveals Hidden API In Abandonware Trail Camera

It sometimes seems like there are two kinds of cheap hardware devices: those dependent on proprietary software that is no longer available and those that are equally dependent but haven’t been abandoned just quite yet. But rest assured, abandonment is always on the table, and until then, you get to deal with poorly written apps that often suffer from a crippling lack of essential functionality.

Such was the case for the wireless game camera that [Chris Jones] scored on the cheap, but rather than suffering with the original software, he decided to reverse engineer the camera and turn it into something more useful. The eBay description was promising — Bluetooth LE! WiFi! — but the reality proved less so. To save the batteries, WiFi is off by default and can only be turned on by connecting to the camera via BLE using a janky and crash-prone Android app.

[Chris]’ first step in reverse engineering the camera was to snoop into the BLE by capturing the Bluetooth packets to a file and running them through Wireshark. This revealed a write command with the text “BT_KEY_ON” — very promising. After verifying that this command turned on the camera’s access point, [Chris] got to work capturing WiFi packets using PCAPDroid and analyzing the results, again with Wireshark. Using every function available in the OEM app eventually revealed the full API on the camera, which gives file system control, access to individual images, and even putting the camera into live video mode.

Continue reading “Reverse Engineering Reveals Hidden API In Abandonware Trail Camera”

A Shutter Speed Tester With Frickin’ Lasers!

Buying old cameras is one of the best ways yet found to part a geek from their money, but if you don’t mind finding a few duds along the way it’s still possible to pick up something nice without paying the excessive scene tax of an Etsy seller or an online store. The trouble is, in the many decades during which your purchase went from being pride and joy to forgotten in a drawer to lying on the shelf of a thrift store, its performance may have degraded a little. Does the shutter still operate as it should? How long is a split second anyway? You need a shutter speed tester, and luckily for us, [Stuart Brown] has one.

There are no sharks involved in this build, but it does rely on laser diodes as a light source. There are three of them as well as three sensors, packaged photodiodes with a Schmidt trigger. These feed an Arduino which is hooked up to a TFT display, and the software measures how long each diode receives the light. We’re told it can also measure the raise time on curtain shutters, another important metric.

There’s little in the way of usage examples, but we’re guessing it requires positioning the camera between lasers and photodiodes. We’re curious as to how such an instrument would perform on a camera with a fixed lens, or whether it’s only suitable for those with access to the shutter itself. If this subject interests you, it’s not the first shutter speed tester we’ve shown you.

Header image: Runner1616, CC BY-SA 4.0.

Blood Pressure Monitor For Under $1

Medical equipment is not generally known for being inexpensive, with various imaging systems usually weighing in at over a million dollars, and even relatively simpler pieces of technology like digital thermometers, stethoscopes, and pulse oximeters coming in somewhere around $50. As the general pace of technological improvement continues on we expect marginal decreases in costs, but every now and then a revolutionary piece of technology will drop the cost of something like a blood pressure monitor by over an order of magnitude.

Typically a blood pressure monitor involves a cuff that pressurizes against a patient’s arm, and measures the physical pressure of the blood as the heart forces blood through the area restricted by the cuff. But there are some ways to measure blood pressure by proxy, instead of directly. This device, a small piece of plastic with a cost of less than a dollar, attaches to a smartphone near the camera sensor and flashlight. By pressing a finger onto the device, the smartphone uses the flashlight and the camera in tandem to measure subtle changes in the skin, which can be processed in an app to approximate blood pressure.

The developers of this technology note that it’s not a one-to-one substitute for a traditional blood pressure monitor, but it is extremely helpful for those who might not be able to afford a normal monitor and who might otherwise go undiagnosed for high blood pressure. Almost half of adults in the US alone have issues relating to blood pressure, so just getting information at all is the hurdle this device is attempting to overcome. And, we’ll count it as a win any time medical technology becomes more accessible, more inexpensive, or more open-source.

Take A Ride In The Bathysphere

[Tom Scott] has traveled the world to see interesting things.  So when he’s impressed by a DIY project, we sit up and listen. In this case, he’s visiting the Bathysphere, a project created by a couple of passionate hobbyists in Italy. The project is housed at Explorandia, which based on google translate, sounds like a pretty epic hackerspace.

The Bathysphere project itself is a simulation of a submarine. Sounds simple, but this project is anything but.  There are no VR goggles involved.  Budding captains who are up for the challenge find themselves inside the cockpit of a mini-submarine. The sub itself is on a DIY motion platform. Strong electric motors move the system causing riders to feel like they are truly underwater. Inside the cockpit, the detail is amazing. All sorts of switches, lights, and greebles make for a realistic experience.  An electronic voice provides the ship status, and let’s the crew know of any emergencies. (Spoiler alert — there will be emergencies!)

The real gem is how this simulation operates. A Logitec webcam is mounted on an XY gantry. This camera then is dipped underwater in a small pond. Video from the camera is sent to a large monitor which serves as the sub’s window. It’s all very 1960’s simulator tech, but the effect works. The subtle movements of the simulator platform really make the users feel like they are 20,000 leagues under the sea.

Check out the video after the break for more info!

Continue reading “Take A Ride In The Bathysphere”