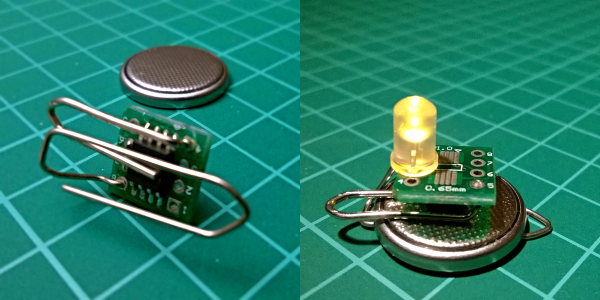
AVR Vs PIC, Round 223: Fight!

Get ready to rumble! [Thierry] made the exact same Hello-World-esque project with two microcontrollers (that are now technically produced by the same firm!) to see how the experience went.

It’s not just an LED-blinker, though. He added in a light-detection function so that it only switches on at night. It uses the Forest Mims trick of reverse-biasing the LED and waiting for it to discharge its internal capacitance. The point is, however, that it gives the chip something to do instead of simply sleeping.

Although he’s an AVR user by habit, [Thierry] finds in favor of the PIC because it’s got a lower power draw both when idling and when awake and doing some computation. This is largely because the PIC has an onboard low-power oscillator that lets it limp along at 32 kHz, but also because the chip has a lower power consumption in general. In the end, it’s probably a 10% advantage to the PIC on power.

If you’re competent with one of the two chips, but not the other, his two versions of the same code would be a great way to start familiarizing yourself with the other. We really like his isDarkerThan() function which makes extensive use of sleep modes on both chips during the LED’s discharge period. And honestly, at this level the code for the two is more similar than different.

(Oh, and did you notice [Thierry]’s use of a paper clip as a coin-cell holder? It’s a hack!)

Surprisingly, we’ve managed to avoid taking a stray bullet from the crossfire that occasionally breaks out between the PIC and AVR fans. We have covered a “shootout” before, and PIC won that round too, although it was similarly close. Will the Microchip purchase of Atmel calm the flames? Let’s find out in the comment section. We have our popcorn ready!

Hacking Candle Extinguishing

Anyone can put out a candle by blowing on it. According to [Physics Girl], that method is old hat. She made an educational video that shows five different ways to put out a candle using–what else–physics.

You might not need alternate ways to put out a candle, but if you are looking to engage students in STEM (Science, Technology, Engineering, and Math), this video along with others from [Physics Girl] might spark interest.

Continue reading “Hacking Candle Extinguishing”

“Reverse engineering” a real candle

Reverse Engineering A Real Candle

[cpldcpu] just can’t leave the mysteries of candles alone. We’ve covered his explorations of candle flicker LEDs before, but this time he’s set his sensors on the real thing. [cpldcpu] hooked a photodiode to his oscilloscope, pointed it at a candle flame, and recorded the result.

The first interesting observation was the candle slowly changed brightness, whether it was interacted with or not. Next he measured the effect when the flame was disturbed by small gusts of air. This produced a bright flicker with an oscillation at 5Hz before returning to steady state, which as [stygiansonic] mentioned in a the Hacker News comment, is a known phenomenon used in flame detectors. Neat! There’s even an equation:

Under normal gravity conditions, the flames have a well defined oscillation frequency which is inversely proportional to the square root of the burner diameter, D, and to a good approximation can be written as f » 1.5/D½, with D given in meters.

[cpldcpu] then compiled his measurements into a series of graphs and ultimately an animated gif comparing the candle steady state, a real candle’s flicker, and the flicker he recorded from a candle flickr LED. It’s surprising how different the fake is from the real thing. You can look at his measurements and code at his github.

[via Hacker News]

Spark Plug Lights The Darkness

When you have an idea, just go build it. That’s the approach that [GordsGarage] takes with most of his projects, and he’s back in the machine shop again. This time it’s with a rather unique oil candle that uses a spark plug as inspiration. We have to say, the results are on fire.

thumbThe spark plug candle was fashioned out of a single piece of 6061 aluminum. To create the scale model, first the stock metal hit the lathe to create the “insulator” section of the plug. From there, he milled in the hex bolt section, then it hit the lathe again to create the threaded section. The inside was bored out to create space for the wick and oil, and then the electrode was installed just above the flame.

This is a pretty impressive scale model and has a great finished look. The only thing that isn’t to scale is the gap for the electrode which is completely necessary to keep the candle from getting smothered. It’s an interesting, unique idea too, which is something that [GordsGarage] excels at. And, if you want to scale his model up a little bit, perhaps you can find some inspiration from this other candle.

Hand Cranking The Malevolent Mechanical Pumpkin

Meet Marty. He’s a pumpkin that has been fitted out with a moving eyes, tongue and an expression of malevolent glee. You would probably assume that this is all driven by servos, right? Nope: Marty is driven by an old-fashioned crank mechanism, designed and built by [Ben Brandt].

He wanted to make something that could be driven by a hand crank. Of course, there is nothing stopping you from throwing a motor on the back to drive the mechanism, but [Ben] wanted the internals to be fireproof so he could light it with a candle. His mechanism, built from old bits of wire and sheet metal, is not flammable or adversely affected by heat like a motor and power supply would be. He succeeded admirably, and he has also done an excellent job of documenting the process to providing handy tips on creating a mechanical pumpkin-based monstrosity.

Those hackers down with a little electronic wet work you should start building their LED-integrated Jack-O-Lantern now. These things take a lot of time turn out.

Continue reading “Hand Cranking The Malevolent Mechanical Pumpkin”

Mood Lighting With LEDs And An Arduino

Regular candles can be awfully boring at times. They can only produce one color and the flicker is so… predictable. They can’t even be controlled by an infrared remote control, not to mention the obvious fire hazard. Now, however, [Jose] has come up with an LED candle that solves all of these problems. (Original link to the project in Spanish.)

The heart of the project is an Arduino Pro Mini, which is especially suited for this project because of its size. [Jose] put the small form-factor microcontroller in the base of a homemade wax enclosure and wired it to a Neopixel WS2812b LED strip. The strip can produce any color, and has some programmed patterns including flicker, fade, rainbow, and fire.

The artificial candle is controlled with an infrared remote control, and all of the code for the project is available on the project site if you want to build your own. [Jose] has been featured here before for his innovative Arduino-driven RGB lighting projects, and this is another great project which builds on that theme!


Reverse Engineering Candle Flicker LEDs, Again

Flickering candle LEDs are seemingly everywhere these days, and like all fads, someone has to take a very close look at the engineering behind them.

[cpldcpu] had earlier taken a look at the controller chip in these candle flicker LEDs by measuring the current used and developing a statistical model of how these LEDs flicker. That’s math, of course, and much more fun can be had by decapsulating one of these flicker LED controller chips. It’s not very advanced tech; the LED controller is using a 1 or 2um process and a pair of RC oscillators, but it appears there could be a hardware random number generator in the silicon of this chip.

Earlier, [Cpldcpu] had taken a look at the tiny controller in these flickering LEDs and determined they used a linear feedback shift register to generate pseudorandom LED intensities. The new teardown seems to confirm that a linear feedback shift register is being used to drive the flickering LED.

Custom chips are only one way to skin a cat, or flicker a LED, and PICatout used the the tiniest PIC microcontroller (French, translation) to create his own flickering LED. Seems like making a few custom flickering LED throwies shouldn’t be too hard.