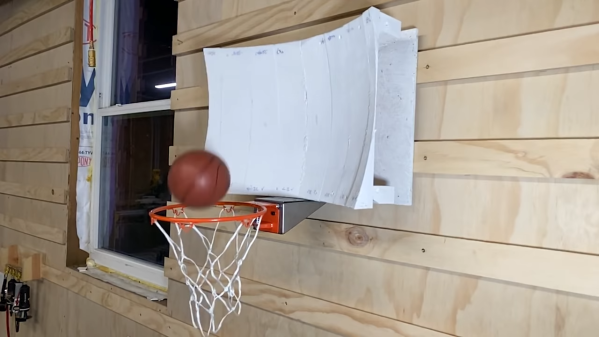
Analyzing CNC Tool Chatter With Audacity

When you’re operating a machine that’s powerful enough to tear a solid metal block to shards, it pays to be attentive to details. The angular momentum of the spindle of a modern CNC machine can be trouble if it gets unleashed the wrong way, which is why generations of machinists have developed an ear for the telltale sign of impending doom: chatter.

To help develop that ear, [Zachary Tong] did a spectral analysis of the sounds of his new CNC machine during its “first chip” outing. The benchtop machine is no slouch – an Avid Pro 2436 with a 3 hp S30C tool-changing spindle. But like any benchtop machine, it lacks the sheer mass needed to reduce vibration, and tool chatter can be a problem.

The analysis begins at about the 5:13 mark in the video below, where [Zach] fed the soundtrack of his video into Audacity. Switching from waveform to spectrogram mode, he was able to identify a strong signal at about 5,000 Hz, corresponding to the spindle coming up to speed. The white noise of the mist cooling system was clearly visible too, as were harmonic vibrations up and down the spectrum. Most interesting, though, was the slight dip in frequency during the cut, indicating loading on the spindle. [Zach] then analyzed the data from the cut in the frequency domain and found the expected spindle harmonics, as well the harmonics from the three flutes on the tool. Mixed in among these were spikes indicating chatter – nothing major, but still enough to measure.

Audacity has turned out to be an incredibly useful tool with a broad range of applications. Whether it be finding bats, dumping ROMs, detecting lightning strikes, or cloning remote controls, Audacity is often the hacker’s tool of choice.

Continue reading “Analyzing CNC Tool Chatter With Audacity”

Stacks Of Spring Washers Power The Drawbar On This CNC Mill Conversion

With Tormach and Haas capturing a lot of the entry-level professional market for CNC machines, we don’t see too many CNC conversions of manual mills anymore. And so this power drawbar conversion for a Precision Matthews mill really caught our eye.

What’s that, you say? Didn’t [Physics Anonymous] already build a power drawbar for a mill? They did, and it was quite successful. But that was based on a pneumatic impact wrench, and while it worked fine on a manual mill, the same approach would be a bit slow and cumbersome on a CNC mill. For this build, they chose a completely different approach to providing the necessary upward force to draw the collet into the collet holder and clamp down on the tool: springs. Specifically, Belleville spring washers, which are shaped like shallow cups and can exert tremendous axial force over a very short distance.

[PA] calculated that they’d need to exert 2,700 pounds (12,000 Newtons) of force over a length of a couple of inches, which seems outside the Belleville washer’s specs. Luckily, the springs can be stacked, either nested together in “series” to increase the load force, or alternating in “parallel” to apply the rated force over a greater distance. To compress their stack, they used a nifty multi-stage pneumatic cylinder to squash down the springs and release the collet. They also had to come up with a mechanism to engage to machine’s spindle only when a tool change is called for. The video below details the design and shows the build; skip to 11:32 to see the drawbar in action.

We’re looking forward to the rest of [Physics Anonymous]’ conversion. They’re no strangers to modifying off-the-shelf machines to do their bidding, after all – witness their improvements to an SLA printer.

Continue reading “Stacks Of Spring Washers Power The Drawbar On This CNC Mill Conversion”

Unique 3D Printer Turned CNC Engraver

As we’ve said in the past, one of the most exciting things about the proliferation of low-cost desktop 3D printers (beyond all the little boats we get to see on Reddit), is the fact that their motion control systems are ripe for repurposing. Outfitting a cheap 3D printer with a drag knife, pen holder, or even a solid-state laser module, are all very common ways of squeezing even more functionality out of these machines.

But thanks to the somewhat unusual nature of his printer, [Hammad Nasir] was able to take this concept a bit farther. Being considerably more rigid than the $99 acrylic-framed box of bolts we’ve become accustomed to, he was able to fit it with a basic spindle and use it for CNC engraving. He won’t be milling any steel on this rig, but judging by the pictures on the Hackaday.io page for the project, it does a respectable job cutting designs into plastic at least.

The IdeaWerk 3D printer that [Hammad] used for this project is phenomenally overbuilt. We don’t know whether the designers simply wanted to make it look futuristic and high-tech (admittedly, it does look like it could double as a movie prop) or they thought there was a chance it might get thrown down the stairs occasionally. In either event, it’s built like an absolute tank.

While the frame on lesser printers would likely flex as soon as the bit started moving across the workpiece, this thing isn’t going anywhere. Of course this machine is presumably still running on the standard GT2 belt and NEMA 17 arrangement that has been used in desktop 3D printers since the first wooden machines clattered to life. So while the frame might be ready to take some punishment, the drive system could respectfully disagree once the pressure is on.

Modification was simplified by the fact that the hotend and extruder assembly on the IdeaWerk is mounted to the X axis with just a single bolt. This makes it exceptionally easy to design alternate tool mounts, though arguably the 3D printed motor holder [Hammad] is using here is the weak link in the entire system; if it’s going to flex anywhere, it’s going to be there.

If you’re more photonically inclined, you might be interested in this similarly straightforward project that sees a 2.5 W laser module get bolted onto an entry level 3D printer.

Universal Interface Board Comes To The Rescue Of Bigger Projects

As soon as a project involves other assemblies, parts, or modules, things get more complicated. Devices like fans, cooling units, probes, pumps, or lighting might have simple electrical requirements, but they are rarely identical. As a result, one’s tidy project ends up having to deal with, for example, a pump that is controlled with 5 V active high logic, a sensor that outputs 5 V active low, lights that expect to be switched with 24 VDC, and a fan that needs a relay right now. But that might change in the future.

That’s exactly what led [Lukas Fässler] to design and build the Universal Interface, a board intended to be a kind of universal translator and interface for all such devices. The idea is to have one Universal Interface board for every external device. For each board, a wide variety of input combinations controls a single output. The boards are “hardware programmable” in the sense that jumpers (zero-ohm resistors) are used to spell out in black and white exactly what combinations of inputs result in which output state. In this way, some standardization and clarity of control can be enforced while still being flexible enough to accommodate changes.

Jumper-configured logic table defining with utter clarity which combination of inputs results in an OFF or ON.

Each Universal Interface board has three inputs and an enable line, each with their own indicator LED visually confirming its state. The inputs are 24 V tolerant and each can be configured with a pull-up, a pull-down, and as an active high or active low. There is one output, but it takes several forms: a sturdy relay, a powerful open-collector output, a 5 V logic output, and a 24 V logic output. Configuring which output state corresponds to what combination of inputs is set by jumpers, so the board is very much WYSIWYG.

[Lukas] is currently using four of these devices with his CNC mill project, all in different configurations, and they’re working reliably. Interested? The GitHub repository for the project has all the board design files.

3D-Printer And CNC Make This Russian Calculator Bilingual

Let’s be clear right up front: there are probably more obvious solutions to the problem of using a Russian calculator when you don’t speak Russian than printing new keys and engraving translated markings on them. But easy solutions are boring and generally considered beyond the scope of Hackaday articles, so let’s dive in.

They say that mathematics is the universal language, but that’s only true to an extent. Still, even with our limited non-existent Cyrillic skills, the Russian keyboard on this RPN calculator isn’t that hard to figure out. But as [Amen] points out, in the midst of fevered calculations, one prefers not to mentally translate Χ→П to STO or remember that В↑ is the Enter key. So he printed a set of replacements for the confusing keys from PLA. While pondering how to safely fixture such small parts for the later engraving step, [Amen] hit on a genius solution: move the print bed to the CNC router and fixture everything in one go. The resulting characters are large enough to be legible and deep enough to be filled with air-drying polymer clay for contrast. After sanding and polishing, the calculator looks like it came from the Министерство электронной промышленности that way.

Honestly, we’d love to get a look inside this calculator. The insides of Russian electronics can be fascinating, and we’ve even seen entire forums dedicated to decapping Russian parts. But we understand the desire to keep it intact.

Continue reading “3D-Printer And CNC Make This Russian Calculator Bilingual”

Steel Tubes And Ground Plates Form The Skeleton Of This DIY Vertical CNC Mill

If you’re going to do it yourself, you might as well outdo yourself. That seems to be the thinking behind this scratch-built CNC mill, and it’s only just getting started.

According to [Kris Temmerman], the build will cost about $10,000 by the time he’s done. So it’s not cheap, and a personal CNC from Tormach can be had for less, but that’s missing the point entirely. [Kris] built most of the structural elements for the vertical mill from cheap, readily available steel tubing, of the kind used for support columns in commercial buildings. Mounted to those are thick, precision-ground steel plates, which eat up a fair fraction of the budget. Those in turn hold 35 mm linear bearings and ball screws for the three axes, each powered by a beefy servo. The spindle is a BT30 with a power drawbar, belt-driven by an external motor that [Kris] doesn’t share the specs on, but judging from the way it flings chips during the test cut in the video below, we’d say it’s pretty powerful.

There’s still plenty to do, not least of which is stiffening the column; perhaps filling it with epoxy granite would do the trick? But it sure looks like [Kris] is building a winner here, and if he keeps the level of craftsmanship up going forward, he’ll have a top-quality machine on his hands.

Continue reading “Steel Tubes And Ground Plates Form The Skeleton Of This DIY Vertical CNC Mill”

A Super Easy Laser Engraver

CNC comes in all shapes and sizes, from huge industrial lathes to homebuilt wire benders. [MJKZZ] has built their own compact rig, using optical drive parts to create a cute but effective laser engraver. (Video embedded below.)

The build aims to keep things simple by holding the laser stationary, and moving the bed instead. The laser in question is a 500 mW unit, driven by the Z axis on the Arduino CNC shield used to run the system. A DVD drive is taken apart, and the worm drive stepper motor assembly is used to slew the carriage back and forth, atop which is glued a bed. Upon this bed, a copy of the same assembly is then installed, offset 90 degrees, giving the X and Y axes.

The result of this setup is a lightweight moveable bed, controllable through Gcode with GRBL. With the laser situated above on some camera mounting gear, paper can be installed on the bed and engraved with ease. The resulting accuracy is admirable, and at full power, the laser is capable of cutting through the paper.

While it’s a lightweight rig, it could serve a purpose as a cheap and easy way to produce stencils from computerized artwork. Optical drives remain popular in the DIY CNC scene, as they’re a great way to source a moveable platform with all the mechanical considerations already worked out.

Continue reading “A Super Easy Laser Engraver”