Workbench Eye Candy From Around The World

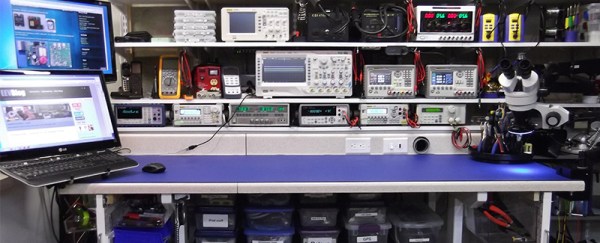
The workbench. We’re always looking for ways to make the most out of the tools we have, planning our next equipment purchase, all the while dealing with the (sometimes limited) space we’re allotted. Well, before you go off and build your perfect electronics lab, this forum thread on the EEVblog should be your first stop for some extended drooling research.

You’ll find a great discussion about everything from workbench height, size, organization, shelf depth, and lighting, with tons of photos to go with it. You’ll also get a chance to peek at how other people have set up their labs. (Warning, the thread is over 1000 posts long, so you might want to go grab a snack.)

We should stop for a moment and give a special note to those of you who are just beginning in electronics. You do not need to have a fancy setup to get started. Most of these well equipped labs is the result of being in the industry for years and years. Trust us when we say, you can get started in electronics with nothing more than your kitchen table, a few tools, and a few parts. All of us started that way. So don’t let anything you see here dissuade you from jumping in. As proof, we’ve seen some amazingly professional work being done with the most bare-bones of tools (and conversely, we seen some head-scratching projects by people with +$10,000 of dollars of equipment on their desk.)

Here’s some links that you might find handy when setting up a lab. [Kenneth Finnegan] has a great blog post on how his lab is equipped. And [Dave Jones] of the EEVblog has a video covering the basics. One of the beautiful things about getting started in electronics is that used and vintage equipment can really stretch your dollars when setting up a lab. So if you’re looking into some vintage gear, head on over to the Emperor of Test Equipment. Of course no thread about workbenches would be complete with out a mention of Jim Williams’ desk. We’ll leave the discussion about workbench cleanliness for the comments.

minimalist desk

Sliding Minimalist Computer Desk Starts Life As Ikea Shelf

Where are you right now? You’re probably sitting at a desk staring at a computer screen. Us tinkerers/makers/hackers/diyers use computers all the time… they are a great tool and an easy way to spread and gather information. Since we spend so much time sitting at a computer, why shouldn’t the computer’s desk be made to enhance the experience?

Self-proclaimed web guru [Ellis] admits to being a minimalist and wanted a super sleek computer desk. He couldn’t find a commercially available model that he liked so he built his own.

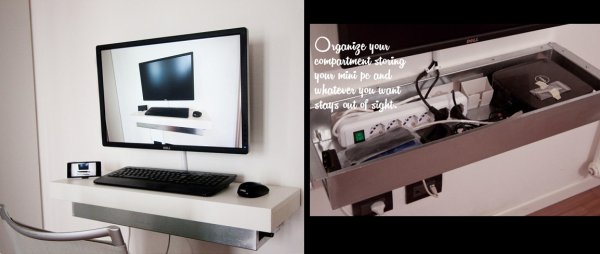
The desk started as an Ikea floating shelf. The shelf comes with a metal bracket that secures to a wall, then the shelf completely slides over the bracket so that the shelf looks as if it is floating in air. Once the u-shaped bracket was installed to the wall, a custom compartment was made to fit in between the bracket’s arms. This compartment will hold a power strip, mini Dell computer and other accessories. On the outside of each bracket arm, [Ellis] mounted drawer slides. The stock shelf was then modified to mount to the newly added drawer slides allowing it to be pulled forward for typing or to expose the hidden compartment. When closed, the shelf-desk looks clean and blends into the wall color.

A wide screen monitor is mounted directly on the wall just above the desk and a wireless keyboard/mouse combo supports the clean look. [Ellis] now has the minimalist computer desk he’s always wanted that doesn’t distract him from his work (or ‘net browsing).

LeanPipe

Building Things With Lean Pipe

Sometimes you just want to build something quickly and easily. Maybe you just need a basic structure for your actual project, or perhaps you want to be able to easily modify the design. Maybe you don’t have access to many fancy tools to build a solid, lightweight structure. Another possibility is that you want to be able to break down your structure and move it at a later date. In cases like these, you might want to consider using lean pipe.

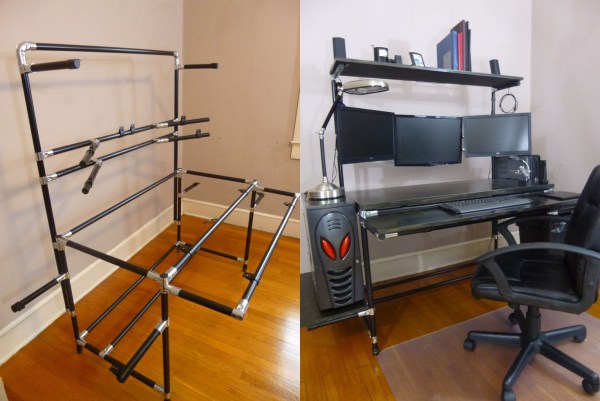
Lean pipe is kind of like K’NEX for adults. It’s made up of metal pipe and specialized fittings. If you’ve ever worked with PVC pipe before then this may sound familiar. The difference is lean pipe is stronger and designed specifically for building sturdy structures. The fixtures designed for use with lean pipe are much easier to work with than PVC pipe. With PVC pipe, it seems like you never have the exact right fitting and you have to build your own adapters, quickly increasing the cost of the design.

A typical lean pipe fitting will either slide over the end of a section of pipe, or wrap around it somewhere in the middle. An adjustment screw can then be tightened to clamp the fitting in place around the sections of pipe. The video below does a good job demonstrating the different possibilities with fittings. The primary issue with this material is that you might not be able to find it at your local hardware store. Luckily, a quick Internet search will turn up a number of online purchasing options.

So what can you build with this stuff? Cody has been building himself computer desks with an industrial look. He first starts out with the frame design. This is the part that’s made from the lean pipe. Once the frame is completed he just needs to work on the wood surfaces. All he really needs to do is cut the wood to shape and then finish it to look nice. It then lays in place and can be bolted down for extra security. Continue reading “Building Things With Lean Pipe”

Adjustable Desk

An Adjustable Sit/Stand Desk For Under $100

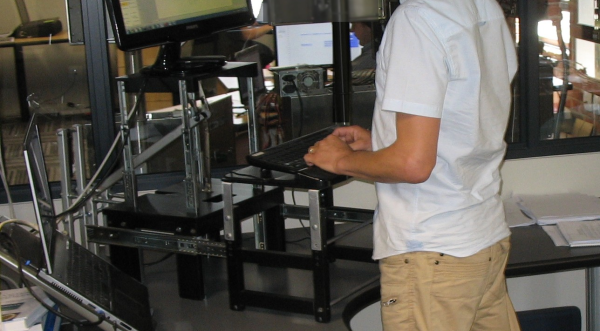
[Cornel Masson] is a 46-year-old computer programmer. He’s been working on his computer for the last 30 years. Computer work can be good for the wallet but it can be bad for our health, particularly the neck and back. You can purchase adjustable desks to allow you to change positions from sitting to standing, but unfortunately these desks are often expensive. [Cornel] took matters into his own hands and build his own adjustable riser for under $100.

To start, [Cornel] used a typical computer desk. He didn’t want to build the entire thing from scratch. Instead he focused on building a riser that sits on top of the desk, allowing him to change the height of both the monitor and keyboard. His design used mostly wood, aluminum stock, threaded rods, and drawer slides.

The main component is the monitor stand and riser. The riser is able to slide up and down thanks to four drawer slides mounted vertically. [Cornel] wanted his monitor to move up and down with ease, which meant he needed some kind of counter weight. He ended up using a gas strut from the trunk of a Nissan, which acts as a sort of spring. The way in which it is mounted makes for a very close approximation of his monitor’s weight. The result is a monitor that can be raised or lowered very easily. The stand also includes a locking mechanism to keep it secured in the top position.

The keyboard stand is also mounted to drawer slides, only these are in the horizontal position. When the monitor is lowered for sitting, the keyboard tray is removed from the keyboard stand. The stand can then be pushed backwards, overlapping the monitor stand and taking up much less space. The keyboard stand has small rollers underneath to help with the sliding. The video below contains a slideshow of images that do a great job explaining how it all works.

Of course if replacing the entire desk is an option go nuts.

Continue reading “An Adjustable Sit/Stand Desk For Under $100”

Hanging Monitors Keeps Your Desk Slightly Less Messy

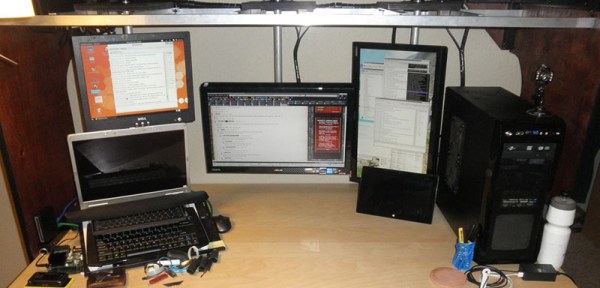
[Gertlex] – like just about everyone reading this, I’m sure – has a messy desk with monitors, keyboards, mice, several other input devices, tablets, and a laptop. He wanted a system that would reduce the wire clutter on his desk and after thinking a bit came up with a really cool solution for arranging his monitors. He’s hanging the monitors from a shelf above his desk using nothing but some aluminum and a few 3D printed brackets.

The main structure is a shelf of ‘bridge’ above his desk, made from 3/4″ ply. The inventive bit of this build is the two 1″ square aluminum tubes spanning the width of this shelf. From these, a few bits of aluminum angle pieces slide along the 1″ rails. a mount holds a 1″ round pipe to these supports, and a VESA mount is clamped to the pipe. There’s an imgur album that goes through the entire design. It’s certainly an improvement over the earlier battlestation, and the wiring loom cleans everything up nice and tidy.

[Gertlex]’s new system of hanging monitors is great, but this simple puts some even cooler builds on the table. The sliding system is great, but by putting one monitor on its own carriage, you could have an infinitely reconfigurable monitor setup. Some proper bearings, 3D printed VESA mounts, and maybe even a few stepper motors would make a build like this the coolest battlestation rig since the great ‘capacitor plague and I have a soldering iron so free monitors’ spectacular of 2005.


Automatic Desk

College Dorm Transforms Into High Tech Office

College dorms are notoriously tiny; which either forces most students into a life of minimalism, or for [Thomas Hopmans], innovation to overcome the lack of square-footage.

His first step was getting a Murphy bed, which saves tons of space. But he wanted to add a few extra features to his, so instead he decided to make his own! He designed the entire thing in SolidWorks, which might seem like overkill, but he’s an Industrial Design student, and has become quite proficient in the software from his various work internships.

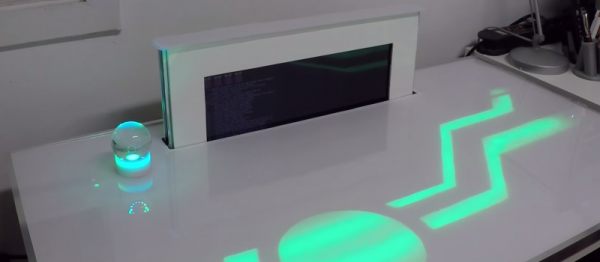
The bed uses pneumatic struts to make lifting and lowering the bed frame easy — the cool part is the mechanism he designed which causes his dual 28″ monitors to pop up from the desk. They’re directly coupled to the bed with a linkage which ensures they’ll never get accidentally crushed by the bed.

He admits he could have just mounted the monitors to the bottom of the bed, but that wouldn’t have been nearly as fun as this.  He estimates the total cost was around $350 for whole thing, which isn’t half bad for a bed… and a desk!

Continue reading “College Dorm Transforms Into High Tech Office”

Genetic Engineering Produces Desk/Computer Hybrid

Desk Holds Computer Internally

Computers and Desks go together like peanut butter and jelly. After many years of modding computer cases with windows, lights and the like, [Cameron] decided it was time to try something new and combine his next custom case with a desk.

The main desk is from Ikea. The computer case portion is made from wood. No one wants to lose leg room, this case was made to be shallow and wide so it would be out of the way when bolted underneath the desk’s work surface. If any serious maintenance has to be done the case can be easily unbolted and lowered for easy access. Speaker grill cloth is used on the front of the case for 2 reasons; hide the case and keep out the dust.

Continue reading “Genetic Engineering Produces Desk/Computer Hybrid”