Review: Inkplate 6PLUS

While the price of electronic paper has dropped considerably over the last few years, it’s still relatively expensive when compared to more traditional display technology. Accordingly, we’ve seen a lot of interest in recovering the e-paper displays used in electronic shelf labels and consumer e-readers from the likes of Amazon, Barnes & Noble, and Kobo. Unfortunately, while these devices can usually be purchased cheaply on the second hand market, liberating their displays is often too complex a task for the average tinkerer.

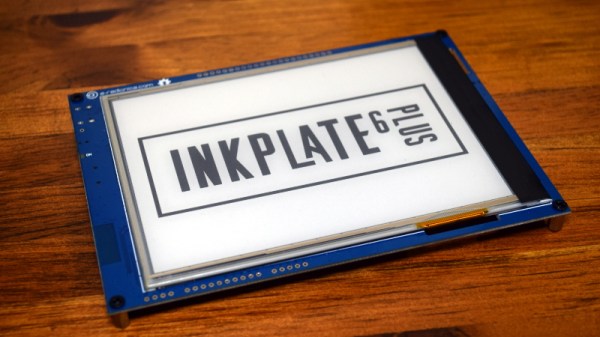
Enter the Inkplate. With their open hardware ESP32 development board that plugs into the e-paper displays salvaged from old e-readers, the team at e-radionica is able to turn what was essentially electronic waste into a WiFi-enabled multipurpose display that can be easily programmed using either the Arduino IDE or MicroPython. The $99 Inkplate 6 clearly struck a chord with the maker community, rocketing to 926% of its funding goal on Crowd Supply back in 2020. A year later e-radionica released the larger and more refined Inkplate 10, which managed to break 1,000% of its goal.

For 2021, the team is back with the Inkplate 6PLUS. This updated version of the original Inkplate incorporates the design additions from the Inkplate 10, such as the Real-Time-Clock, expanded GPIO, and USB-C port, and uses a display recycled from newer readers such as the Kindle Paperwhite. These e-paper panels are not only sharper and faster than their predecessors, but also feature touch support and LED front lighting; capabilities which e-radionica has taken full advantage of in the latest version of their software library.

With its Crowd Supply campaign recently crossing over the 100% mark, we got a chance to go hands-on with a prototype of the Inkplate 6PLUS to see how e-radionica’s latest hacker friendly e-paper development platform holds up.

Continue reading “Review: Inkplate 6PLUS”

Reverse-Engineering An Unknown Microcontroller In E Ink Displays

For a monochrome display where refresh rate isn’t particularly important, there’s almost no better option than an E Ink display. They’re available in plenty of sizes and at various price points, but there’s almost no option cheaper than repurposing something mass-produced and widely available like an E Ink (sometime also called eInk or ePaper) price tag. At least, once all of the reverse engineering is complete.

[Dmitry Grinberg] has been making his way through a ton of different E Ink modules, unlocking their secrets as he goes. In this case he set about reverse engineering the unknown microcontroller on the small, cheap display show here. Initial research showed an obscure chip from the ZBS24x family, packaged with a SSD1623L2 E Ink controller. From there, he was able to solder to the communications wires and start talking to the device over ISP.

This endeavor is an impressive deep dive into the world of microcontrollers, from probing various registers to unlocking features one by one. It’s running an 8051 core so [Dmitry] gives a bit of background to help us all follow along, though it’s still a pretty impressive slog to fully take control of the system.

If you happen to have one of these price tags on hand it’s an invaluable resource to have to reprogram it, but it’s a great read in general as well. On the other hand, if you’re more interested in reverse-engineering various displays, take a look at this art installation which spans 50 years of working display technologies.

Paper Pi Is An Ergonomic Cyberdeck Meant For Thumbs

What’s the fastest way to master console stuff like screen or emacs? Force yourself to use it exclusively, of course. But maybe you’d be tempted to cheat with a desktop. We know we would be. In that case, you ought to build a console-only cyberdeck like this sweet little thing by [a8skh4].

This cyberdeck serves another purpose as well — the keyboard layout is Miryoku, so [a8ksh4] can get more practice with that at the same time. Fortunately, the layout is built for emacs.

Inside is a Raspberry Pi 4 and what looks to be an Arduino handling the keyboard input. The Paper Pi spotlights a 4.2″ e-ink screen between a split thumb keyboard that’s made of soft, silent, tactile switches.

Since they’re SMD, [a8ksh4] made clever use of header pins to get them to work with protoboard. As much as we love the keyboard, it would be awesome to see a few switches on the shoulders or even the back that make use of the rest of the fingers. Check out more build pictures in the gallery.

We love to see cyberdecks with split keyboards, because you shouldn’t have to sacrifice ergonomics in a portable computer. Here’s one that comes in three pieces, making it easy to get the spacing between the halves just right.

Via r/cyberdeck

A Fresh E-Ink Newspaper Delivered Every Morning

[Greg Raiz] recently set out to make it easy to read multiple newspapers in the morning over breakfast. Inspired by a similar project, he built an e-ink newspaper that hangs on his wall, delivering fresh news every ten minutes.

The project started with a 32″ Visionect e-ink display configured as a thin client. With a battery life measured in months thanks to the low power electronics, most of the work here was focused on the backend. A docker container running on a local NAS server collects newspapers via freedomforum.org, formats them to fit the aspect ratio of the display, and serves them up. [Greg] is really trying to preserve the design and thought that goes into the front page of each of these publications as traditional newspaper layouts are often designed by hand.

We love the simplicity and the “it-just-works” feel of this project as there are no buttons, wires, or anything that you need to fiddle with. [Greg] points out that it could also be used for other purposes, and we’d love to see a large calendar such as this e-ink calendar or perhaps even a 32″ version of this e-ink laptop. The code for this is on his GitHub with a video after the break.

Continue reading “A Fresh E-Ink Newspaper Delivered Every Morning”

A Deep Dive Into E-Ink Tag Hacking

Over the last decade or so, e-ink price tags have become more and more ubiquitous, and they’ve now reached the point where surplus devices can be found inexpensively on various websites. [Dmitry Grinberg] found a few of these at bargain-basement prices and decided to reverse engineer and hack them into monochrome digital picture frames.

Often, the most difficult thing about repurposing surplus hardware is the potential lack of documentation. In the two tags [Dmitry] hacked, not only are the labels not documented at all, one even has an almost-undocumented SoC controlling it. After some poking around and some guesswork, he was able to find connections for both a UART and an SWD debugging interface. Fortunately, the manufacturers left the firmware unprotected, so dumping it was trivial.

Even with the firmware dumped, code for controlling peripherals (especially wireless devices) is often inscrutable. [Dmitry] overcomes this with a technique he calls “Librarification” in which he turns the manufacturer’s firmware into libraries for his custom code. Once he was able to implement his custom firmware, [Dmitry] developed his own code to wirelessly download and display both gray-scale and two-color images.

Even if you’re not interested in hacking e-ink tags, this is an incredible walk-through of how to approach reverse-engineering an embedded or IoT device. By hacking two different tags with completely different designs, [Dmitry] shows how to get into these systems with intuition, guesswork, and some sheer persistence.

If you’d like to see some more of [Dmitry]’s excellent reverse-engineering work, take a look at his reverse-engineering and ROM dump of the PokeWalker. If you’re interested in seeing what else e-ink tags can be made to do, take a look at this weather station made from the same 7.4″ e-ink tag.

E-Ink Laptop, First Steps

[Alexander Soto] prefers the reduced eye-strain of an e-ink display, but he doesn’t have a portable solution to use at different work stations. The solution? Make your own e-ink laptop. Once you see his plan, it’s not as crazy as it sounds.

[Alexander] got his inspiration from an earlier Dasung Paperlike Pro teardown that we covered back in 2018. His plan is to shoehorn the e-ink panel into a “headless” Thinkpad T480 laptop. This particular model ES133TT3 display is 13.3 inches (about 40 cm) with a much-better-than-normal laptop resolution of 2200 x 1650 pixels. It is driven over HDMI and is perfect fit for the Thinkpad enclosure.

Unfortunately, these displays haven’t gone down in price since 2018. They’re still in the $1000+ price range, more expensive than many laptops. But if you really want the reduced eye-strain of e-ink in a laptop format, you’re going to have to shell out for it.

It’s a pretty ambitious project. We’re looking forward to following his progress and see how the finished laptop goes together. Do check out the extensive list of e-ink references on his project page, too. If you want to experiment with a less expensive e-ink project, have a look at the PaperTTY project for your Raspberry Pi.


Wireless, Low Power E-Ink Weather Gadget

Not that long ago, making a low-power and wireless weather display complete with an e-ink screen would have required a lot of work and almost certainly would have been larger than the device [Dmitry] created.

(1) Weather alert indicator, (2) Current temperature, (3) Humidity and wind, (4) 24-hour temperature graph, (5) 24-hour precipitation probably graph

His low power e-ink weather gadget takes advantage of one of the niftier developer boards out there to create a useful and slim device that does exactly what he needs and not a lick more. It’s fast to look up weather online, but not as fast as glancing at a display in a convenient location.

The board [Dmitry] selected is a LilyGO TTGO T5s, an ESP32-based board that integrates an e-ink display, which requires no power unless being updated. It has been loaded with just enough smarts to fetch weather information using the OpenWeather API, and update the display accordingly.

Powering up the WiFi to fetch an easily-parsed JSON file and update the display only once per hour means that a battery can provide months of runtime. As a bonus, the LilyGO board even includes the ability to charge the battery, making things awfully convenient.

The bill of materials is here and code for the device, including setup directions, is on the project’s GitHub repository. And if your tastes happen to run more towards the artistic than utilitarian, we have just the weather display for you.