Visualizing LEDs For More Efficient Pin Packing

The archetypal “blink an LED” is a great starter project on any platform, but once the bug takes hold that quickly turns into an exploration of exactly how many LEDs a given microcontroller can drive. And that often leads to Charlieplexing. A quick search yields many copies of The Table describing how many LEDs can be driven by a given number of pins but that’s just the most rudimentary way to describe it. Way back in 2013 [M Rule] developed a clever trick to describe the number of LED matrices which can be driven by a Charlieplexed array of a given size that makes this process much more intuitive. The post may be old, but we promise the method is still fresh.

[M Rule] was specifically looking to drive those big, cheap single color LED matrices which are often used to make scrolling signs and the like. These parts are typically a matrix of LEDs with a row of common cathodes and one of common anodes. Internally they are completely dumb and can be driven by row/column scanning, or any other way a typical matrix can be controlled. The question is, given known matrix sizes, how many can be driven with a a number of Charlieplexed LED drive pins?
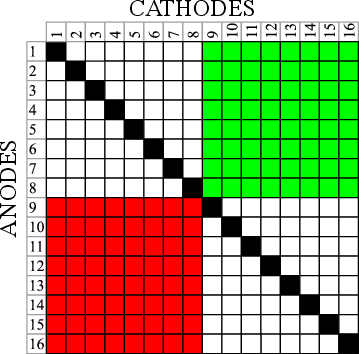
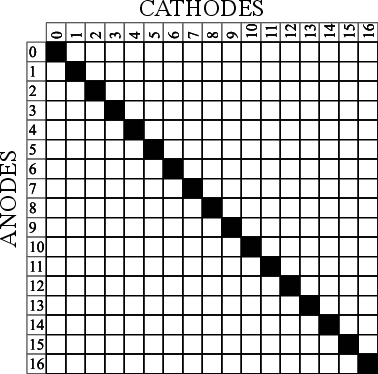
The first step is to visualize the 1D array of available pins as a 2D matrix, as seen to the right. Note each numbered pin is the same on the X and Y, thus the black exclusion zone of illegal drive pin combinations slicing across the graph (you can’t drive an LED connected to one pin twice). The trick, if one were to say it resides in a single place, would be titling the axis anode and cathode, representing two “orientations” the drive pins can be put in. With this diagram [M Rule] observed you can simply drop a matrix into the array. If it fits outside the exclusion zone, it can be driven by those pins!
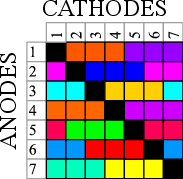
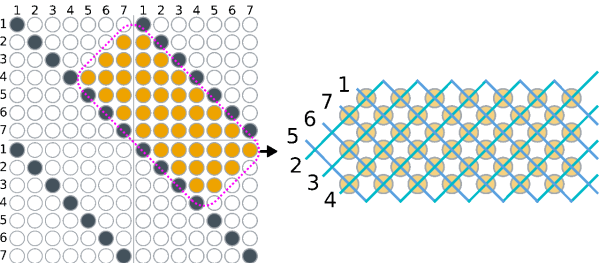
To the left is what this looks like with two 8×8 matrices, one connected between pins 1-8 and 9-16, the other connected between 9-16 and 1-8. This isn’t terribly interesting, but the technique works just as well with single LEDs and any size matrix, including 7-segment displays. Plus as long as an element doesn’t overlap itself it can wrap around the edges leading to some wild visuals, like 14 RGB LEDs on seven pins to the right.

The most extreme examples are pretty exotic. Check out [M Rule]’s post for the crown jewel; 18 pins to drive six 5×7 modules, six 7-segment displays, 12 single LEDs, and 18 buttons!

If this color coded diagram seems familiar, you may be remembering [openmusiclabs]’ excellent diagram describing ways to scan many of buttons. Or our coverage of another trick of matrix topology by [M Rule] from a few weeks ago.

Lateral Thinking For An Easier Charlieplex

In the practical world we live in, PCBs are often rectangles (or rectangles with rectangles, it’s just rectangles all the way down). When a designer goes to schematic capture things are put down on nice neat grid intersections; and if there isn’t a particular demand during layout the components probably go on a grid too. Routing even the nastiest fractal web of traces is mostly a matter of layers and patience. But if the layout isn’t being done in a CAD tool and needs to be hand assembled free-form this isn’t always as simple. [M Rule] had this very problem and discovered a clever solution, turning things diagonal.

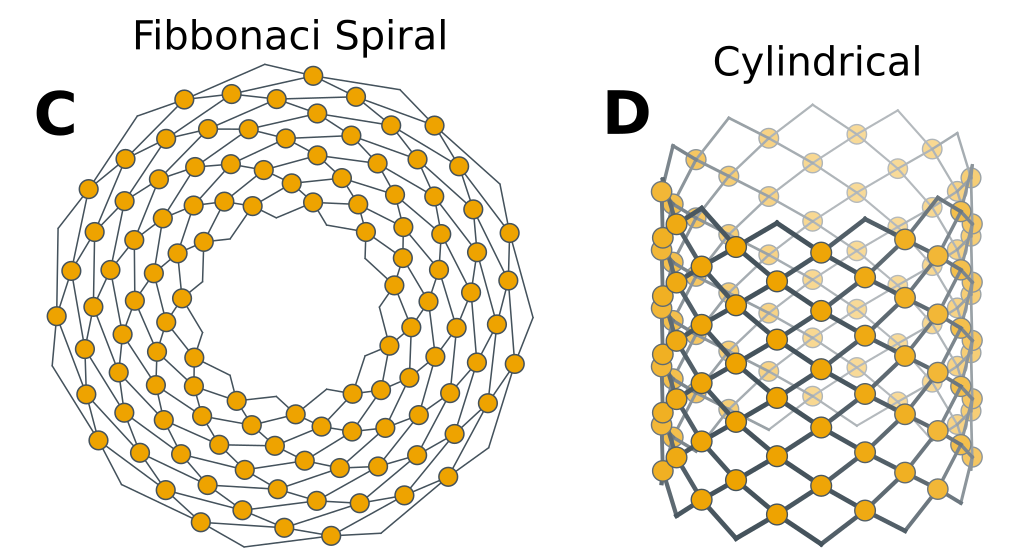
They changed the fitness criteria to the optimization problem that is controlling a lot of LEDs. Instead of minimum pins to drive the goal became “easiest assembly”, which meant avoiding wires snaking back and forth across the layout, a big source of frustration in a big Charlieplexed design. The observation was that if they turned the a rectilinear LED matrix by 45° and wrapped each connection around at the edges it formed what was essentially a large multiplexed matrix. The topology is pretty mind bending, so take a minute to study the illustration and build your mental model.

It looks a little strange, but this display works the same way a normal multiplexed display does but with the added benefit that each trace flows from one side to the other without turning back on itself at any point. To light any LED set the right row/column pair as source/sink and it turns on!

What if you actually need a rectangular display? Well that’s no problem, the matrix can be bent and smooshed as desired to change its shape. At the most extreme the possible display topologies get pretty wild! We’re sure to try thinking laterally next time we need to design an unusual display, maybe there is a more efficient matrix to be found.

Wear A Helmet, Rollerblades With Attitude

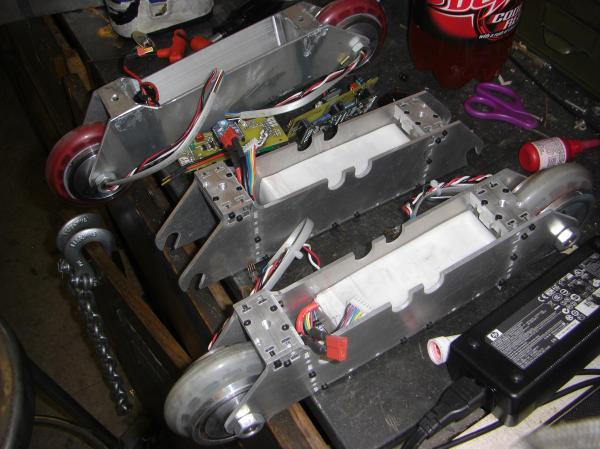
Wireless controller, more powerful custom-made motors, stronger frame, and with a name like DeathBlades, we can’t think of a single reason why you would prefer heel treads, well everyone was young at one time.

[Charleg] has been testing out a slightly new frame, despite having only half the motors necessary, and is getting great results hitting around 23Wh/mi. If you’re looking to build your own, his blog has a post for nearly every aspect of the design.

[Thanks Jerome Demers]

Coffee Powered Car-puccino

We can only imagine how amazing this coffee burning car smells at it speeds down the highway at a maximum of 60mph. Don’t jump out of your seat so quick to get your own, while the idea sounds fantastic, the mileage will bring you back to earth rather quick. At 3 miles per kilo of coffee, it can turn that £36 210 mile trip into one between £910 and £1,820 with a stop to re-bean-fill every half hour!

Still, the Car-puccino is an amazing conversion, and we’re getting closer and closer to Back to the Future’s Mr. Fusion

[Thanks Tim]

PHP Runtime Rewritten, By Facebook?

Yes, its true. Facebook has completely rewritten the PHP runtime to make it faster and more efficient, and its completely open source. Named HipHop, its described as a source code transformer, changing PHP into optimized C++ which is then compiled using g++. Thus keeping the best aspects of PHP while taking advantage of the performance of C++. Using HipHop, the Facebook web server CPU usage has been decreased by about fifty percent! And who would have thought that this and many other cool advances in programming, started at a Hackathon.

Energy Efficient Fridge Hack

Green_Freezer

We’ve already covered a pipe bomb mini-fridge this week, but inventor [Tom Chalko] provides us with today’s fridge hack. He noticed that chest-style (laying down, see above) freezers were more energy efficient when compared to normal stand up refrigerators at the same size, despite the colder temperatures involved. This is largely due to the fact that these chest-style freezers keep cold air in like water in a bowl, even if the lid is open. He has written a very thorough report on his findings (pdf), as well as a detailed walk through of the manageable task of converting a chest-style freezer into a chest-style fridge. In the end, his fridge only used 103 Wh of electricity on the first day to reach and maintain between 4° and 7° C (39° to 45° F), and he noted that 30% of that was just getting it up to temperature. After that, the fridge only turned on for roughly 90 seconds an hour, making it a very quiet fridge as well.