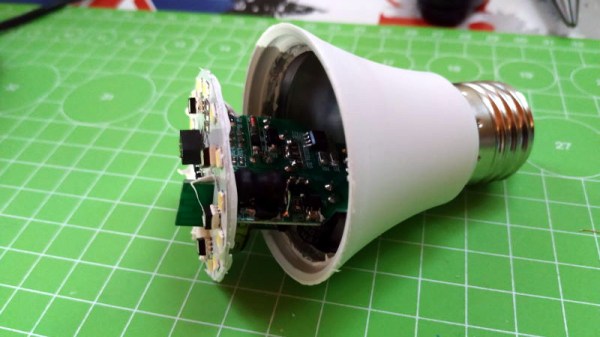
3D Printed ESP8266 TV Is A Blast From The Past

We’ve often said that one of the best applications for desktop 3D printing is the production of custom enclosures, but you certainly aren’t limited to an extruded version of the classic Radio Shack project box. As [Marcello Milone] shows with this very clever retro TV enclosure for the Wemos D1 Mini, 3D printing means your imagination is the only limit when it comes to how you want to package up your latest creation.

As nice as the printed parts are, it’s the little details that really sell the look. [Marcello] has bent a piece of copper wire into a circle to make a faux antenna with vintage flair, and while the ESP is connecting to the WiFi network, it even shows an old school TV test pattern on its 1.8″ TFT display.

In the video after the break you can see the device go through its startup routine, and while displaying the Hackaday Wrencher at boot might not be strictly on theme…we’ll allow it.

While you could certainly use this little enclosure for whatever ESP project you had in mind, [Marcello] says he’s building a distributed environmental monitoring network using HTU21D temperature and humidity sensors. It sounds like he’s still working on the software side of things though, so hopefully he posts an update when the functionality is fully realized.

Continue reading “3D Printed ESP8266 TV Is A Blast From The Past”

Reviving A DOA Smart Bulb With Custom Firmware For Its ESP8266

There are some incredibly cheap WiFi smart bulbs on the market these days, but as is often the case, you tend to get what you pay for. When [Viktor] took delivery of his latest bargain basement bulb, the thing didn’t even work. So much for Quality Assurance. On the plus side, it was a great excuse to pop it open and replace the firmware.

For anyone wondering, [Viktor] never actually figured out why the bulb didn’t work. Its ESP8266-based control board was getting power, and data was getting spit out of the serial port when he connected it to the computer (although he never got the communications settings right to actually see what it was saying). But he also didn’t care much; once he confirmed that the hardware was good, he just uploaded the custom firmware he’d previously developed for another ESP8266 bulb.

Of course, it wasn’t quite that easy. The chances that both bulbs would have used the same GPIO pins to control the red, green, blue, and white LEDs were pretty slim. But after some testing and modifications to the code, he was able to fire them up. The other issue was a bit trickier, as it turned out the bulb’s flash chip was too small to hold his firmware’s web configuration pages. So he had to break out the hot air gun and replace the SPI flash chip with something a bit roomier. We suppose he could have just made smaller web pages… but where’s the fun in that?

Even with the chip swap, this looks a lot easier than building your own smart bulbs from scratch. With so many cheap ESP8266 bulbs on the market, it seems there’s never been a better time to code your own home lighting solution.

Travel Globe Spins You Around Memory Lane

We all have our own preferences when it comes to travel souvenirs — that little something that brings back the memories and feelings of a past holiday every time we look at it, whether it’s the cliché fridge magnet, some local speciality, or just the collection of photos we took. But then there are those journeys that can’t be summarized into a single item and may require a bit more creativity. For [Jonathan], it was last year’s trip around the world that took him and [Maria] to locations all over Europe, Asia, and Oceania, and he found a great way to remember it: an interactive, laser-cut travel globe displaying all the places they went to.

Building a sphere is of course a bit tricky with a laser cutter, so [Jonathan] went for the icosahedron shaped Dymaxion map projection (think of a large d20 dice) and burnt the world onto it. Inside the globe is an ESP8266, an MPU-6050 IMU, and a bunch of LEDs to light up the travel locations using the WLED library. Taking the data from the IMU, he customized the WLED library to determine which way the globe is positioned, and highlights the top-facing location in a different color.

While that would already make a nice souvenir on its own, [Jonathan] didn’t stop here. Using Google’s My Maps service, which lets you create custom maps with own points of interest and have for example photos attached to them, the ESP8266 hosts the travel map also as a web page. Feeding the IMU data to the JavaScript code that’s handling the map API, the globe itself now doubles as an input device to control the virtual map. So whenever the globe is physically rotated to highlight a certain location, the web page’s map is focused to that same location and shows randomly the pictures they have taken there. Check out the video below to see it all in action.

This is a great way to reminisce about a memorable journey even years down the road, and while it may not be flexible to extend, it seems like the kind of trip that deserves a standalone device anyway. Plus, the Dymaxion map is definitely an interesting projection — so here’a a foldable one, just because. And If you like tracking things on a globe, here’s one that shows the location of the ISS.

Continue reading “Travel Globe Spins You Around Memory Lane”

Easy, Secure HTTPS With An ESP8266

Security has always been an issue with IoT devices. Off the shelf devices often have terrible security while DIY solutions can be complicated, needing recompilation every time a website’s fingerprint changes. [Johannes] wrote in to let us know he’s been working on a way to make HTTPS requests easier to do on ESP devices.

The normal ways to do HTTPS with an ESP8266 is to either use Fingerprints, or to use client.setInsecure(). Fingerprints require the user to know exactly which pages the ESP will connect to and extract the Fingerprints from each of those websites. Since the fingerprints change yearly, this means the fingerprint will have to be re-extracted and the code recompiled each time a fingerprint changes. The use of client.setInsecure() is, obviously, insecure. This may not be an issue for your project, but it might be for others.

[Johannes’] solution is to extract the trusted root certificates and store them in PROGMEM. This allows access to any web page, but the root certificates do expire as well. As opposed to the fingerprints, though, they expire after 20 years, rather than every year, so the program can run for a long time before needing recompilation. This solution also doesn’t require any manual steps – the build process runs a script that grabs the certificates and stores them in files so that they can be uploaded to the SPIFFS written to PROGMEM to be used during HTTPS requests.

He’s come up with a fairly straightforward way to have your IoT device connect to whichever web page you want, without having to recompile every once in a while. Hopefully, this will lead to better security for your IoT devices. Take a look at some previous work in this area.

WiFi Networks Turned Targets In This Pocket Game

Looking for a way to make his warwalking sessions a bit more interactive, [Roni Bandini] has come up with an interesting way to gamify the discovery of new WiFi networks. Using a Heltec WiFi Kit 8, which integrates an OLED screen and ESP8266, this pocket-sized device picks up wireless networks and uses their signal strength and encryption type as elements of the game.

After selecting which network they want to play against, a target is placed on the screen. The distance between the target and the player is determined by signal strength, and how much damage the target can take correlates to how strong its encryption is. As you can see in the video after the break, gameplay is a bit reminiscent of Scorched Earth, where the player needs to adjust the angle of their artillery to hit distant targets.

The Heltec board is attached to a 3D printed front panel, which fits neatly into an Altoids tin. The controls consist of a button and a potentiometer, and with the addition of a battery pack salvaged from an old cell phone, this little device is ready to do battle wherever you roam.

While this is just a fun diversion for the time being, [Roni] says it wouldn’t take much to actual log networks to a file and generate some statistics about their strength and encryption type. If the idea of a portable WiFi scanning companion seems interesting, you should definitely check out the Pwnagotchi project.

Continue reading “WiFi Networks Turned Targets In This Pocket Game”

Smart Home Meets Dumb Terminal

Most smart home products are designed to be controlled from a mobile device, which makes sense since that’s what the average consumer spends most of their day poking around on these days. But you aren’t the average consumer, are you? If you’re looking for a somewhat more tactile experience, then why not put your smart home dashboard on a vintage serial terminal as [Daniel Karpantschof] did?

So how do you get the latest and greatest in home automation talking to a serial terminal built before the Internet as we know it? With Python, of course. [Daniel] has some code running on a Linux server that’s actually taking to his various smart home gadgets, which then spits out a simple ASCII user interface that his circa 1976 ADM-3A terminal can handle; complete with a floor plan view of the house that shows the temperature in different rooms.

Naturally, that’s only half the battle. You still need to get that interface onto the terminal. For that, [Daniel] is using the “Simulant Retro WiFi Modem” that we’ve covered in the past. An ESP8266 connects to the network and shuffles data over to the target device over serial. It’s all transparent to the terminal itself, so this project could be reproduced with whatever vintage machine holds a special place in your heart.

Did Grandma Remember Her Pills? This Dispenser Tells You!

Everything has to be smart these days, and while smartening things up is a good incentive to tip your own toes into the whole IoT field, many of these undertakings are oftentimes just solutions looking for a problem. Best case, however, you actually make someone’s life easier with it, or help a person in need. For [Guli Morad] and [Dekel Binyamin], it was a bit of both when they built their automated pill dispenser: help people dependent on taking medication, and ease the mind of those worrying whether they actually remembered to.

Using an ESP8266 and a rather simple construct comprised of a set of servos with plastic sheets attached, and a plastic tube with strategically placed cuts for each pill type, a predefined amount of each of the pills can be automatically dispensed into a box — either at a given time, or on demand — using a Node-RED web interface. A reed switch mounted on the box then monitors if it was actually opened within a set time, and if not, informs emergency contacts about it through the Telegram app. Sure, a tenacious medication recipient might easily fool the system, but not even adding a precision scale to make sure the pills are actually taken out could counter a pill-reluctant patient of such kind, so it’s safe to assume that this is primarily about preventing simple forgetfulness.

Their proof of concept is currently limited to only two different types of pills, but with enough PWM outputs to control the servos, this should be easily scalable to any amount. And while the built may not be as sophisticated as some pill dispensers we’ve seen entering the Hackaday Prize a few years back, it still gets its main task done. Plus, when it comes to people’s health, a good-enough solution is always better than a perfect idea that remains unimplemented.

Continue reading “Did Grandma Remember Her Pills? This Dispenser Tells You!”