If you just wait around long enough, the future becomes the past. And that’s happened to the “Back to the Future” future, as you probably all remember. But BttF-themed projects are still pouring in.
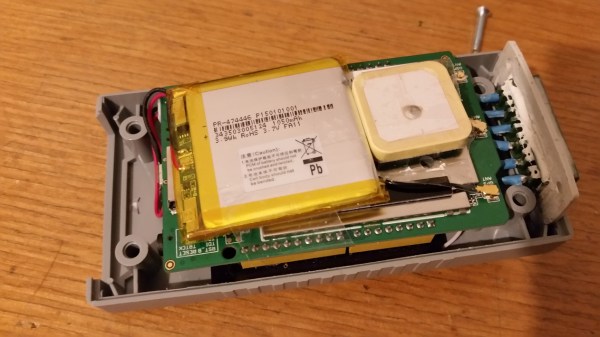
[ossum] sent us the link for his build of Doc Brown’s briefcase that only opens above 88 mph. His writeup is fantastically detailed, and worth a look if you’re interested in working with a GPS unit and microcontrollers, driving seven-segment LEDs with shift registers, or just driving too fast in an old Jetta. And there’s a video demo just below the break if you’re not a believer.
For all the destruction and human misery unleashed during World War II, it was also a time of incredible creativity and ingenuity. In America, it was a time when everyone wanted to pitch in. Young men and women enlisted and were shipped overseas, and those left behind kept the factories running full tilt. Even Hollywood went to war, with its steady output of films that gave people a little glamour and provided an escape from the horror and loss of the war. Hollywood stars lined up to entertain troops and raise money for the war effort, and many joined up and fought too.
But one Hollywood star made an unconventional contribution to the war effort, and in the process proved that beauty and brains are not always mutually exclusive. This is the story of Hedy Lamarr, movie star and inventor.
“The Most Beautiful Woman in the World”
By the time she was 23 in 1937, Hedwig Eva Maria Kiesler was a genuine film star in her native Austria. She was also trapped in an unhappy marriage to a rich and powerful Austrian munitions magnate, Fritz Mandl. Hedy was miserable as a trophy wife, adorning the dining room as her husband entertained rich and powerful guests – including Mussolini and Hitler – over long dinners in one of his mansions. They dismissed her; clearly a woman so beautiful could have nothing else to offer, an empty head perched on a graceful neck. But she was far from stupid, and while her husband discussed business with the men who were building the Axis arsenal, Hedy listened and learned.
One of the fundamental technologies of modern gadgets is the Global Positioning System (GPS). Using signals from satellites orbiting the earth, a GPS receiver can pin down its location with remarkable accuracy: the latest generation of Civilian Navigation Signals (CNAV) sent by the US GPS system has an accuracy of less than half a meter (about 3 feet). These signals also contain the time, accurate to within milliseconds, which makes it perfect for off-line dataloggers and systems that require very accurate timing. That’s a powerful combination that has made GPS one of the main technologies behind the mobile revolution, because it lets gadgets know where (and when) they are.
[Joop Brokking] wanted to know where his quadcopter was and had been. He thought about Google Earth, but assumed it would be difficult to get the GPS data and integrate it with Google’s imagery. But he discovered it was easier than he thought. He wound up spending around $10, although if his ‘copter didn’t already have GPS, it would have been more.
Hardware-wise, [Joop] made a pretty straightforward data logger using a small Arduino (a Pro Mini) and an SD Card (along with an SD breakout board). With this setup, NMEA data from the GPS comes in the Arduino’s serial port and winds up on the SD Card.
[Jed Hodson] put together a nice little data logger with a Linkit One board at its heart. It’s capable of logging two analog channels and one digital channel which also has PWM capabilities. A GPS is used to get the correct time and a Freetronics OLED display coupled with a shield lets the user view the data in real time.
The data is logged on the Linkit One’s internal storage as a .CSV file, allowing for easy access via a spread sheet program. A LiPo rechargeable battery keeps the electrons flowing and the system will give a warning once the power drops below 20%. Speaking of system – the Linkit One board features an ARM-7 processor and has headers to fit Arduino shields. It’s targeted for wearable and IoT type devices.
Be sure to check out this project if you’re in need of a nice data logger. All code and details of the build are available on [Jed’s] Blog.
I came across an interesting question this weekend: how do you establish your East/West location on the globe without modern technology? The answer depends on what you mean by “modern”, it turns out you only have to go back about three centuries to find there was no reliable way. The technology that changed that was a clock; a very special one that kept accurate time despite changing atmospheric conditions and motion. The invention of the Harrison H1 revolutionized maritime travel.
We can thank Andy Weir for getting me onto this topic. I just finished his amazing novel The Martian and I can confirm that George Graves’ opinion of the high quality of that novel is spot on. For the most part, Andy lines up challenges that Mark Watney faces and then engineers a solution around them. But when it came to plotting location on the surface of Mars he made just a passing reference to the need to have accurate clocks to determine longitude. I had always assumed that a sextant was all you needed. But unless you have a known landmark to sight from this will only establish your latitude (North/South position).
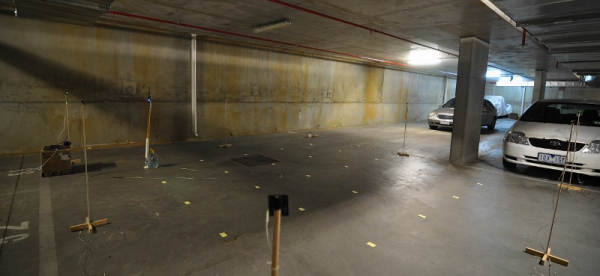
GPS-based location services will be around with us forever. If you’re in the outback, in the middle of the ocean, or even just in a neighborhood that doesn’t have good cell coverage, there’s no better way to figure out where you are than GPS. Using satellites orbiting thousands of miles above the Earth as a location service is an idea that breaks down at some very inopportune times. If you’re in a parking garage, you’re not using GPS to find your car. If you’re in a shopping mall, the best way to find your way to a store is still a map. Anyone every tried to use GPS and Google Maps in the hotel/casino labyrinth that is the Las Vegas strip?
[Blecky]’s entry for the Best Product competition of the Hackaday Prize aims to solve this problem. It’s an indoor location service using only cheap WiFi modules called SubPos. With just a few ESP8266 modules, [Blecky] can set up a WiFi positioning system, accurate to half a meter, that can be used wherever GPS isn’t.
The idea for a GPS-less positioning system came to [Blecky] after a caving expedition and finding navigation though subterranean structures was difficult without the aid of cell coverage and GPS. This got [Blecky] thinking what would be required to build a positioning service in a subterranian environment.
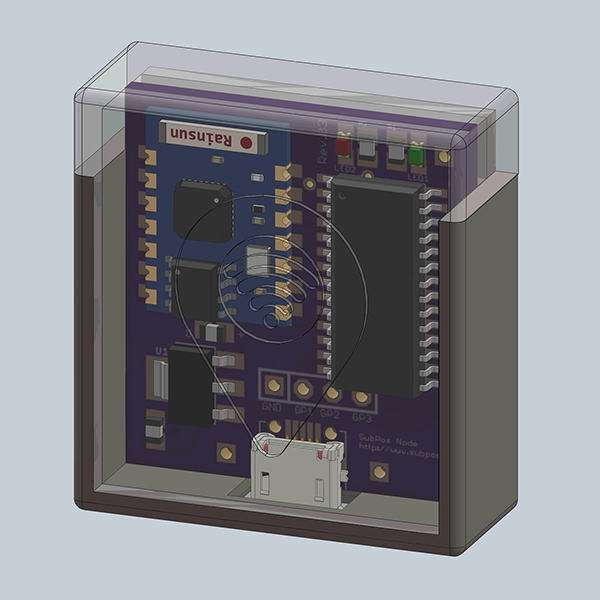
A SubPos node, equipped with an ESP8266 WiFi module
The answer to this question came in the form of a cheap WiFi module. Each of the SubPos nodes are encoded with the GPS coordinates of where they’re placed. By transmitting this location through the WiFi Beacon Frame, along with the transmitted power, any cell phone can use three or more nodes to determine its true location, down to a few centimeters. All of this is done without connecting to a specific WiFi network; it’s a complete hack of the WiFi standard to allow positioning data.
The most shallow comparison to an existing geolocation system would be a WiFi positioning system (WPS), but there are several key differences. In WPS, the WiFi APs don’t transmit their own location; the AP is simply cross-referenced with GPS coordinates in a database. Secondly, APs do not transmit their own transmit power – important if you’re using RSSI to determine how far you are from an Access Point.
The best comparison to an indoor location service comes from a new Decawave module that sets up ‘base stations’ and figures out a sensor’s location based on time of flight. This, however, requires additional radios for each device receiving location data. SubPos only requires WiFi, and you don’t even need to connect to an AP to get this location data; everything is broadcast as a beacon frame, and every device with WiFi detects a SubPos node automatically.
As an entry to the Hackaday Prize Best Product competition, there is an inevitable consideration as to how this product will be marketed. The applications for businesses are obvious; shopping malls could easily build a smartphone app showing a user exactly where in the mall they are, and provide directions to The Gap or one of the dozens of GameStops in the building. Because the SubPos nodes also work in 3D space, parking garage owners could set up a dozen or so SubPos nodes to direct you to your exact parking spot. Disney, I’m sure, would pay through the nose to get this technology in their parks.
Already [Blecky] is in talks with one company that would like to license his technology, but he’s not focused only on the high-dollar business accounts. He already has a product that needs manufacturing, and if he wins the Best Product competition, he will be working on something for the hacker/homebrew market. The price point [Blecky] sees is around $15 a node. The economics of this work with the ESP WiFi module, but [Blecky] is also looking at alternative chip sets that would allow for more than just RSSI position finding; an improved version of the SubPos node not based on the ESP-8266 could bring time of flight into the mix, providing better position accuracy while still being cheaper to manufacture than the current ESP-based solution.
[Blecky] has a great project on his hands here, and something we will, undoubtedly, see more of in the future. The idea of using WiFi beacon frames to transmit location data, and received signal strength to suss out a position is groundbreaking and applicable to everything from spelunking to finding your car in a parking garage. Since the SubPos system isn’t tied to any specific hardware, this could even be implemented in commercial routers, giving any device with WiFi true location data, inside or out. It’s also one of the top ten finalists for the Hackaday Prize Best Product competition, and like the others, it’s the cream of the crop.