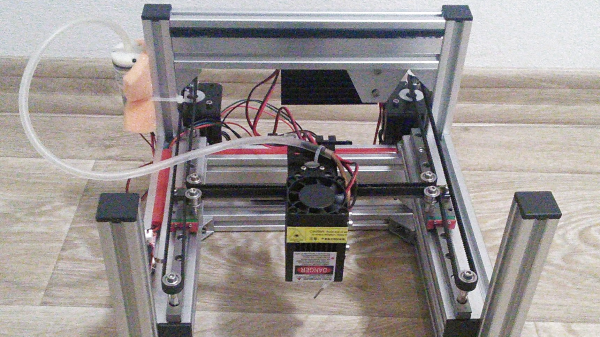
Sometimes you just gotta sit down and hack something together. Forget the CAD and the cool software toys; just hammer away until you have something working. That’s how [bobricus] ended up with this cute little laser engraver anyway.
For under $300 US of parts and a few nights working in his pajamas, the aptly named, pajama micro laser engraver is a pretty nice little machine for its class. Not having the space for a full size machine and not necessarily needing its capabilities he aimed to produce something compact.
The frame is aluminium extrusion, the movement is core-XY an H-bot on linear rails, and it appears to just be a grbl board with a Chinese laser module on it. He took a bit of care to make the frame a cube which allows him to easily vent the fumes from the little unit. There’s even a small air pump to blow the off-gas from the cutting away from the laser.
All in all a nice little hack useful for all sorts of things from solder masks to cutting wood veneers. You can see it zipping around in the video after the break.
When it comes to building a new CNC machine, you’ve got a wide world of controller boards to choose from. Whether you’re building a 3D-printer or a CNC plasma cutter, chances are good you’ll find a controller that fits your needs and your budget. Not so much, though, when you want to add CNC to a pen plotter from the early days of the PC revolution.
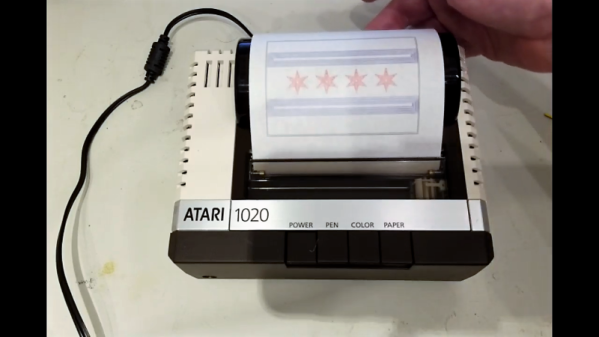
[Barton Dring] just posted the last installment of a five-part series in which he documented putting an Atari 1020 plotter under CNC control. The plotter was a peripheral for the Atari line of 6502 machines from the late 1970s; the guts of the little roll-fed, ballpoint-pen plotter appeared in Commodore, Tandy, and TI versions as well. [Bart]’s goal was to not add or modify anything to the mechanically simple device apart from the controller. That was easier said than done, given the unipolar stepper motors controlling the pen position and paper roll, and the fact that the pen lift mechanism uses a solenoid. Support for those had to be added to his Grbl_ESP32 firmware, as did dealing with the lack of homing switches in the plotter, and adapting the Grbl tool change command to the pen color change mechanism, which rotates the pen holder by bumping it into the right-hand carriage stop. The stock controller was replaced by a custom PCB that fits perfectly within the case, with plenty of room to spare. The video below shows it plotting out a vexillogically relevant sample.
From custom coasters to wooden nickels to complex string art, [Bart] has really put Grbl through the wringer. We really like this retro-redo, though, and fully support his stated desire to convert more old hardware to Grbl_ESP32.
An eggbot is probably the easiest introduction to CNC machines that you could possibly hope for, at least in terms of the physical build. But at the same time, an eggbot can let you get your hands dirty with all of the concepts, firmware, and the toolchain that you’d need to take your CNC game to the next level, whatever that’s going to be. So if you’ve been wanting to make any kind of machine where stepper motors move, cut, trace, display, or simply whirl around, you can get a gentle introduction on the cheap with an eggbot.
Did we mention Easter? It’s apparently this weekend. Seasonal projects are the worst for the procrastinator. If you wait until the 31st to start working on your mega-awesome New Year’s Dropping Laser Ball-o-tron 3000, it’s not going to get done by midnight. Or so I’ve heard. And we’re certainly not helping by posting this tutorial so late in the season. Sorry about that. On the other hand, if you start now, you’ll have the world’s most fine-tuned eggbot for 2020. Procrastinate tomorrow!
I had two main goals with this project: getting it done quickly and getting it done easily. That was my best shot at getting it done at all. Secondary goals included making awesome designs, learning some new software toolchains, and doing the whole thing on the cheap. I succeeded on all counts, and that’s why I’m here encouraging you to build one for yourself.
If you’re reading Hackaday, you’ve probably heard of OpenBuilds. Even if the name doesn’t sound familiar, you’ve absolutely seen something on these pages that was built with their components. Not only is OpenBuilds a fantastic place to get steppers, linear rails, lead screws, pulleys, wheels, and whatever else you need to make your project go, they’re also home to an active forum of people who are passionate about developing open source machines.
As if that wasn’t enough reason to head over to the OpenBuilds website, [Peter Van Der Walt] recently wrote in to tell us about some new free and open source software he and the team have been working on that’s designed to make it easier than ever to get your creations cutting, lasing, milling, and whatever else you could possibly imagine. If you’ve got a machine that moves, they’ve got some tools you’ll probably want to check out.
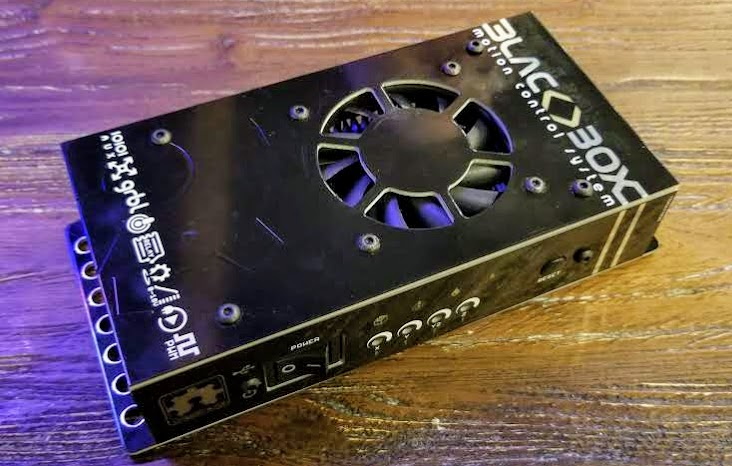
BlackBox CNC controller
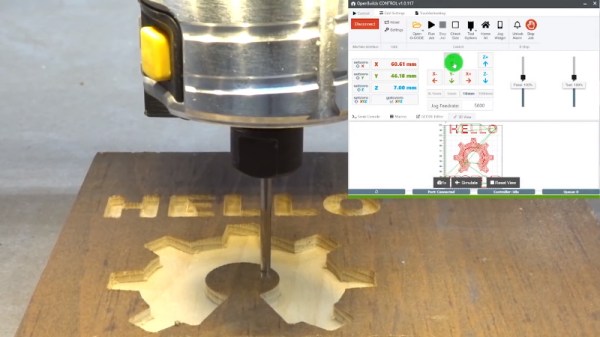
“OpenBuilds CAM” is a web-based tool which imports SVG and DXF files and creates toolpaths for all sorts of cutting, whether your machine does the business using a beam of angry photons or a simple drag knife. The resulting GCode can then be plugged into “OpenBuilds CONTROL”, which as you may have guessed, does the actual controlling of the piece of hardware connected to your computer. There’s no worries about vendor lock in here either, CONTROL will talk to any Grbl-compatible board.
But what if you don’t have a board? Well, it just so happens that OpenBuilds offers a very slick new piece of gear they’re calling the BlackBox. This beefy CNC controller includes a laundry list of features that [Peter] says the team is very excited about, including stepper drivers powerful enough to run NEMA 23 motors. As an interesting note, they’ve actually made the enclosure for the BlackBox out of cleverly solder masked PCBs; a fantastic trick we don’t see often enough.
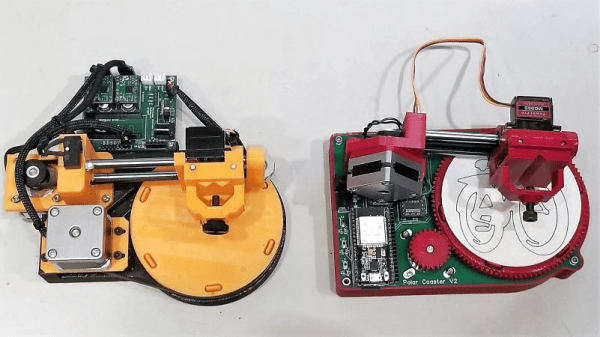
If you’re anything like us, your success with the opposite sex at the bar wasn’t much to brag about. But imagine if you had only had this compact CNC polar plotter and could have whipped up a few custom coasters for your intended’s drink. Yeah, that definitely would have helped.
Or not, but at least it would have been fun to play with. This is actually an improved version of [bdring]’s original “Polar Coaster”. Version 2 is really just a more compact and robust version of the original. The new one has a custom controller for the steppers and pen-lift servo, and everything is mounted neatly to the main PCB. Where the original used a timing belt to drive the platter, the new one uses 3D-printed helical gears, and the steppers have been replaced by slimmer motors. It even has an SD card and smartphone UI, and the coasters look pretty good.
There’s no video of the new one, but you can see its predecessor in action below and imagine the possibilities. Snap a picture and have a line art rendition of someone plotted while you’re waiting for drinks? Just remember not to take any laser engraved wooden nickels.
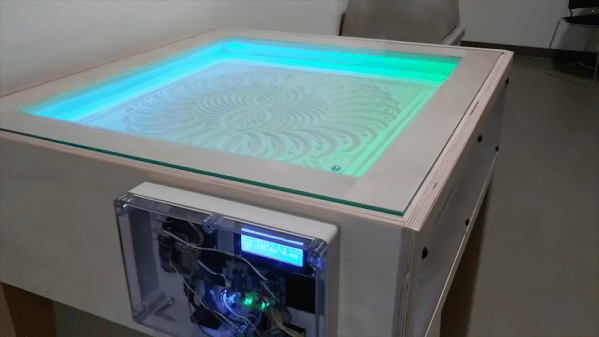
The purpose of a Zen garden, those stylized landscapes created by painstakingly placing rocks and raking gravel into perfect patterns, is the doing of the thing. Making sure every line is perfectly formed is no mean feat, and the concentration required to master it is the point of the whole thing. But who has time for that? Why not just build a robot to create the perfect Zen garden in miniature?
That was what [Tim Callinan] and his classmates did for a semester project, and the “ZenXY” sand plotter was the result. There isn’t a build log for the device per se, although the video below makes it plain how they went about this. The sand table itself is a plywood box whose bottom is layered with fine white sand and contains a single steel ball. Below the table is an X-Y gantry carrying a powerful magnet. A gShield riding on top of an Uno turns G code into slow, stately movement of the ball through the sand. The patterns are remarkably intricate, and while it might not be the same as mastering the body control needed to rake gravel with precision, watching the ball push the sand around is pretty Zen all by itself
Looks like [Sam Zeloof] got bored on his Thanksgiving break, and things got a little weird in his garage. Of course when your garage contains a scanning electron microscope, the definition of weird can include experimenting with electron-beam lithography, resulting in tiny images etched into silicon.
You’ll probably remember [Sam] from his 2018 Hackaday Superconference talk on his DIY semiconductor fab lab, which he used to create a real integrated circuit. That chip, a PMOS dual-channel differential amp, was produced by photolithography using a modified DLP projector. Photolithography imposes limits to how small a feature can be created on silicon, based on the wavelength of light.
[Sam] is now looking into using the electron beam of his SEM as a sort of CNC laser engraver to produce much finer features. The process involves spin-coating silicon wafers with SU-8, an epoxy photoresist normally used with UV light but that also turns out to be sensitive to electron beams. He had to modify his SEM to control the X- and Y-axis deflection with a 12-bit DAC and provide a custom beam blanker. With a coated wafer in the vacuum chamber, standard laser engraving software generates the G-code to trace his test images on the resist. A very quick dip in acetone develops the exposed chip.
[Sam] says these first test images are not too dainty; the bears are about 2.5 mm high, and the line width is about 10 μm. His system is currently capable of resolving down to 100 nm, while commercial electron beam lithography can get down to 5 nm or so. He says that adding a Faraday cage to the setup might help him get there. Sounds like a project for Christmas break.