FLOSS Weekly Episode 785: Designing GUIs And Building Instruments With EEZ

This week Jonathan Bennett chats with Dennis and Goran about EEZ, the series of projects that started with an Open Source programmable power supply, continued with the BB3 modular test bench tool, and continues with EEZ Studio, a GUI design tool for embedded devices.

Continue reading “FLOSS Weekly Episode 785: Designing GUIs And Building Instruments With EEZ”

A General-Purpose PID Controller

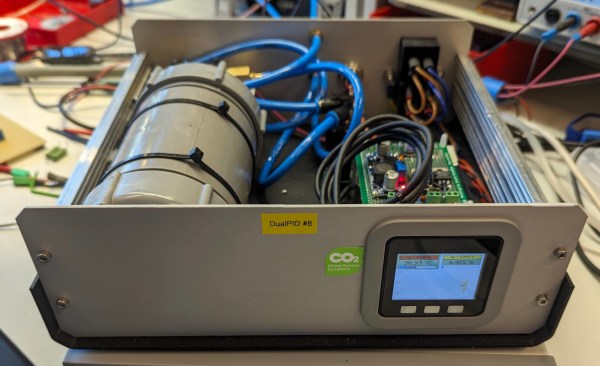
For those new to fields like robotics or aerospace, it can seem at first glance that a problem like moving a robot arm or flying an RC airplane might be simple problems to solve. It turns out, however, that control of systems like these can get complicated quickly; so much so that these types of problems have spawned their own dedicated branch of engineering. As controls engineers delve into this field, one of their initial encounters with a control system is often with the PID controller, and this open source project delivers two of these general-purpose controllers in one box.

The dual-channel PID controller was originally meant as a humidity and temperature controller and was based on existing software for an ATmega328. But after years of tinkering, adding new features, and moving the controller to an ESP32 platform, [knifter] has essentially a brand new piece of software for this controller. Configuring the controller itself is done before the software is compiled, and it includes a GUI since one of the design goals of the project was ease-of-use. He’s used it to control humidity, temperature and CO2 levels in his own work at the University of Amsterdam, but imagines that it could see further use outside of his use cases in things like reflow ovens which need simple on/off control or for motors which can be controlled through an H-bridge.

The PID controller itself seems fairly robust, and includes a number of features that seasoned controls engineers would look for in their PID controllers. There are additionally some other open-source PID controllers to take a look at like this one built for an Arduino, and if you’re still looking for interesting use cases for these types of controllers one of our favorites is this PID controller built into a charcoal grill.

Weather Station With Distributed Sensors

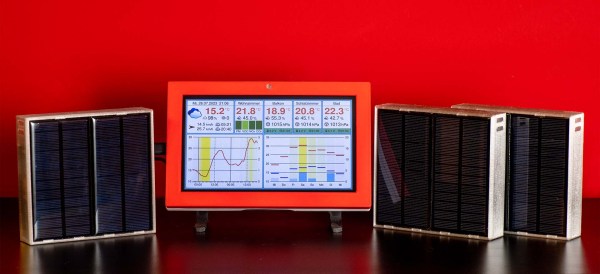
Building a weather station is a fairly common project that plenty of us have taken on, and for good reason. They can be built around virtually any microcontroller or full-scale computer, can have as many or few sensors as needed, and range from simple, straightforward projects to more complex systems capable of doing things like sending data off to weather services like Weather Underground. This weather station features a few innovations we don’t often see, though, with a modular and wireless design that makes it versatile and easy to scale up or down as needed.

Each of the modules in this build use the ESP32 platform, which simplifies design and also takes care of the wireless capability needed. The base station gets a few extra sensors including those for carbon dioxide, volatile organic compounds, and nitrogen oxides. It also includes a screen which can be used to display a wide variety of data gathered locally but also includes forecast information fetched from the free OpenWeatherMap API. For the sensor modules, BME280 sensors are used for temperature, pressure, and humidity and each module includes its own solar panel and battery with the ESP32 chips set to operate using as little energy as possible.

One of the things that helps easily integrate all of the sensor modules is the use of ESP-NOW, which we have seen a few times before. It essentially eliminates the need for a router and allows ESP modules to connect directly with one another. The build also goes into detail about most of the aspects of this project including the programming of the GUI that the ESP32 base station displays on its screen, so for anyone looking to start their own weather station project this should be an excellent guide. Make sure to check out this one as well if you want to send all of your weather data to Weather Underground.

Learning X86_64 Assembly By Building A GUI From Scratch

Some professional coders are absolutely adamant that learning to program in assembly language in these modern times is simply a waste of time, and this post is not for them. This is for the rest of us, who still think there is value in knowing at a low level what is going on, a deeper appreciation can be developed. [Philippe Gaultier] was certainly in this latter camp and figured the best way to learn was to work on a substantial project.

Now, there are some valid reasons to write directly in assembler; for example hand-crafting unusual code sequences for creating software exploits would be hindered by an optimising compiler. Creating code optimised for speed and size is unlikely to be among those reasons, as doing a better job than a modern compiler would be a considerable challenge. Some folks would follow the tried and trusted route and work towards getting a “hello world!” output to the console or a serial port, but not [Philippe]. This project aimed to get a full-custom GUI application running as a client to the X11 server running atop Linux, but the theory should be good for any *nix OS.

Hello World! In X11!

The first part of the process was to create a valid ELF executable that Linux would work with. Using nasm to assemble and the standard linker, only a few X86_64 instructions are needed to create a tiny executable that just exits cleanly. Next, we learn how to manipulate the stack in order to set up a non-trivial system call that sends some text to the system STDOUT.

To perform any GUI actions, we must remember that X11 is a network-orientated system, where our executable will be a client connected via a socket. In the simple case, we just connect the locally created socket to the server path for the local X server, which is just a matter of populating the sockaddr_un data structure on the stack and calling the connect() system call.

Now the connection is made, we can follow the usual X11 route of creating client ids, then allocating resources using them. Next, fonts are opened, and a graphical context is created to use it to create a window. Finally, after mapping the window, something will be visible to draw into with subsequent commands. X11 is a low-level GUI system, so there are quite a few steps to create even the most simple drawable object, but this also makes it quite simple to understand and thus quite suited to such a project.

We applaud [Phillip] for the fabulous documentation of this learning hack and can’t wait to see what’s next in store!

Not too long ago, we covered Snowdrop OS, which is written entirely in X86 assembly, and we also found out a thing or two about some oddball X86 instructions. We’ve also done our own Linux assembly primer.

Flipper Zero Hacker Tool Gets UI Editor For Custom Apps

[Mikhail] released a handy GUI editor/generator tool for the Flipper Zero multipurpose hacker tool, making layouts and UI elements much easier and more intuitive to craft up.

Those who decide to delve into rolling their own applications or add-ons will find this a handy resource, especially as it generates the necessary code for the visual elements. It’s not limited to placing icons, either. Boxes, lines, dots, text, and more can be freely laid out to get things looking just right.

To use it, simply drag and drop icons of various sizes into the screen area. Non-icon UI elements like frames, lines, text, and others can be placed with a click using the buttons. To move elements around, click the SELECT button first, then drag things as needed. To fine-tune positioning (or change the text of a string) a selected element’s properties can be accessed and modified to the right of the simulated screen. When things look good, switch to the CODE tab and copy away to use it in your Flipper application.

Unfamiliar with the Flipper Zero? It’s a kind of wireless multitool; a deeply interesting device intended to make wireless exploration and experimentation as accessible as its dolphin mascot is adorable.

Remote Screen Viewer Is Text-Only

Have you been slowly falling down a rabbit hole of Stallman-like paranoia of computers ever since installing Ubuntu for the first time in 2007? Do you now abhor anything with a GUI, including browsers? Do you check your mail with the command line even though you’re behind seven proxies? But, do you still want to play Minecraft? If so, this command-line-only screen viewer might just be the tool to use a GUI without technically using one.

This remote screen viewer is built in Python by [louis-e] and, once installed, allows the client to view the screen of the server even if the client is a text-only console. [louis-e] demonstrates this from within a Windows command prompt. The script polls the server screen and then displays it in the console using the various colors and textures available. As a result, the resolution and refresh rate are both quite low, but it is still functional enough to play Minecraft and do other GUI-based tasks as long as there’s no fine text to read anywhere.

The video below only shows a demonstration of the remote screen viewer, and we can imagine plenty of uses beyond this proof-of concept game demonstration. Installing a desktop environment and window manager is not something strictly necessary for all computers, so this is a functional workaround if you don’t want to waste time and resources installing either of those components. If you’re looking for remote desktop software for a more specific machine, though, take a look at this software which enables remote desktop on antique Macs.

Continue reading “Remote Screen Viewer Is Text-Only”

Gaming Mouse Becomes Digital Camera

Ever since the world decided to transition from mechanical ball mice to optical mice, we have been blessed with computer pointing devices that don’t need regular cleaning and have much better performance than their ancestors. They do this by using what is essentially a tiny digital camera to monitor changes in motion. As we’ve seen before, it is possible to convert this mechanism into an actual camera, but until now we haven’t seen something like this on a high-performance mouse designed for FPS gaming.

For this project [Ankit] is disassembling the Logitech G402, a popular gaming mouse with up to 4000 dpi. Normally this is processed internally in the mouse to translate movement into cursor motion, but this mouse conveniently has a familiar STM32 processor with an SPI interface already broken out on the PCB that could be quickly connected to in order to gather image data. [Ankit] created a custom USB vendor-specific endpoint and wrote a Linux kernel module to parse the data into a custom GUI program that can display the image captured by the mouse sensor on-screen.

It’s probably best to not attempt this project if you plan to re-use the mouse, as the custom firmware appears to render the mouse useless as an actual mouse. But as a proof-of-concept project this high-performance mouse does work fairly well as a camera, albeit with a very low resolution by modern digital camera standards. It is much improved on older mouse-camera builds we’ve seen, though, thanks to the high performance sensors in gaming mice.