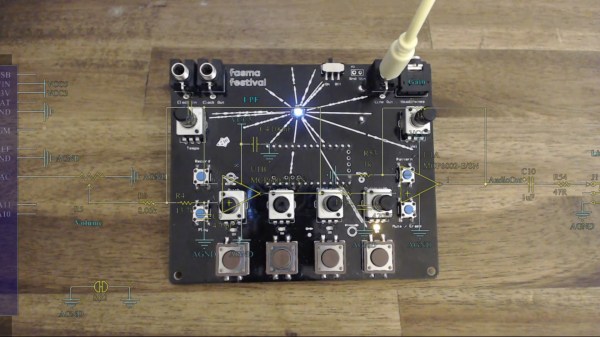
A Gif-Playing Top Hat For FRC 2018!

In gearing up to mentor a team at the 2018 FIRST Robotics Competition, redditor [dd0626] wanted to do something cool that resonated with this year’s 8-bit gaming theme. Over the course of a few days, they transformed a top hat into a thematically encapsulating marquee: a LED matrix display loaded with gifs!

The display is actually a sleeve — made from shipping foam, a pillow case, and an old t-shirt — that fits over the hat, leaving it intact and wearable for future events. A Teensy3.6 displays the gifs on four WS2812 16×16 RGB LED matrices, and while a sheer black fabric diffuses the light, it’s still best viewed from several feet away. This is decidedly not intended to be a stealthy hat display.

To mitigate current draw, [dd0626] is using a 5V 30A DC/DC converter and keeping the brightness at a minimum — otherwise, each panel can pull up to 15A! To offset any dip in performance, they’ve bundled in a massive 22,400mAh, 24V battery pack to keep the hat running for a while. Despite all the hardware, the hat weighs under two pounds — eminently wearable for a long day of competition. Continue reading “A Gif-Playing Top Hat For FRC 2018!”

Astro Cat: Raspberry Pi Telescope Controller

When somebody tackles an engineering problem, there are two possible paths: they can throw together a quick and dirty fix that fits their needs (the classic “hack”, as it were), or they can go the extra mile to develop a well documented solution that helps the community as a whole. We cover it all here at Hackaday, but we’ve certainly got a soft spot for the latter approach, even if some may feel it falls into the dreaded territory of “Not A Hack”.

When [Gary Preston] wanted to control his telescope and astrophotography hardware, he took the second path in a big way. Over the course of several posts on his blog, [Gary] walks us though the creation of his open source Raspberry Pi add-on board that controls a laundry list of sensors and optical gear. Just don’t call it a HAT, while it may look the part, [Gary] is very specific that it does not officially meet the HAT specifications put out by the Raspberry Pi Foundation.

Even if you aren’t terribly interested in peering into the infinite void above, the extremely detailed write-up [Gary] has done contains tons of multidisciplinary information that you may find useful. From showing how to modify the Pi’s boot configuration to enable true hardware UART (by default, the Pi 3 ties it up with Bluetooth) and level shifting it with a ST3232 to a breakdown of the mistakes he made in his PCB layout, there’s plenty to learn.

Astro CAT is a completely open source project, with the hardware side released under the CERN Open Hardware License v1.2, and the INDI driver component is available under the GPL v3.

If this looks a bit daunting for your first stab at astrophotography with the Raspberry Pi, fear not. We’ve covered builds which can get you up and running no matter what your budget or experience level is.

8-Channel ADC For The Raspberry Pi

The Raspberry Pi is a powerful embedded computing platform. However, for all its Linux-based muscle, it lacks one thing that even the simplest 8-bit microcontrollers usually have – analog-to-digital conversion. There are a great many ways to rectify this shortcoming, and [Chris Burgess] has brought us another – with an 8-channel ADC for the Raspberry Pi.

For the ADC, [Chris] chose the MCP3008, for its low cost and availability. In this configuration it offers 10-bit resolution and a maximum sampling rate of 200 kilosamples per second. Adafruit has a great guide on working with the MCP3008, too. With such a useful resource to hand, [Chris] was able to spin up a PCB to interface the chip to the Raspberry Pi using SPI. [Chris] took care to try to make the board to the official HAT specifications. As far as the physical aspects go, the board is to spec, however [Chris] omitted the EEPROM required for auto-configuration purposes. That said, the pads are on the board if someone wants to take the initiative to install one.

It’s a tidy build that provides something sorely missing from the Raspberry Pi, for a reasonable cost. [Chris]’s goal was to build something that would enable the measurement of analog sensors for a robot project; we’d love to hear your ideas for potential uses in the comments!

Old Intercom Gets Googled With Raspberry Pi And AIY Hat

Old Radio Shack intercom; brand new Google Voice interface for a Raspberry Pi. One of these things is not like the other, but they ended up together in this retro-look Google Voice interface, and the results are pretty slick.

The recipient of the Google hive-mind transplant was one of three wireless FM intercoms [MisterM] scored for a measly £4. Looking much as they did when they were the must-have office tool or home accessory for your modern mid-80s lifestyle, the intercom case was the perfect host for the Pi and the Google AIY hat. Only the case was used — not even the original speaker made it into the finished product. The case got a good scrubbing, a fresh coat of paint to perk up the gone-green plastic, and an accent strip of Google’s logo colors over the now-deprecated station selector switch. [MisterM] provided a white LED behind the speaker grille for subtle feedback. A tap of the original talk bar gets Google’s attention for answers to quick questions, and integration into the family’s existing home automation platform turns the lights on and off. See it in action after the break.

[MisterM] was lucky enough to score an AIY hat for free, and as far as we know they’re still hard to come by. If you’re itching to try out the board, fear not — turns out you can roll your own.

Continue reading “Old Intercom Gets Googled With Raspberry Pi And AIY Hat”

3.3V Is Not Enough For This Raspberry Pi Zero

A Raspberry Pi Zero is down to a price and size where it’s just begging to be integrated into your projects. Unless, that is, if your project involves a lot of 5 V equipment. Then it’s just begging to be fried.

[David Brown] solved this problem by breaking out pins with level converters. He used flat-flex cable and some pin-headers. While he was at it, he added a full-sized USB port and power headers. (Extra hack points are awarded for connecting the USB to the board through pogo pins.)

Continue reading “3.3V Is Not Enough For This Raspberry Pi Zero”

Kansas City Maker Faire: Pi-Plates

As soon as he spied the Jolly Wrencher on my shirt, [Jerry Wasinger] beckoned me toward his booth at Kansas City Maker Faire. Honestly, though, I was already drawn in. [Jerry] had set up some interactive displays that demonstrate the virtues of his Pi-Plates—Raspberry Pi expansion boards that follow the HAT spec and are compatible with all flavors of Pi without following the HAT spec. Why not? Because it doesn’t allow for stacking the boards.

[Jerry] has developed three types of Pi-Plates to date. There’s a relay controller with seven slots, a data acquisition and controller combo board, and a motor controller that can handle two steppers or up to four DC motors. The main image shows the data acquisition board controlling a fan and some lights while it gathers distance sensor data and takes the temperature of the Faire.

The best part about these boards is that you can stack them and use up to eight of any one type. For the motor controller, that’s 16 steppers or 32 DC motors. But wait, there’s more: you can still stack up to eight each of the other two kinds of boards and put them in any order you want. That means you could run all those motors and simultaneously control several voltages or gather a lot of data points with a single Pi.

The Pi-Plates are available from [Jerry]’s site, both singly and in kits that include an acrylic base plate, a proto plate, and all the hardware and standoffs needed to stack everything together.

Stepping Out In Style With Top Hat Navigation

Wearable tech is getting to be a big thing. But how we interface with this gear is still a bit of a work in progress. To explore this space, [Bruce Land]’s microcontroller course students came up with an acoustic interface to assist with navigation while walking. With style, of course.

[Bruce], from the Cornell University School of Electrical and Computer Engineering, has been burning up the Hackaday tips line with his students’ final projects. Here’s the overview page for the Sound Navigation Hat. It uses a PIC32 with GPS and compass. A lot of time was spent figuring out how to properly retrieve and parse the GPS data, but for us the interesting bits on that page are how the directional sound was put together.

Audio tones are fed to earbuds with phase shift and amplitude to make it seem like the sound is coming from the direction you’re supposed to walk. Navigation is all based on pre-programmed routes which are selected using a small LCD screen and buttons. One thing’s for sure, the choice of headwear for the project is beyond reproach from a fashion standpoint – engineering has a long history with the top hat, and we think it’s high time it made a comeback.

Is this a practical solution to land navigation? Of course not. But it could be implemented in smartphone audio players for ambient turn-by-turn navigation. And as a student project, it’s a fun way to demonstrate a novel interface. We recently covered a haptic navigation interface for the visually impaired that uses a similar principle. It’ll be interesting to see if either of these interfaces goes anywhere.

Continue reading “Stepping Out In Style With Top Hat Navigation”